Transcription of RYOBI GDO System OPERATOR’S MANUAL
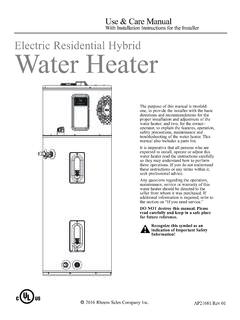
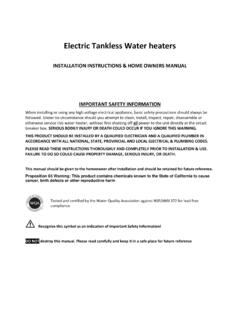
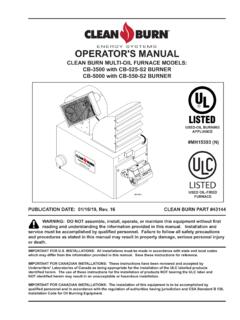
1 FIG. 1. FEATURES OPERATION. A - Wi-Fi Button (bouton wi-fi, bot n wi-fi). B - Lens (lentille, lente). PRODUCT SPECIFICATIONS: NOTE: The LED will flash blue indicating the pairing process has begun. If the LED remains a C - Speaker (parleur, parlante). Lens Field of View:.. 100 solid red, press the Wi-Fi button on the camera to begin the pairing process. D - Microphone (microphone, micr fono). MicroSD Card:..16GB Launch the RYOBI GDO System app. E - LED Light (LED light, LED light). Follow the directions on the screen to finish connecting to your security camera accessory. operator 'S MANUAL Expected Video Recording Time with 16GB MicroSD Card.
2 Approximately 30 Hours Communication Encryption Method:..openssl/wolfssl The following chart explains the different LED displays: MANUEL D'UTILISATION KNOW YOUR SECURITY CAMERA LED INDICATION CAMERA STATUS. MANUAL DEL OPERADOR See Figure 1. Red Solid Power to accessory The safe use of this product requires an understanding of the information on the product and in Pairing process has begun waiting for Wi-Fi B. SECURITY CAMERA ACCESSORY this operator 's MANUAL as well as a knowledge of the project you are attempting. Before use of this Blue Flashing Slowly setup FOR RYOBI GARAGE DOOR OPENERS product, familiarize yourself with all operating features and safety rules.
3 Red Flashing Slowly Scanning for QR code ACCESSOIRE DE CAM RA DE S CURIT WI-FI BUTTON Red Flashing Quickly Hardware issue call customer service POUR OUVRE-PORTE DE GARAGE DE RYOBI Pressing this button will restart the connection process. A. Blue Flashing Quickly Contacting with the Wi-Fi network C. ACCESORIO DE C MARA DE SEGURIDAD LENS. Wi-Fi and network connected successfully and PARA EL SISTEMA DE APERTURA PARA PORT N DE GARAJE DE RYOBI Lens covers a field of view of 100 in the direction in which it is aimed. Blue Solid ready for use through the RYOBI GDO System E. SPEAKER smart phone app D.
4 GDM610 Speaker can broadcast sound when connected to RYOBI GDO System smart phone app. Red and Blue Flashing Alternately System is upgrading MICROPHONE Magenta (Red and Blue) Solid Live streaming or video recording FIG. 2 FIG. 3 E. SAFETY RULES FOR SECURITY CAMERA Microphone can pick up and record sound when connected to RYOBI GDO System smart phone app. D. After the Wi-Fi is connected, the images from the security camera accessory can be viewed with LED LIGHT the RYOBI GDO System app. WARNING: The LED light displays the status of your camera at a glance. NOTICE: To reduce the risk of injury, do not attempt to use this product until you have read thoroughly and A flashing red LED indicates a Wi-Fi connection failure.
5 Press the Wi-Fi button to restart the understand completely this operator 's MANUAL and the operator 's MANUAL for your RYOBI garage ASSEMBLY connection process. The security camera will not function, provide video to the RYOBI GDO. C. door opener. Ensure compatibility and fit before using this accessory. Do not use this accessory System app, or record video unless it is connected to the internet. if a part is damaged or missing. PACKING LIST. B A. Do not overreach. Keep proper footing and balance at all times. Proper footing and balance Security Camera Accessory, Antenna, Icon Label, and operator 's MANUAL .
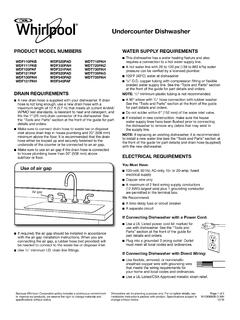
6 ADJUSTING THE LENS. enable better control of the accessory in unexpected situations. See Figure 5. Do not use the accessory if the indoor keypad or smartphone app does not turn it on or off. A WARNING: accessory that cannot be controlled with the keypad or app is dangerous and must be repaired. Ensure accessories are properly and securely connected to their port on the garage door opener. NOTICE: Deactivate accessory ports before making adjustments, cleaning, or changing accessories. Such Failure to properly secure the accessory can cause it to fall and could result in serious personal This security camera can only provide video coverage and record video in the area in which the injury or property damage.
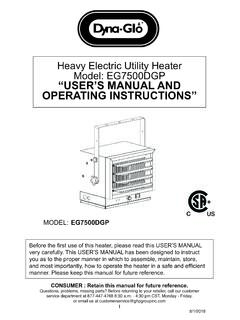
7 Lens is aimed. The images displayed on the smartphone app indicate the area covered and areas A - Accessory Port #7 (prise du accessoire #7, puerto del preventive safety measures reduce the risk of starting the accessory accidentally. accesorio #7). Keep the accessory dry, clean and free from oil and grease. Always use a clean cloth when outside of this area will not be displayed on the smartphone app or recorded. Ensure that the B - Latch (loquet, pestillo). cleaning. Never use brake fluids, gasoline, petroleum-based products, or any strong solvents to lens is aimed in the area of desired coverage.
8 C - Security Camera Accessory (accessoire de cam ra de s curit , clean your accessory. Following this rule will reduce the risk of loss of control and deterioration WARNING: accesorio de c mara de seguridad). Use extreme care if you need to stand on a ladder to install or adjust this accessory. Ensure The security camera lens adjusts in two different ways. Manually rotate the outer ring left to right or D - Hooks (crochets, ganchos). of the enclosure plastic. someone is holding the ladder on the ground to keep it stable. Failure to safely use a ladder can raise and lower the center lens, as shown, to achieve the desired viewing area.
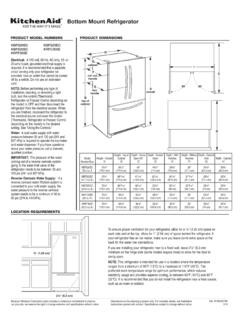
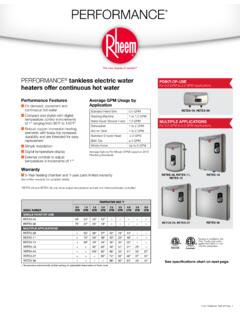
9 E - Slots (slots, slots). Clean only with dry cloth. cause a fall and result in death or serious personal injury. MICRO SD CARD FOR STORAGE. Do not operate near any heat sources such as radiators, heat registers, stoves, or other apparatus FIG. 4. (including amplifiers) that produce heat. See Figure 6. INSTALLING THE ANTENNA The included MicroSD card can store pictures or videos captured by the security camera accessory. Save these instructions. Refer to them frequently and use them to instruct others who may use See Figure 2. To install: B. this tool. If you loan someone this tool, loan them these instructions also to prevent misuse of the product and possible injury.
10 Locate the antenna inside the package and connect to the accessory as shown. Insert card into the slot as shown and press and release to lock into place. CALIFORNIA PROPOSITION 65 INSTALLING/REMOVING THE SECURITY CAMERA ACCESSORY To remove: See Figure 3. Press card to release and remove from slot. WARNING: It is recommended to install the security camera accessory in port #7 to face the garage door and into the drive once the door is opened. The security camera accessory will, however, operate in any SMART PHONE APP. This product may contain chemicals, including lead, known to the State of California to cause of the ports on the RYOBI Garage Door Opener.