Transcription of S. B. International, Inc. 2108 Utopia Ave. Nashville, …
1 S. B. international , Inc. 2108 utopia ave . Nashville, TN 37211 Tech Services line: 888-843-7328 TT00024 Conical Injector Sleeve Removal & Installation for Mack MP7, MP8 & MP10 Engines These engines utilize two different injector sleeves and it is important that the correct removal and installation procedure for the correct injector sleeve is followed. This procedure provided by Mack is for the conical type injector sleeve which is made of stainless steel. Mack also uses a flat type injector sleeve and it s is made of copper, and also was the original design sleeve.
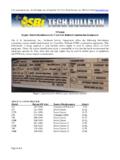
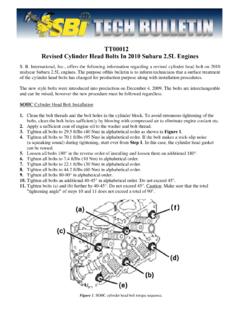
2 Both of these designs allow replacement in frame but it is certainly a less complicated procedure if the cylinder head is on a stationary workbench. The following is a bench repair after the cylinder head has been thoroughly cleaned and dried. Conical injector sleeve & conical type injector shown below: Two sealing rings (Part #9998250) Page 1 of 7 REMOVAL 1. Install the extractor into the sleeve. The puller is installed correctly when the outer barrel tabs are resting on the cylinder head and the top outer diameter of the inner tool is slightly above or flush with the bottom of the cutout on the outer barrel. Apply multipurpose grease to all threads to prevent wear.
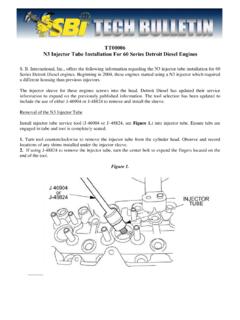
3 Turn the center shaft clockwise until contact with the sleeve is felt. Using a wrench, turn the center shaft one additional flat. Turn the knurled collar clockwise until contact is made between the thrust bearing and outer barrel. 2. Use a wrench to hold the center shaft to prevent it from turning. Turn the collar nut clockwise until the injector sleeve is removed. Loosen the center shaft to release the jaws from the injector sleeve. (1) Center Shaft, (2) Collar Nut, (3) Knurled Collar. 3. Inspect condition of the J-42885-25 O-rings before installing the protective sleeve. If necessary, replace O-rings (part numbers 507688 and 10914). Install the injector bore sealing tool, J-42885-25, to protect the fuel passage area and prevent debris from entering.
4 4. Using the cleaning kit, J42885, clean the injector sleeve seat of the cylinder head. NOTE: The injector bore sealing tool must be used to prevent dirt from entering the fuel passage. NOTE: A high speed drill or angle die grinder works best for cleaning with the J42885-2 brush tip as shown on the following page. Page 2 of 7 J-42885-25 Tool Kit 4. Using the brush J42855-6, clean the cylinder head injector bore walls for the injector sleeve. NOTE: The injector bore sealing tool must be used to prevent debris from entering the fuel passage. NOTE: Inspect brush for missing wire bristles and for brush tightness in bore. If several wire bristles are missing or brush fits loose in the bore replace brush. NOTE: When replacing the injector sleeves, it is important to check that the sleeve bore in the cylinder head is free from any carbon deposits or other residue ( , pieces of O-ring, etc.)
5 Before installing a new injector sleeve. Repeat cleaning if necessary. J-42885-6 Brush Tool 6. Using the brush J42855-5, clean the injector sleeve opening in the bottom of the cylinder head. NOTE: Inspect brush for missing wire bristles and for brush tightness in bore. If several wire bristles are missing or brush fits loose in the bore replace brush. Repeat cleaning if necessary. Page 3 of 7 J-42885-5 Brush Tool NOTE: When replacing the injector sleeves, it is important to check that the sleeve bore in the cylinder head is free from any carbon deposits or other residue ( , pieces of O-ring, etc.)
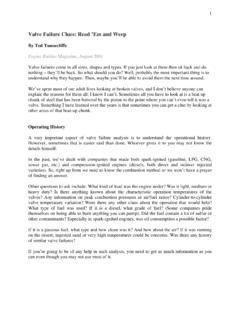
6 Before installing a new injector sleeve. Repeat cleaning if necessary, the head has to be absolutely cleaned of any deposits. INSTALLATION 1. After you ve assured yourself the bores are completely cleaned, saturate a lint free paper shop towel with brake clean or contact cleaner. Wipe out injector sleeve bore with special attention to the injector sleeve seating area and injector sleeve O-ring sealing area in the cylinder head. NOTE: Make sure the sleeve bore surface in the cylinder head is clean and dry prior to sealant being applied. 2. Before installing a conical sleeve, apply Loctite spray activator 7649 to the bottom surface of the sleeve where sealing compound is to be applied and allow to completely dry.
7 When activator is dry, apply a 2-3 mm bead of Mack approved sealing compound (part number 1161059) to the bottom of the injector sleeve. 3. Always use the new O-ring included in the sleeve kit. Lubricate the new injector sleeve O-ring with clean coolant or soapy water. Install the O-ring on the injector sleeve and lubricate again with clean coolant or soapy water. Caution: Clean coolant or soapy water is the only approved l lubricant for the injector sleeve O-ring. If oil is used it can cause the O-ring to swell and be damaged during installation. Page 4 of 7 Applying a bead of Sealant (1161059) 4. Using a calipers, measure the swedging bit to make sure that the proper swedging tool is used. Measurement should read.
8 ( mm). Also, verify that the swedging bit has four stages and the length is 120 mm. NOTE: Swedging bit, 88880054, can be ordered as spare part if the bit is worn or broken. Conical Injector Sleeve Installation Tool, 88800457 5. Lubricate an injector sleeve O-ring (part number 20536487) with clean coolant or soapy water. Install the O-ring on the injector sleeve installation tool and lubricate again with clean coolant or soapy O-ring is used on the tool to protect the cylinder head bore only. The O-ring only needs to be replaced when damaged. A used injector sleeve O-ring can be used on the tool. NOTE: Special tool 88800457 can only be used on the conical injector sleeves. It CAN NOT be used for installation on the copper injector sleeve. 6.
9 Place the new injector sleeve on the installation tool. Thread the swedging bit completely into the flaring tool until it stops (finger tight). Loosen the swedging bit 180 before installing the tool in the cylinder head. Lubricate the swedging bit and the threads on the tool with fresh, extreme pressure NLGI #2 grease or equivalent. Page 5 of 7 Installation Tool 88800457 7. Remove any oil from the injector hold down bolt holes to avoid hydraulic lock for this step and when the injector is installed. 8. Carefully place the sleeve installation tool and new injector sleeve into the injector bore of the cylinder head. Carefully move the injector sleeve downward into the injector bore so that the swedging bit is guided into the injector tip bore in the cylinder head.
10 Using hand force, press down on the installation tool until the injector sleeve bottoms against the bore. The shoulder of the hold down should be flush with the top of the cylinder head. Use the injector hold down yoke and bolt 8192804 to hold the tool in position. To ensure that the sleeve is bottomed in the cylinder head, tighten the bolt to 56-64 FT/LBS (80 5 Nm). Installation Tool 88800457 & Wrenches Page 6 of 7 9. Flare the injector sleeve by turning the nut clockwise while holding the spindle (A) until the swedging bit has been pulled completely through the injector sleeve. Failure to hold the spindle can result in a twisted or broken swedging bit. 10. Remove sleeve installation tool from the injector bore.