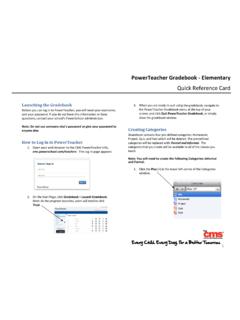
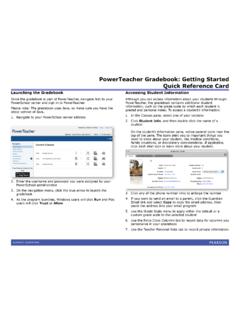
Transcription of Setting Up PowerTeacher Pro Quick Reference Card Setting ...
1 Setting Up PowerTeacher Pro Quick Reference Card Copyright 2005-2016 PowerSchool Group LLC and/or its affiliate(s). All rights reserved. All trademarks are either owned or licensed by PowerSchool Group LLC and/or its affiliates. 1 Setting Up PowerTeacher Pro Several features are available at the District Office for Setting up grade scales, defining PowerTeacher Pro as the default gradebook , and configuring grading preferences and calculations. Some of the same features are also available at the school level. Creating Grade Scales At the district level, define the grade scales that teachers will use. Set up regular grade scales for traditional and standards-based grading, or set up a scale for special score codes. Grade scales include color levels for each item in the scale.
2 Grade scale color levels provide a consistent visual indicator of student progress. The color levels can be aligned across all different types of grade scales. These color levels are used on the Progress pages in the gradebook and in other parts of PowerSchool, such as in the At Risk Student Dashboard. When you create a new grade scale, select the number of colors associated to the grade scale. Once you generate the grade scale table, select the color level for each grade. Available colors include dark green, green, yellow, orange, and red. Depending on the number of items in the grade scale, the color levels may include different shades of these colors. In an A, B, C, D, F grade scale: Color Equates to a Grade of Dark green A Green B Yellow C Orange D Red F If you had set up conversion scales previously, when you upgrade to PowerSchool 10 and start using PowerTeacher Pro, the grade scales will be copied from the conversion scales and tied to standards automatically.
3 Be sure to review the scales to make sure they are set up properly and configured with the new grade scale features, such as color levels. To create a grade scale: 1. On the District Setup page, click Grade Scales 2. Click New 3. Enter the name of the grade scale, such as Traditional 4. To use traditional letter grades, open the Type menu and choose Alpha Setting Up PowerTeacher Pro Copyright 2005-2016 PowerSchool Group LLC and/or its affiliate(s). All rights reserved. All trademarks are either owned or licensed by PowerSchool Group LLC and/or its affiliates. 2 5. From the Use menu, choose Traditional Grade For standards-based grading, you would choose Standards. For a combination of traditional and standards-based grading, choose Traditional Grade and Standards.
4 6. Enter a description of the grade scale, such as Use for traditional grading 7. Verify Scale Used in GPA and Course Credit is selected 8. In the Enter Starting Grade Scale Items field, enter the grades in this grade scale, separated by commas Enter the grades from highest to lowest, so the percentages and grade values are auto-assigned correctly. Include all grades in the scale, including any with plus signs and minus signs, such as A- and B+. 9. Choose the starting number of colors, such as 5 10. Click Generate Table The Grade Scale table will appear with the grades, percentages, and gradebook values. 11. Edit the grades and gradebook values, if needed 12. For each grade in the scale, enter a description, GPA points, and added value 13. Use the menus in the Color Levels column to edit the colors associated with the grades 14.
5 Click Add Grade to add another grade 15. When you ve finished making changes, click Save A special codes scale may be used in conjunction with any grade scale you create. For example, you may create a special scale that includes alphanumeric score codes, or you may create one that includes codes such as NC for no credit, or W for withdraw. When you associate a regular grade scale with a special scale, teachers can access all of the items on both scales. To create a special codes scale: 1. On the District Setup page, click Grade Scales 2. Click New 3. Enter the name of the grade scale, such as District Special Codes Scale 4. Enter a description of the grade scale, such as Includes special codes for use with a regular scale 5. Since the codes, or grades, in this scale will not be included in students GPAs or count toward course credit, clear the "Scale Used in GPA and Course Credit" check box 6.
6 In the Enter Starting Grade Scale Items field, enter the codes in this grade scale, separated by commas, such as I, NC, W, P, and NHI 7. Click Generate Table The Grade Scale table will appear with the codes and code values. Setting Up PowerTeacher Pro Copyright 2005-2016 PowerSchool Group LLC and/or its affiliate(s). All rights reserved. All trademarks are either owned or licensed by PowerSchool Group LLC and/or its affiliates. 3 8. Edit the codes values, if needed 9. For each code in the scale, enter a description 10. For each code that teachers can enter manually as a final grade, such as I (Incomplete), check Use As a Final Grade Clear the Use As a Final Grade check boxes next to the codes that teachers cannot use as final grades. 11. Use the menus in the Color Levels column to edit the colors associated with the codes 12.
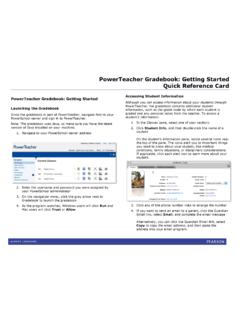
7 Verify that Use on Assignments is checked for each code, such as NHI, that teachers can use to score assignments 13. For the NHI (Not Handed In) code, check Is Missing to indicate that when a teacher uses the code to score an assignment, it means the assignment is missing 14. Click Add Grade to add another code, if needed 15. When you ve finished making changes, click Save To associate a special codes scale with a regular grade scale: 1. On the District Setup page, click Grade Scales 2. Click the Edit icon next to the regular grade scale 3. From the Uses Special Codes menu, select the special codes scale 4. Click Save Teachers who use the regular scale will now have access to the items in both the regular scale and the special scale. Setting PowerTeacher Pro as the Default gradebook Define PowerTeacher Pro as the default gradebook (instead of PowerTeacher gradebook ) that teachers will use for new course sections at the district level.
8 Define the default gradebook for existing sections at the school level. To set PowerTeacher Pro as the default gradebook for new course sections: 1. From the District Office Start Page, click District 2. In the Grading section, click PowerTeacher Pro Settings 3. Click Default gradebook Type 4. From the Default gradebook Type menu, choose PowerTeacher Pro 5. Click Submit To set PowerTeacher Pro as the default gradebook for existing course sections: 1. From the school s Start Page, click School 2. On the School Setup page, click Sections Setting Up PowerTeacher Pro Copyright 2005-2016 PowerSchool Group LLC and/or its affiliate(s). All rights reserved. All trademarks are either owned or licensed by PowerSchool Group LLC and/or its affiliates. 4 3. Choose a course 4.
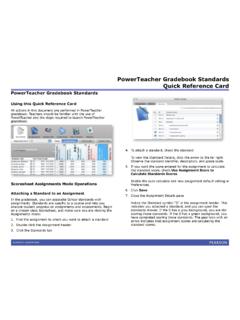
9 Select a section number 5. From the gradebook Type menu, choose PowerTeacher Pro If the teacher will continue to use PowerTeacher gradebook , choose PTG instead. 6. To save the section settings, click Submit Sections that are set up to use PowerTeacher Pro are the only classes that will appear in the PowerTeacher Pro gradebook . Sections that are set up to use PowerTeacher gradebook will appear in that gradebook . For more information on the data migration process, see the PowerTeacher Pro data migration guide on PowerSource. Setting Up District Grading Preferences District administrators can configure the grading preferences and calculations for a single school or for multiple schools to provide grading consistency, and to save teachers from having to set up the preferences in the gradebook for each section they teach.
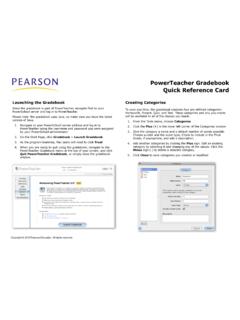
10 To set up district grading preferences, navigate to the District Setup page and then click PowerTeacher Pro Settings. To view and manage the preferences at the school level, navigate to the School Setup page and click PowerTeacher Pro Settings. You may edit some of the preferences at the school level, but some are view-only. Creating District Categories for Teachers Set up assignment categories, such as Test and Homework, for each type of school in the district to provide grading consistency. For example, if teachers at all of the elementary schools in the district use the same six assignment categories, you can set them up once and make them available at all of those schools. You must set up district-created categories if you will be Setting up category weighting as the final grade calculation method at the district level.