Transcription of Setting up the TS-590S/SG for FT8 operations - KENWOOD
1 1 The KENWOOD TS-590S/SG is equipped with a USB (B) connector for exchanging both of audio signals and PC control commands for performing data communication with an external device such as a PC. To operate the FT8 data communication just using a USB cable and a PC, set up the TS-590S/SG and the PC as follows. 1. Download the WSJT-X software Windows version from the following web page of Dr. J oseph Taylor K1JT (the author of WSJT-X), and install on the PC. (For data communication such as FT8 or JT65, the PC clock needs to be properly adjusted within 1 second.) 2. Download the virtual COM port driver from the following KENWOOD web page and install on the PC for USB cable connection.
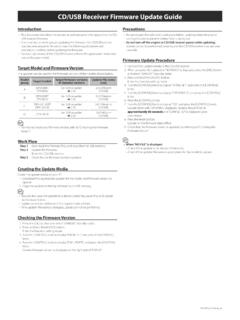
2 3. Connect the transceiver to the PC using a commercially available USB cable. (USB cable with ferrite core would be recommended to prevent RF interference.) 4. Confirm the COM port number which is assigned to the transceiver . Refer to the virtual COM port driver download page above for how to identify the port. 5. Once full reset the transceiver by pressing [A/B (A=B)] + Power ON in order to initialize the PC control, audio input/output, and other settings. 6. Enable USB audio as the transceiver s audio input source for data transmission as follows. TS-590S: In Menu , select "USB". (The default is ACC2 .) TS-590SG: In Menu , select "USB".
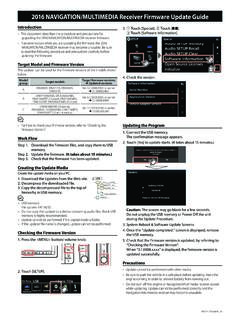
3 (The default is ACC2 .) 2 7. Launch the WSJT-X software and set the parameters as follows. Click [File] [Settings] to open the "Settings window. Then select the "General" tab to set your Callsign and Grid Locator. Open the "Radio" tab and set the parameters as follows. "Rig:" TS-590S: Select " KENWOOD TS-590S". TS-590SG: Select " KENWOOD TS-590SG". * If you select in correct model name, the PC cannot control the transceiver . "Serial Port:" The port number assigned to the transceiver virtual COM port which is confirmed in the previous page step 4. "Baud Rate:" "115200" ( TS-590S/SG 's default value.)
4 Confirm in the TS-590S Menu or TS-590SG Menu ) "Data Bits" "Default" "Stop Bits" "Default" "Handshake" "Default" "PTT Method" "CAT" (The transceiver transmits by PC control commands.) "Transmit Audio Source" "Rear/Data" "Mode" "USB" (For the TS-590SG, selecting "Data/Pkt" is also available, but the DSP filter control method in SSB-DATA mode should be changed in Menu from "2"(WIDTH/SHIFT: default) to "1 (HI/LO) to obtain sufficient RX bandwidth of up to 5kHz even in SSB-DATA mode in the same way as in SSB mode. Incidentally, the TS-590S's DSP filter control method in SSB-DATA mode cannot be changed from "WIDTH/SHIFT".
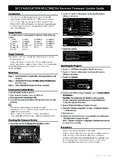
5 "Split Operation" "Fake It" (The "Fake It" shifts the transceiver 's VFO frequency during transmission automatically so that the AF modulation frequency is set to be in the range of 1500 Hz to 1999 Hz. The fundamental is not reduced and the harmonics are driven out of the TX IF filter passband.) 3 Open the "Audio" tab and make sure "USB AUDIO CODEC" is set as an audio device for both Input and Output. Click [OK] to apply the settings and exit. 8. After turning the transceiver power on, launch the WSJT-X software and click [Mode] to select "FT8" from the pull-down menu, and select the frequency to operate from the band selection pull-down menu.
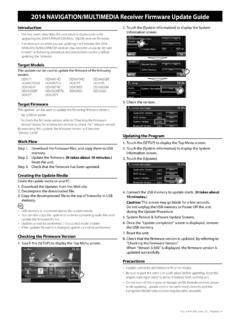
6 The frequency and mode (USB) are set to the transceiver . 4 RX Level Adjustment RX level is indicated below the band selection. Appropriate level would be around 30dB when the transceiver is on and there is no input signal from the antenna connector. If necessary, adjust the level with the PC sound settings (Recording devices), and if still cannot, adjust the audio output level from the transceiver as follows. TS-590S: In Menu , adjust in the range of 0 ~ 9 . (The default is 4 .) TS-590SG: In Menu , adjust in the range of 0 ~ 9 . (The default is 4 .) TX Level Adjustment First set the TX power on the transceiver and press the software [Tune] to transmit.
7 Adjust the audio (single tone) output level from the PC to the transceiver by "Pwr" slide bar in the software to the level that the transceiver s ALC meter lights up 2 to 3 dots (approx.) as shown on the right in order to prevent distortion in AF stage by excessive audio input. And press and hold [PWR (TX MONI)] to enable the transceiver s TX monitor function to audibly confirm that the modulation signal has no distortion and no noise. If necessary, adjust the level with the PC sound settings (Playback devices), and if still cannot, adjust the audio input level to the transceiver as follows. TS-590S: In Menu , adjust in the range of 0 ~ 9 . (The default is 4.)
8 TS-590SG: In Menu , adjust in the range of 0 ~ 9 . (The default is 4 .) The above description is just an example of the basic settings when using the WSJT-X software and the TS-590S/SG . Please refer to the information on the Internet for the actual operation method, more detailed settings and operations by other software. 2020 JVCKENWOOD Corporation