Transcription of Setup guide - Logitech
1 GROUPS etup guide2 LanguagesEnglish 3 Deutsch 12 Fran ais 21 Italiano 30 Espa ol 39 Portugu s 48 Nederlands 57 Svenska 66 Dansk 75 Norsk 84 Suomi 93 102По-русски 111Po polsku 120 Magyar 129 esk verze 138 Sloven ina 147Укра нська 156 Eesti 165 Latviski 174 Lietuvi 183Български 192 Hrvatski 201 Srpski 210 Sloven ina 219 Rom n 228Tu rk e 237246 255 English MICROPHONES (OPTIONAL)
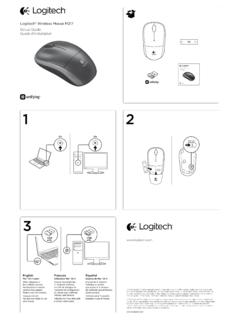
2 HUBCAMERA1 10X lossless zoom2 Camera LED3 Kensington security slotHUB4 Hub LED5 Power6 USB7 Camera8 SpeakerphoneSPEAKERPHONE9 Kensington security slotACCESSORIES10 Camera mount11 Hub velcro mount12 Cables clip13 Cables14 Power adapter15 Expansion MicrophonesEnglish 4 CONNECTION AND SETUPS etup and connection to a computer1 Set the camera on the table, or using the included camera mount on the table or a wall 2 The hub can be on placed on a table or mounted underneath using the included hook and loop pads See alignmentpin for positionHub velcro mountEnglish 5 CONNECTION AND SETUPS etup and connection to a computer3 Connect the cable between the speakerphone and hub Simply match the colored ends of the cables to the corresponding color marks on the speakerphone and hub Connect the cable between the camera and hub Simply match the colored ends of the cables to the corresponding color marks on the camera and hub If you re using the optional Expansion Microphones, connect them to the appropriate jacks on the bottom of the speakerphone Please use only these microphones with GROUP.
3 Use of other microphone can damage GROUP and the microphones and may void the warranty English 6 CONNECTION AND SETUPS etup and connection to a computerPress the cables into the slots on the bottom of the speakerphone Connect the power cable to the hub and plug in the power adapter The display on the speakerphone will turn on and show the Logitech logo when powered 4 Connect the hub to a USB port on your computer The speakerphone display will also prompt you to make this connection The camera and the Activity light will flash to show that connection is taking place, and when completed, the camera head will rotate and the speakerphone will play a sound If these activities do not take place, try again and then consult Troubleshooting or contact technical support Cable slotsEnglish 7 CONNECTION AND SETUPS etup and connection to a computer5 Attaching cable lock Attach Cable Lock to cable end that connects to the camera Plug Cable Lock into the slot of the housing of the camera Rotate the Cable Lock clockwise to lock the cable 6 Optional: connect computer to external display such as a television, monitor or projector Note regarding longer cables: GROUP includes 5m/16 cables to connect the speakerphone and camera to the hub Extending this length while maintaining picture quality requires amplified cables Please see the Complimentary Solutions page at www Logitech com/LCP-compsolutions for options side upEnglish 8 CONNECTING TO bluetooth DEVICETo connect GROUP to your mobile device.
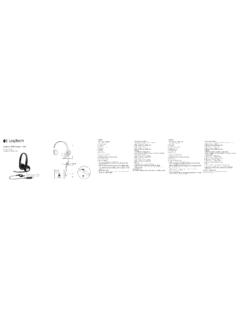
4 If your device is NFC enabled, touch the mobile device to the NFC icon on the speakerphone, which should enable bluetooth acceptance on the mobile device OR Hold down the bluetooth button until the Activity light on the speaker-phone starts blinking blue rapidly Follow the instructions on your mobile device to pair with bluetooth Note: When GROUP is paired and connected, the bluetooth icon on the speakerphone will appear bright When paired but not connected, it will be greyed out GROUP cannot pair to bluetooth while streaming to USB If an attempt is made to pair to a mobile device while in a USB call, an error beep will sound Please wait until the USB call is complete before pairing your mobile device USING Logitech GROUPV ideo and audio Ensure GROUP is selected as the microphone, speaker and camera in your video application Simply start a call in your video application to use GROUP for HD video and high quality audio The Activity light will be blue when video is streaming Audio only with bluetooth Ensure GROUP is paired and connected to your mobile device as outlined in Connection and Setup Place a call on your mobile device and enjoy the improved audio experience via the GROUP speakerphone English Call answer2 Microphone mute3 Volume down4 Camera pan/tilt 5 Camera zoom out6 Camera presets7 Call end8 Volume up9 Camera zoom in10 Near/Far camera control11 Remote battery door The GROUP remote control runs on a Li-ion CR2032 battery Battery life will vary based on usage REMOTE and EXPANSION MICROPHONES English Answers incoming calls in supported applications Note.
5 Call Answer and End buttons may not work in some applications so simply use your video application to answer and end calls To enable answer and end buttons for Skype or Cisco Jabber, please download the respective plug-ins available from www Logitech com/support /group 2 Mutes the microphones 3 Decreases the speaker volume 4 Pans and tilts the camera Press once for incremental or press and hold for continuous pan or tilt Caution: Do not manually rotate the camera as doing so may cause damage 5 Zooms the camera out 6 Camera Presets: GROUP has 5 camera presets (1 through 3 are on both the remote and the speakerphone and 4 & 5 are on the remote) that allow you to position the camera at a preset location with a push of a button To set the camera preset, move the camera to the desired location and then press and hold the Camera Preset button until the associated icon shows on the display and a beep plays to confirm the setting 7 Ends the current call in supported applications 8 Increases the speaker volume 9 Zooms the camera in up to 10x 10 Near/Far camera control: In supported applications this button allows you to control the pan, tilt and zoom of a remote GROUP, ConferenceCam CC3000e or a ConferenceCam BCC950 Some applications support this feature natively, others can be enabled by using an application that can be downloaded from www Logitech com/support /group Please visit the download page listed for more information 11.
6 bluetooth pairing button Please see Connection and Setup section for more information 12 NFC antenna location Place your NFC enabled mobile device here to initiate bluetooth pairing 13 Speakerphone Activity light indications: Blue GROUP is in active call Blinking blue incoming call Blinking blue light in call Call has been put on hold (via hold function in application) Rapid blinking blue in bluetooth pairing mode Speakerphone blue activity light may not function in some applications Red Audio is muted 14 Display will show call activity as well as volume and connectivity status 15 Kensington Security Slot for securing the speakerphone and camera English 11 VISIT PRODUCT CENTRALD iscover your product s full potential Get valuable information and usage tips by browsing easy-to-use FAQs Find answers to product questions and get help setting up your product See if there s software available for download that can enhance your product experience To enjoy all the benefits of your Logitech product, visit www Logitech com/support /group and take advantage of Logitech s wide range of useful support services.
7 Product information Tutorials Troubleshooting Diagnostics Firmware upgrades Support community Software downloads In-box documentation Warranty information Spare partsTroubleshooting tips Please visit www Logitech com/support /group for troubleshooting tips, information on software tools and for a diagnostic tool to help troubleshoot issues you may have with GROUP Deutsch RERWEITERUNGSMIKROFONE (OPTIONAL)HUBKAMERA1 10-fach verlustfreier Zoom2 Kamera-LED3 Kensington Security SlotHUB4 Hub-LED5 Ein/Aus6 USB7 Kamera8 FreisprecheinrichtungFREISPRECHEINRICHTU NG9 Kensington Security SlotZUBEH R10 Kamerahalterung11 Klettbefestigung fu r Hub12 Kabelhalterung13 Kabel14 Netzteil15 ErweiterungsmikrofoneDeutsch 13 VERBINDUNG UND EINRICHTUNGE inrichtung und Verbindung mit einem Computer1 Stellen Sie die Kamera auf dem Tisch auf oder positionieren Sie sie mit der mitgelieferten Kamerahalterung auf dem Tisch oder an der Wand 2 Der Hub kann auf dem Tisch oder darunter aufgestellt werden.
8 Wenn Sie hierfu r die im Lieferumfang enthaltenen Befestigungen und Klettschlu sse verwenden Siehe die Ausrichtung des Pins fu r die BefestigungKlettbefestigung fu r HubDeutsch 14 VERBINDUNG UND EINRICHTUNGE inrichtung und Verbindung mit einem Computer3 Verbinden Sie das Kabel zwischen der Freisprecheinrichtung und dem Hub Vergleichen Sie einfach die farbigen Kabelenden mit den entsprechend gef rbten Markierungen auf der Freisprecheinrichtung und dem Hub Verbinden Sie das Kabel zwischen der Kamera und dem Hub Vergleichen Sie einfach die farbigen Kabelenden mit den entsprechend gef rbten Markierungen auf der Kamera und dem Hub Wenn Sie die optionalen Erweiterungsmikrofone verwenden, verbinden Sie sie mit den entsprechenden Buchsen auf der Unterseite der Freisprecheinrichtung Verwenden Sie nur diese Mikrofone mit GROUP Die Verwendung anderer Mikrofone kann zu Sch den an GROUP und zum Erl schen der Garantie fu hren Deutsch 15 VERBINDUNG UND EINRICHTUNGE inrichtung und Verbindung mit einem ComputerDru cken Sie die Kabel in die Anschlu sse an der Unterseite der Freisprecheinrichtung Verbinden Sie das Netzkabel mit dem Hub und schlie en Sie das Netzteil an Die Anzeige auf der Freisprecheinrichtung schaltet sich ein und zeigt nach dem Einschalten das Logitech Logo an 4 Verbinden Sie das Kabel Ihres Hubs mit einem USB-Anschluss an Ihrem Computer Auf der Anzeige der Freisprecheinrichtung werden Sie aufgefordert, diese Verbindung herzustellen Die LEDs von Kamera und die Betriebs-LED blinken , w hrend die Verbindung aufgebaut wird Ist der Vorgang abgeschlossen.
9 Dreht sich der Kamerakopf und die Freisprecheinrichtung gibt ein Audiosignal aus Wenn diese Signale ausbleiben, starten Sie einen neuen Versuch und suchen Sie ggf anschlie end unter Fehlerbehebung nach weiteren Informationen oder wenden Sie sich an den technischen Support Kabelanschlu sseDeutsch 16 VERBINDUNG UND EINRICHTUNGE inrichtung und Verbindung mit einem Computer5 Anbringen des Kabelschlosses Bringen Sie das Kabelschloss an das Kabelende an, das mit der Kamera verbunden ist Schieben Sie das Kabelschloss in die Aussparung am Geh use der Kamera Drehen Sie das Kabelschloss im Uhrzeigersinn, um das Kabel zu sichern 6 Optional: Verbinden Sie den Computer mit einer externen Anzeige wie Fernseher, Monitor oder Projektor Hinweis zu l ngeren Kabeln: GROUP umfasst 5-m-Kabel, um die Freisprecheinrichtung und die Kamera mit dem Hub zu verbinden Um diese Kabell nge zu erweitern und gleichzeitig die Bildqualit t aufrechtzuerhalten, sind verst rkte Kabel erforderlich Weitere Optionen finden Sie auf der Seite Erg nzungsl sungen" unter www Logitech com/LCP-compsolutions Seite nach obenDeutsch 17 VERBINDUNG MIT bluetooth -GER TSo verbinden Sie GROUP mit Ihrem Mobilger t: Bei NFC-f higen Ger ten beru hren Sie mit dem Ger t das NFC-Symbol auf der Freisprecheinrichtung Daraufhin sollte der Aufbau einer bluetooth -Verbindung auf Ihrem Mobilger t akzeptiert werden Halten Sie die bluetooth -Taste so lange gedru ckt, bis die Betriebs-LED an der Freisprecheinrichtung schnell blau zu blinken beginnt Folgen Sie den Anweisungen auf Ihrem Mobilger t, um mit bluetooth zu pairen Hinweis.
10 Wenn GROUP gepairt und verbunden ist, leuchtet das bluetooth -Symbol auf der Freisprecheinrichtung Wenn nach dem Pairen keine Verbindung hergestellt wurde, ist das Symbol ausgegraut GROUP kann kein bluetooth - pairing durchfu hren, w hrend die USB-Verbindung verwendet wird Wird w hrend eines u ber die USB-Verbindung abgewickelten Telefongespr chs versucht, das pairing mit einem Mobilger t durchzufu hren, wird ein Warnton ausgegeben Warten Sie, bis das Gespr ch u ber die USB-Verbindung beendet ist, bevor Sie das pairing mit einem Mobilger t durchfu hren Logitech GROUP VERWENDENV ideo und Audio Achten Sie darauf, dass GROUP in Ihrer Videoanwendung als Mikrofon, Lautsprecher und Kamera ausgew hlt ist Starten Sie einfach einen Anruf in Ihrer Videoanwendung, um GROUP fu r HD-Video und hochwertige Audioqualit t zu verwenden W hrend der laufenden bertragung des Videos leuchtet die Betriebs-LED Mit bluetooth nur Audio Achten Sie darauf, dass GROUP entsprechend der Beschreibung in "Verbindung und Einrichtung" gepairt und mit Ihrem Mobilger t verbunden ist T tigen Sie einen Anruf auf Ihrem Mobilger t und genie en Sie das verbesserte Klangerlebnis u ber die GROUP Freisprecheinrichtung Deutsch Anruf annehmen2 Mikrofon stummschalten3 Leiser4 Schwenk-/Kippfunktion der Kamera 5 Anzeige der Kamera verkleinern6 Kameravoreinstellungen7 Anruf beenden8 Lautst rke +9 Anzeige der Kamera vergr ern10 Kamerasteuerung fu r N he/Ferne.