Transcription of Shell Installation Instructions Revision 114 - …
1 1 of 2 Revision 1/14 Installation Instructions There are many important features that distinguish the genuine SNUGTOP from other truck caps/shells on the market. One important features are SNUGTOP s unique hidden clamp mounting systems, which do not require any drilling into your vehicle. The Installation is easy and fast. IMPORTANT! Read all Instructions carefully before commencing any work. Always wear safety equipment. Some Installation steps will require two or more installers. A. Vehicle and Shell preparation 1. Clean the front of the Shell with a soft non-abrasive cloth. 2. Clean the outside rear surface of the vehicle s cab with a soft non-abrasive cloth. 3. Wipe the bottom seal surface of the Shell to remove dirt and debris. 4. Clean the top of the bed rails and tailgate.
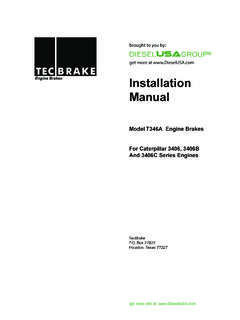
2 B. Installing the Shell 1. Place the Shell on the bed rails and slide it forward until the front edge of the Shell is flush with the front edge of the bed. The Shell tailgate flange should not contact the vehicle s tailgate. Please refer to Figure 1. (This operation requires at least two people) NOTE: If equipped with a front boot, slide the Shell forward until the rubber boot touches the cab of the vehicle. Then, push the rubber boot outwards from inside the Shell to allow the Shell to slide completely forward. 2. Loosely install the mounting hardware as shown in Figure 2. 3. Tighten the mounting hardware as described below: HIDDEN CLAMP SYSTEM (Figure 2) Begin the tightening sequence with the center clamp nuts first.
3 Complete the process by tightening the clamp nuts at the front and rear comers. Clamp nuts should be tightened to a target torque of in-lbs. Next, secure the clamp nut by installing the keps nut tightly against it. Finally, cover the keps nut with the vinyl cap. Recommended tools Ratchet Torque wrench Window cleaner Deep socket Wrench (2) Wiping cloth Figure 1. Shell alignment Figure 2. Hidden clamp system NO CONTACT FLUSHSHELLTAILGATEFLANGEVINYL CAPKEPS NUTCLAMP NUTFLAT W ASHERHEX HEAD CAP SCREWVEHICLE BED RAILSHELL SIDE RAILFIBERGLASSRAIL2 of 2 Installation Instructions C. Tailgate adjustments 1. Rotary latch tailgate adjustment : The rotary latch tailgate fit and function may be easily adjusted by simply loosening a few hex head screws.
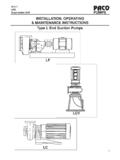
4 To adjust the fit (depth when closed) of your tailgate, loosen the two hex head screws on the rotary latch assembly and move it down to push the tailgate away from the Shell when closed, or up to move the tailgate towards the Shell when closed. To adjust the function (latch engagement) of your tailgate, begin by inspecting the mechanism to determine the direction of the adjustment needed. Next, loosen the two philip head screws on the strike loop and move it to the desired position. Please refer to Figure 4. Important care Instructions for your SNUGTOP Your SNUGTOP will give you years of trouble free service if you follow these recommendations: Prolong the life of the painted surfaces by waxing your SNUGTOP every four to six weeks with a high quality car or boat wax.
5 (Wait approximately 30 days from the time of purchase before waxing to allow for maximum cure of the finish.) Keep the area between the rubber collar and back of the truck cab free of dust and dirt. You can use a damp cloth from the inside of the Shell to wipe this area once a week. When waxing the vehicle, be sure to apply wax where the rubber boot makes contact with the back of the cab. Always wash your SNUGTOP in a shaded area. Do not wipe painted surfaces with a dry cloth. Do not use any abrasive cleaners. Lubricate all moving door lock parts once a month with an oil base lubricant. Do not use any silicon or petroleum distillate (WD-40) type spray lubricants. CAUTION: Improper tightening of J-hooks (mounting hardware) may result in excessive movement of the Shell causing paint wear where the rubber seal makes contact with the truck rails and where the rubber boot makes contact with the vehicle s cab.
6 NOTE: Contact your dealer regarding availability of products that protect truck surfaces against scuffing and/or chafing. WARNING! Camper shells/truck tops are not designed to serve as a passenger compartment. State laws prohibit carrying passengers in the bed of a pickup truck. Do not occupy pickup truck box while the engine is running or the vehicle is in motion. Serious or fatal injury may occur from collision or carbon monoxide poisoning. Always keep your camper Shell doors closed while driving your vehicle. All mounting hardware requires regular inspection and occasional tightening. If you detect any wear or corrosion on mounting hardware, contact your dealer or the manufacturer for a replacement. This camper Shell /truck cap is weather resistant but not weather proof.
7 Please take appropriate measures to ensure the safety of any items of value. This product is not a Roll Bar, in case of an accident it does not provide protection to the occupants of the vehicle. Protect yourself and others buckle up! Make other family members aware of these warnings. MOVE STRIKE LOOP POSITION TO ADJUST ENGAGEMENT WITH ROTARY LATCHLOOSEN TO ADJUSTSTRIKE LOOP POSITIONDIRECTION OF adjustment :MOVE ROTARY LATCH ASSEMBLY POSITIONTO ADJUST TAILGATE DEPTH WHEN CLOSEDDIRECTION OF adjustment :LOOSEN TO ADJUSTROTARY LATCH ASS'YFigure 4. Rotary latch tailgate adjustment