Transcription of SPECIFICATION AND INSTALLATION INSTRUCTIONS - Gliderol
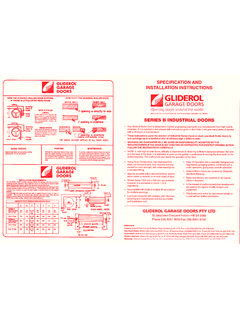
1 INSTALLATION INSTRUCTIONS - Series A & AA Roller doors, Page-1 SPECIFICATION AND INSTALLATION INSTRUCTIONS Made under license Aust Patent No. 413178 and Patent Application No. 483904 SERIES A & AA CONTINUOUS CURTAIN ROLLER DOORS For all popular sizes of garage openings Your Gliderol Roller door is designed to highest engineering standards and manufactured from high quality materials. If it is installed in accordance with the INSTRUCTIONS given in this manual it will give many years of service with a minimum of maintenance.
2 Warning! No guarantee will be given or responsibility accepted by the manufacturer if the door is not installed by an authorised Gliderol Installer. Gliderol GARAGE DOORS 32 Jacobsen Crescent Holden Hill SA 5088 Phone (08) 8261 9633 Fax (08) 8261 9700 Branches Victoria: Gliderol Garage Doors, 23 Kitchen Rd, Dandenong, VIC 3175. Phone: 03 97935455 Fax: 03 9706 8492 NSW: Gliderol Garage Doors, 45 Sammut St, Smithfield, NSW 2164. Phone: (02) 9725 1033 Fax: (02) 9725 1115 Queensland: Gliderol Garage Doors, 241 Elliott road Banyo, QLD 4014.
3 Phone: 07 3260 9000 Fax: 07 3260 9055 Western Australia: Gliderol Garage Doors, 21 Prindiville Dr, Wangara, WA 6065. Phone: 08 94093000 Fax: 08 94093200 New Zealand: Gliderol Garage Doors, 12 Cape Hill Road, Pukekohe, Auckland NZ. Phone: 09 835 0211 Fax: 09 237 0440 UK: Gliderol Garage & Industrial Doors Ltd. 1 Davy Drive, North West Industrial Estate, Peterlee Co, Durham, SR8 2JF UK. Phone: 1915 18 0455 Fax: 1915 18 0548 PREPARATION Remove all parts. THE WRAPPING HOLDING THE DOOR MUST NOT BE CUT AT THIS STAGE.
4 The doors are positioned inside the opening and, therefore, overlap the opening on each side by 25mm for series A and 50mm for Series AA doors. A minimum of 75mm is required between the opening and the side wall for Series A doors, 150mm for Series AA. Before commencing, measure both the opening and the door curtain and mark the overlap on the wall to facilitate the fixing of brackets and guides. PLEASE FOLLOW THE INSTRUCTIONS CAREFULLY 12 AFFIXING MOUNTING BRACKETS The minimum headroom required between the underside of the rafters and the top of the opening is 400mm for Series A doors and 450mm for Series AA doors.
5 Firmly secure one of the mounting brackets with appropriate fixings for the material you are fixing to, (Refer table for maximum pull out strength requirements while selecting fixings). It is important that the outside face (smooth side) of the angle brackets faces the side wall of the garage. The clearance on either side between the door curtain and mounting brackets is 10mm minimum and 100mm maximum. (Manual Doors Only) The top of the bearing surface of the mounting brackets should be 150mm from the top of the opening, and 250mm minimum from the underside of the rafters.
6 In the event of shallower headroom, the 250mm dimensions must be maintained. Shallower headroom s down to 300mm can be maintained, but will result in the underside of the rolled up door showing when the door is in the open position. The second mounting bracket should then be positioned. The use of a line level or spirit level and straight edge is recommended as IT IS VITAL THAT THE BRACKETS ARE EXACTLY LEVEL WITH EACH OTHER, otherwise the door will not sit square.
7 The minimum 250mm dimension must be maintained. Fig- 1 INSTALLATION INSTRUCTIONS - Series A & AA Roller doors, Page-2 POSITIONING THE DOOR First make sure the axle is centered within the curtain roll. Place the rolled up door on the mounting brackets and centre the axle approximately 250mm from the front wall, ensuring that the door iscentralized with the opening.
8 If the side clearance for the axle is insufficient, cut EACH END of the axle. IT IS IMPORTANT THAT THE AXLE IS NOT CUT TOO SHORT. UNROLLING THE DOOR Hold the door in its tensioned position and remove the wrapping which holds the door in a roll. It is important that the door is held firmly at this stage to prevent loss of tension. Pull the door partly down. THE DOOR MAY HAVE A STRONG TENDENCY TO RISE WHICH, IF UNCONTROLLED, CANCAUSE DAMAGE. Affix the lifting handle in the centre of the aluminium bottom rail and allow the door to rise slowly, the handle acting as a door stop against the lintel.
9 If the lifting handle will not engage the lintel for anyreason, use a piece of soft timber as a chock, approximately 450mm long, and place it between the bottom rail and the drum, as shown, taking care not to damage the door. On Series AA doors only, fit the left and right handed nylon guide stop blocks to the aluminium bottomrail by sliding them beneath the Polyglide wearing strips and securing the gutter bolts, ensuring thehead of the gutter bolt is on the outside of the door.
10 When lifting the Polyglide, ensure that the PVC finned weatherseal remains in position. FIXING THE SIDE TRACKS Carefully remove the wood chock, if used. Ensure that the door curtain is rolled up evenly andcentered on the opening. Should the door be coned due to movement in transit, then the door curtain should be carefully unrolled to its full extent and rolled back evenly before continuing, making sure the curtain is no longerin a coned position. Clean the side tracks with a spirit cleaner.