Transcription of Table of Contents General Safety Information
1 Table of ContentsGeneral Description ..2 Receiving and Handling ..2 Installation Control Box ..3 Switch Mounting ..3 Temperature Sensor(s) - Hood Mounting .. 3-4 Duct Collar Mounting ..4 Thermostat - Hood Mounting ..4 Duct Collar Mounting ..5 Electrical Connections Power for Automatic Fan Controls (AFC) ..6 Power for Hood Lights ..6 Power for Starters and Fans ..7 Fire System Integration ..7 Spare Fire Contacts ..8 Switches - Fan, 1-Speed ..8 Fan, 2-Speed ..8 Lights ..8 Tempered Supply, Heat Only ..9 Tempered Supply, Cool Only ..9 Tempered Supply, Heat and Cool.
2 9 Combination Fan/Light Switch ..9 Make-Up Air Interface ..9 Power for Shunt Trip ..9 Audible Alarm ..9 Lights Out in Fire ..10 Additional Fire Contacts ..10 Additional Exhaust Contacts ..10 Additional Supply Contacts ..11 Exhaust Fan Failure Indicator ..11 Supply Fan Failure Indicator ..11 Status Lights ..11 Temperature Interlock, Digital ..12 Temperature Interlock, Thermostat ..12 Digital Temperature Interlock Configuration ..13-14 Thermostat Style Temperature Interlock Configuration ..15 Automatic Fan Controls Field Connection Checklist.
3 16 General Wiring Diagram ..17 Testing ..18 Operation ..19 Troubleshooting ..19 Maintenance ..20 Frequently Asked Questions ..20 Replacement Parts ..21 Codes and Standards ..21 Maintenance Log ..22-23 Our Commitment ..24 WARNINGE lectrical shock hazard. Can cause equipment damage, personal injury or death. Service must only be performed by personal that are knowledgeable in the operation of the equipment being disconnect power before working on or near the product. Lock and tag the disconnect switch or breaker to prevent accidental power is the responsibility of the installer to make sure both electrical and gas appliances shut down in the event of a fire or in the event of a power loss to the building when this sequence is required by the authority having Safety InformationOnly qualified personal should install this product.
4 Personnel should have a clear understanding of these instructions and should be aware of General Safety precautions. Improper installation can result in electric shock and other potential Follow all local electrical and Safety codes, as well as the National Electrical Code (NEC) and latest edition of the National Fire Protection Agency Standard for Ventilation Control and Fire Protection of Commercial Cooking Operations (NFPA 96). Follow the Canadian Electrical Code (CEC) and ULC-S650 if installing this product in Do not allow the electrical components of this product to come in contact with oil, grease, hot surfaces, water, or Verify the site can supply the necessary power for each fan and for the control 482438 Automatic Fan Conrols(AFC)Installation, Operation and Maintenance ManualPlease read and save these instructions for future reference.
5 Read carefully before attempting to assemble, install, operate or maintain the product described. Protect yourself and others by observing all Safety Information . Failure to comply with instructions could result in personal injury and/or property damage!Automatic Fan Control1 Receiving and HandlingReceivingUpon receiving the product, check to make sure all items are accounted for by referencing the bill of lading to ensure all items were received. Notify the carrier if any damage is noticed. The carrier will make notification on the delivery receipt acknowledging any damage to the product. All damage should be noted on all of the copies of the bill of lading which is countersigned by the delivering carrier.
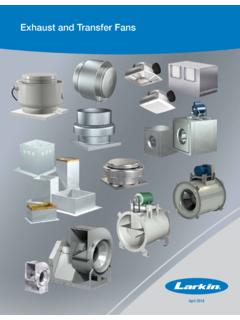
6 If damaged upon arrival, file a claim with the carrier. Any physical damage to the unit after acceptance is not the responsibility of the that all required parts and the correct quantity of each item have been received. If any items are missing, report shortages to your local representative to arrange for obtaining missing parts. StorageIf this product must be stored prior to installation, it must be protected from dirt and moisture. Indoor storage is highly sure the equipment does not suffer any heavy vibration or storage which results in damage to the unit will void the DescriptionDescriptionThe automatic fan controls, or AFC, is a pre-engineered package designed to control the operation of fans in a constant volume kitchen.
7 The package consists of a cabinet encasing one or more fan motor starters interlocked together for on/off operation. Different fan, light and thermal switch combinations may be provided to operate the kitchen hood fan(s), light(s), and heating/cooling capabilities of the supply air. The control center as a standard is equipped with additional relays prewired to the fan starter(s). These additional relays are capable of turning on the kitchen exhaust and shutting down supply regardless of the present state of the fans via integration of a fire system microswitch with factory terminals. The control center can be equipped with temperature interlock, designed to automatically start kitchen fans and keep them running while heat is being generated from the cooking appliances.
8 Hood systems should always be manually started before the cooking equipment is turned on, but if forgotten the interlock will safely trigger the fans to start once heat is detected. Other options are purpose of the AFC is to provide a complete control center equipped with fan motor starters. The control center provides a common connection point to interlock kitchen exhaust, supply, and hood lights with the hood s fire suppression system. The cabinet is pre-engineered with terminal blocks for most field wiring connections. The control center can also be equipped with interlock between the exhaust fans and cooking equipment, as to meet International Mechanical Code (IMC) 2015 Section In this case, the system will utilize a temperature sensor in the exhaust duct collar or capture area in the hood to detect heat generated from cooking operations and automatically activate the exhaust fans if not already ApplicationThe AFC is designed for both Type I and Type II (grease and non-grease) constant volume hood systems, where starters are needed to activate fans.
9 The control center can operate both single and three phase fans. Larkin recommends using one AFC per hood system (activates all fans simultaneously). When temperature interlock is provided in this package, it is not to be used in conjunction with exhaust fire Fan Control2 InstallationControl Box MountingLocate an area with enough space to mount the control box and fasten to the wall. Use appropriate type fasteners depending on the mounting location. Avoid installing the control box in environments with high magnetic and/or radio frequency box may be factory mounted. If so, continue to the next MountingLocate an area with enough space to mount the switches junction box and fasten to the the switches were NOT shipped loose, provided in a separate junction box, continue to the next Sensor(s) - Hood MountingNOTET emperature sensor(s) will be provided only if the digital temperature interlock option was configured/ordered with the unit.
10 If it wasn t, continue to the next sensor(s) may be factory installed. If so, continue to the next Find a spot for the sensor in the flat space that will not interfere with the fire suppression nozzles and that is not within 12 inches ( mm) of any light fixtures. Cut a 3/4 to 7/8-inch ( to mm) diameter hole in the flat spot of the capture Locate flat area(s) at the top interior of the hood in front of the filters, towards the front of the inch typical( mm) inches( mm)3 inch air space( mm)Sensor Install(cutout area)Exhaust AreaSupply Area(optional) 410 SCHOFIELDTITLEINSTR ADJTop View of Exhaust to inch ( to mm)diameter holeHood SurfaceAutomatic Fan Control3 Temperature Sensor(s) - Duct Collar Mounting1.

![MISSISSIPPI [TABLE OF CONTENTS FOR CHAPTER 1: GENERAL]](/cache/preview/4/d/1/2/f/1/7/6/thumb-4d12f176c690014d346ca36438ddbcce.jpg)