Transcription of TECHNICAL BULLETIN TB-2000 ... - …
1 TB-2000 February 2015 Page 1 of 4 installation and maintenance of ESD MatsIntroductionThe purpose of an ESD worksurface is to aid in the prevention of damage to ESD sensitive components and assemblies from electrostatic discharge. An ESD worksurface provides protection in the following two ways:1. Providing an antistatic worksurface area that will limit static electricity generation. 2. Removing the charge from a conductive object placed on the worksurface. A dissipative worksurface having a surface resistance of at least 1 x 10⁶, but less than 1 x 10⁹ ohms is recommended by worksurface standard ANSI/ESD Dissipative materials minimize the generation of static charges, and will dissipate a charge slow enough so that a spark will not occur.
2 Dissipative materials are usually the preferred choice for bench top materials are the quickest to remove a charge, but they can also cause damage by discharging too rapidly. Conductive materials are usually used as floor mats, which is defined by ANSI/ESD as less than 1 x 10⁶ Grounding Guidelines1. ANSI/ESD requires that all conductors in an ESD protected area, including personnel, must be The ESD ground must be tied directly to and at the same potential as the building or green wire equipment Per ANSI/ESD , the ESD control program can in no way replace or supercede any requirements for personnel safety.
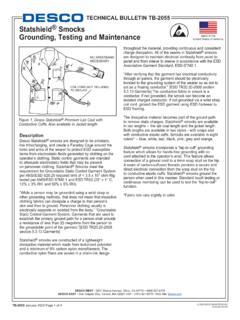
3 Ground fault circuit interrupters (GFCI) and other safety protection should be considered wherever personnel might come into contact with electrical sources. 4. All electrical outlets should be verified for proper wiring configuration, resistance or impedance and GFCI function when the mat is installed and periodically Point GroundsA common point ground is defined by the grounding standard ANSI/ESD , as:1. A grounded device where two or more conductors are A system or method for connecting two or more grounding conductors to the same electrical of common point grounds with ground cords are illustrated 2.
4 Other ground 3. 09814 with screw allows ground cord to be bolted to mat to keep cord from point grounds are designed to provide ground for worksurface mats, wrist straps, and other items. NOTE: DO NOT DAISY CHAIN. Because of the high resistances inherent to many types of protective surfaces, daisy chaining of these materials can severely limit their ability to properly dissipate and protect against static WEST - 3651 Walnut Avenue, Chino, CA 91710 (909) 627-8178 DESCO EAST - One Colgate Way, Canton, MA 02021-1407 (781) 821-8370 Web Site: BULLETIN TB-2000 Made in the United States of America 2015 DESCO INDUSTRIES Owned0983509740 Figure 1.
5 Typical common point POINT GROUNDPer ANSI/ESD , Grounding section Every element to be grounded at an ESD protected station shall be connected to the same common point ground. ESD Handbook ESD section Basic Grounding Requirements The first step in ensuring that everything in an EPA is at the same electrical potential is to ground all conductive components of the work area (worksurfaces, people, equipment, etc.) to the same electrical ground point. This point is called the common point ground. The next step in completing the ground circuit is to connect the common point ground to the equipment ground (third wire, green).
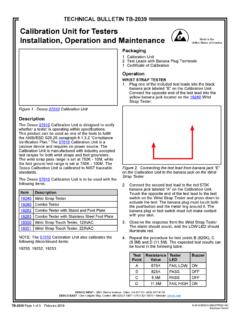
6 WRONG!RIGHTF igure 4. ESD mats should never be grounded in series, that is daisy Page 2 of 4 Grounding MethodsMethod 1 (Grounding via ground cords)1. Desco recommends using a common point ground cord when grounding via ground cords. Most common point ground cords will ground your ESD worksurface and provide banana jack ground points for two wrist A common point ground should be installed at each workstation and should be connected directly to a verified green wire equipment ground. Only one groundable point should exist on a 5. Common point ground for each Wrist straps should never be grounded through a worksurface, as the added resistance of the worksurface material will prevent the wrist strap from operating 6.
7 Proper grounding of wrist Per ANSI/ESD , a current limiting resistor in the wrist strap ground cord is recommended. If other than a one megohm resistor, special marking in red is additional information on grounding we recommend Desco TECHNICAL BULLETIN Point Installation1. Before installing a groundable point on your mat you must first determine whether you will need a snap socket or stud, the type of snap hardware and the Desco has three types of 10mm ( ") field installable mat grounding snaps. The first type is a screw-on snap kit Desco item number 09864 Universal Snap Kit.
8 A. Determine the position of the grounding snap (one only per mat) and type of fastener you will be installing (socket or stud). Take precautions not to cut your hand, and punch a hole through the material with a small Phillips screwdriver or awl. B. Remove the release paper from the circular common point ground label and affix it so that it aligns with the hole on the material . C. Select one of the screws as follows: material less than " thick - short screw material greater than " thick - long screw D. Insert the screw through the top on the snap stud or socket, the washer, the label and the material .
9 Affix the assembly with the conical nut supplied with the kit and tighten down the screw using a Phillips screwdriver. E. Remaining will be either a 10mm stud or socket, and either a long or short screw to be discarded or saved for another , STUD,WASHER, LABELAND CONICAL NUTAS SHOWNDESCO WEST - 3651 Walnut Avenue, Chino, CA 91710 (909) 627-8178 DESCO EAST - One Colgate Way, Canton, MA 02021-1407 (781) 821-8370 Web Site: ! RIGHT!Figure 8. Installing Universal Snap Kit on A PHILLIPSSCREWDRIVER ORAWL TO PUNCHA HOLE IN THEMATERIAL 2015 DESCO INDUSTRIES OwnedFigure 7.
10 Three kinds of The second type of mat grounding snap is the push and clinch snap. This snap is designed for use with any type of soft mat material : dissipative, conductive or multi-layered. It is recommended for use with three-layered material , because it provides excellent contact with the internal con ductive scrim layer. It is recommended that before inserting this snap, the mat be punctured with a sharp tool where the snap will be placed. Take precautions not to cut your hand. Push and Clinch snaps are available as a snap stud as item 09861 and as a snap socket as item 09863.