Transcription of Techniques to Master Dovetail Joints - Popular Woodworking
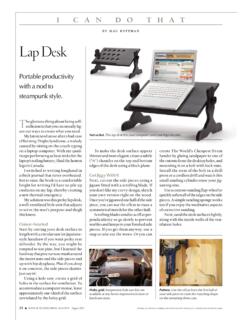
1 Techniques to Master Dovetail Joints : Beyond the Basics with a Router Photo by Al Parrish Sliding ne of the defi ning features of 17th- and 18th- O century furniture is the dovetailed horizontal case divider. Case dividers are the rails that separate the drawers, or the door and drawer sections. Attaching these dividers to a case's sides using sliding dovetails is probably Dovetails the strongest way possible to assemble a carcase. However, reproducing this detail is daunting to many woodworkers. Not only is a sliding Dovetail seen as complex joinery, but it can be made in different ways. The basic slid- ing Dovetail , shouldered sliding Dovetail and through sliding Dovetail (shouldered or not) are just a few of the options. by Glen Huey Two router bits with guides and a simple Glen builds custom furniture in Middletown, Ohio, for Malcolm shop-made jig make three variations of L.
2 Huey & Son, teaches Woodworking and is a contributing edi- tor for Popular Woodworking . He also is the author of two books, Building Fine Furniture and Fine Furniture for a Lifetime ( Popular this joint a snap. Woodworking Books). See more of his work at 9/16". Each type of sliding Dovetail have a rounded end, the trench requires a different jig. I've used must extend a little further so the a variety of these jigs in my many square-shouldered tail on the di- years of building reproduction vider will fit. furniture. Some jigs capture the router base and are specific to a Two-step Shouldered Joints certain router bit. If you need to A shouldered Dovetail is ideal for use more than one bit (to make a casework that uses web frames, shouldered Dovetail , for example) which support drawers.
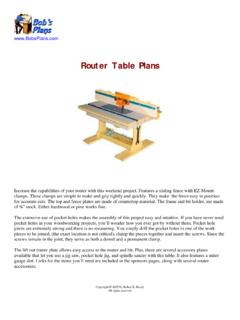
3 The this can be a problem unless you straight shoulder, which supports own two identical routers . the web frame, is cut just as you Other jigs are as large as the would cut a basic dado. BASIC SLIDING Dovetail entire case side, making them First align your straightedge The simplest option in sliding dovetails. The socket or hard to handle and store. But I've as you did with the basic sliding trench requires only a single pass with the Dovetail bit. found a better way. Using a 3 4" Dovetail . With a 3 4"-diameter 9/16". top-bearing flush-trimming bit flush-trimming bit in your router, (often used for pattern routing), plow out the dado to 3 16" deep. a 3 4" Dovetail bit, a template guide Next, take your router with a tem- with a 3 4" outside diameter and plate guide and Dovetail bit, set it a shop-made straightedge, any of to 9 16" deep (without moving the these Joints can be made easily.)
4 Straightedge) and make the cut into the case side. The cut should From Dado to Dovetail be a bit longer than the width of 3/16". To understand how this works, your front divider. let's start with a simplified ver- Thanks to the template guide sion of the joint: a dado. With a (and keeping the straightedge in straightedge clamped across a cab- one fixed location), the Dovetail inet side and a flush-trimming bit portion of this cut is centered in SHOULDERED in your router, you can cut a dado the dado automatically. SLIDING Dovetail for case dividers or web frames. This joint adds a shoulder to the Dovetail and Simply position the straightedge Through Sliding Dovetails requires you to make a rst pass with a where you want your dado, set the For an even fancier look, you can pattern-making straight bit.
5 Then the depth of cut on your router and create through sliding dovetails. Dovetail bit (set at the same depth as on the joint above) is used to cut the Dovetail . plow it out. The bearing on the bit These Joints allow the end of the 3/4" follows your straightedge. case's divider to be seen on the By using a Dovetail bit with outside of the case. a template guide and this same Start once again by plowing setup, you can use the straight- the dado as explained above. You edge to make the basic sliding could cut the socket portion of Dovetail shown above left. this joint with a router, but there's Use a template guide that has much less chance of tear-out if you the same outside diameter as your cut the socket using a handsaw. 3/16" Dovetail bit to make measuring If you go with this hand-tool simple.
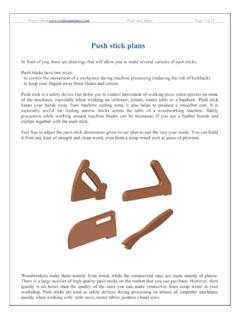
6 Next, clamp your straight- route, you should first cut the male edge exactly where you want the portion of the joint (called the sliding Dovetail to go. tail) on the end of your horizontal Set the proper depth for the divider using the Dovetail bit in bit, (9 16" in 3 4" material, for ex- your router table. The process is ample) then rout the Dovetail explained on the next page. Then THROUGH SLIDING Dovetail trench or socket in a little fur- use the tail to lay out the location A more complicated joint, this is made in three steps. ther than the width of the divider. of the socket on the case side. First the straight bit forms the shoulder, then The trench doesn't need to extend Now you can saw out the the Dovetail bit shapes the divider pin. The nal all the way across the side.
7 But socket. Orient the saw to match Dovetail socket is hand cut to avoid tear-out. because the Dovetail trench will the two tail sides, then cut in from Popular Woodworking August 2004. the front edge the width of the di- Set the bit to cut at the appro- of the divider. For example, you Whatever Size You Need vider. Finally, chisel out the waste priate height for each joint style. can show only 3 4" on the sides if While these Techniques work between your saw cuts. For the basic sliding Dovetail , that you like. After cutting the tails on great with the standard 3 4"-thick height should be about two-thirds both ends of the divider, use a saw drawer dividers that are common Don't Forget the Tails! of the width of the case side. If to trim the end 3 4" back from the today, they also work with other To make the mating joinery on you're making a shouldered dove- front of the divider on both sides.
8 Thicknesses of dividers by using the dividers (the tails), I use my tail, allow for the 3/16" shoulder Then cut from the back of the different-sized template guides router table. Use the same dove- depth in your layout. divider right at the point where and bits. The guides are readily tail bit you used to cut the dove- The through Dovetail is cut the tail begins from the divider to available in a wide variety of sizes, tail sockets to form the tails to with the height of the tail equal remove the unneeded tail section. including 51 64" and 1" if you need ensure that the joint fits well. Set to the thickness of the case side (if Repeat this cut on both ends. thicker drawer dividers. the fence to adjust the size of the you are adding a shoulder, remem- With the back portion of the You should consider using tails, cutting on both sides of the ber to allow for the shoulder).
9 Tail removed, slide the divider into sliding dovetails for any number divider. I like to sneak up on the Your through Dovetail doesn't the dado in the case and mark, of Woodworking tasks. The pos- final cut to ensure a snug fit. need to expose the whole width then cut, the matching socket. sibilities are endless. PW. THE STEPS TO A SHOULDERED SLIDING Dovetail . Making a shouldered sliding Dovetail begins interfering with the base of the router. As you diameter as the collar to allow the Dovetail to by cutting a dado in the case's side. This dado cut the dado, make sure you move the router run exactly down the center of the dado cut. is easily made with a pattern-cutting bit and in the correct direction (against the rotation With the template guide in place and the the right jig, which I call a straightedge guide.)
10 Of the bit) to keep it tight against the jig. depth set on the Dovetail bit, you're ready to The bed of my jig, shown below, is simply Next, install a template guide in your cut the Dovetail socket, as shown below. two pieces of plywood cut slightly longer handheld router and the Dovetail bit. I should With the socket created, it's time to make than the width of the case side, then glued or mention one important detail: To use a the mating tail on the end of the drawer screwed together face to face. (Depending on template guide that is the same diameter as divider. Mount the Dovetail bit in a router your router and bit, you might need only one the pattern-cutting bit's bearing collar (in table and run both sides of your divider on thickness.) To complete the jig, screw a third this case 3 4"), it will be necessary to attach end between the fence and bit.