Transcription of Tile & Shake INSTALLATION GUIDE - Stone Coated …
1 INSTALLATION GUIDETile & ShakeLEARN MORE AT | with Battens - DECRA Tile & DECRA ShakeDECRA Tile & Shake Roof Overview ..2 Introduction ..3 Safety ..3 Tools ..3 Estimating Sheets ..4 Codes & Requirements ..4 Roof Slope ..4 Underlayment ..4 Deck Preparation ..4 New Construction ..4 Roof Tear-off (Solid Deck) ..4 Re-Roof Tear-off (Skip/Spaced Sheathing) ..4 Re-Roof Over Even Surfaces (i .e . Asphalt Shingles) ..4 Re-Roof Over Irregular Surfaces (i .e . Wood Shake or Wood Shingles) ..4 Fasteners ..4 Venting Preparation ..4 Measuring, Cutting, Bending Panels ..5 Panels ..5 DECRA Tile & Shake .. 5 Preparation for Panel INSTALLATION ..6 Counter Battens and Battens.
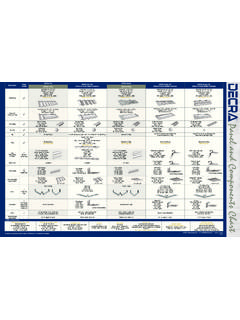
2 6 Steel Hat Sections ..6 Fascia Metal Flashing ..6 Panel Layout ..7 Fastening Panels ..7 Valley Application ..8 Open Valley ..8 Closed Valley ..9 Rake/Gable ..9 Penetrations ..10 Roof-to-Wall ..11 Roof to Side Wall w/ J Channel (Tile Pan) ..11 Roof to Side Wall w/ Side Flashing ..11 Chimneys ..12 Venting ..13 Panel Vent ..13 Ridge Venting ..14 Hip ..14 Ridge ..14 Hip & Ridge ..15 Short Course ..16 High Wind ..16 Freeze/Thaw ..16 Foot Traffic ..16 Sealants ..16 Cleaning & Repairs ..16 Table of | 02/182 INSTALLATION with Battens - DECRA Tile & DECRA ShakeDECRA Tile & Shake (installed on battens)DECRA Tile PanelDECRA Shake PanelTile Hip & Ridge(hips, ridges & rakes) Shake Hip & Ridge(hips, ridges & rakes) W Style Valley(Source Locally)Tile UnderpanShake UnderpanSide or 5 Fascia MetalTile End CapShake End CapDECRA Tile Panel VentDECRA Ridge VentFlat SheetSide Flashing DECRA Tile Panel VentDECRA panel vents should be installed on the last full course below the ridge, and no more than 4 feet down from the peak of the roof facet.
3 Panel vents should NOT be used for air | with Battens - DECRA Tile & DECRA ShakeRidge BenderBase BenderDECRA BenderTile Batten Spacer(14-1/2 ) Shake Batten Spacer(12-5/8 )Introduction The instructions and drawings included here are intended only as a GUIDE for the INSTALLATION of DECRA Roofing Systems Tile and Shake profiles. The materials and methods specified help maintain the overall integrity of the roofing system. These instructions are not intended to address all aspects of roofing INSTALLATION ; a quality INSTALLATION is ultimately dependent upon the workmanship of the roofing contractor. Information regarding alternative situations not covered in these instructions can be obtained by contacting DECRA Roofing Systems.
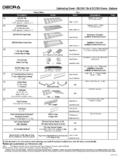
4 Safety Adhere to recommended safe roofing practices. Wear appropriate clothing and use safety equipment, such as protective eyewear. Light, soft-soled shoes are recommended. Use proper tools and keep the roof clear of debris as you work. ToolsDECRA panels may be cut using a cutter/guillotine, tin or aviation snips, or a circular saw using metal-cutting blades. A portable brake (DECRA Bender) or hand bender is recommended to bend the panels for hips, ridges and valleys. Safety equipment should be worn during the INSTALLATION process. DECRA Cutter/GuillotineCordless DrillCircular SawAviation or Tin SnipsHand | 02/184 INSTALLATION with Battens - DECRA Tile & DECRA ShakeEstimating Sheets The DECRA Tile and DECRA Shake Estimating Sheet (With Battens) is available at.
5 Codes & Requirements Refer to local codes and/or ICC Reports. A link to DECRA ICC reports is available at .Roof Slope Roof slopes less than 3:12 are considered decorative and panels must be applied over a roof system complying with local It is required that one layer of underlayment be used before applying the DECRA Tile or DECRA Shake panels to a roof deck in new construction or if the existing roofing material is removed. If the panels are installed over another roofing material, additional underlayment is not required unless specified by local code. Underlayment should be placed between the roof deck and the counter battens or battens. Underlayment shall comply with ASTM D 226, Type I or Type II, ASTM D 4869, Type I or Type II or ASTM D 1970.
6 Check local code requirements as ice and water shield and additional requirements may Preparation New Construction: Prepare roof deck to meet local building Tear-off (Solid Deck): If tearing off old roof, clean and prepare deck to meet local building Tear-off (Skip/Spaced Sheathing): There are two options available when skip/spaced sheathing is encountered. Use counter battens and battens without filling or fill as necessary and install just battens . Re-Roof Over Even Surfaces ( Asphalt Shingles): Prepare the asphalt shingles by cutting them back, flush with the fascia or rake, as needed. Remove existing hip and ridge material. Install Tile or Shake with Over Irregular Surfaces ( Wood Shake or Wood Shingles): When needed, use counter battens to obtain a level surface for battens when installing over an irregular surface.
7 Additionally, some codes require specified underlayments when roofing over wood shakes. Prepare the roof deck by removing all existing hip and ridge. Cut the existing overhang back as needed to install battens and accommodate Screws: Use a minimum of at least 5 corrosion resistant screws minimum #9 Hex (1/4 diameter) x 1-1/2 long. Use fasteners of sufficient length to penetrate through the sheathing (deck) by at least 1/2 . Recommended length is 1-1/2 long. High Wind details, see Preparation If using DECRA Ridge Vent material, prepare the deck for ridge venting (without center beam) by cutting both sides of the plywood 3/4 from the center of the ridge to expose attic space, or as required by local codes.
8 Refer to Venting section or DECRA Ridge Venting wrapper for additional INSTALLATION details. If DECRA Panel Vents will be used, See Panel INSTALLATION - Installing Panel Vents and | with Battens - DECRA Tile & DECRA ShakeDo not use LEAD or COPPER with this steel roofing system. Do not use pressure treated lumber decking or should be taken using front edge of battens for , Cutting, Bending Panels Measuring: Measurements are made on the roof, however, the panels are normally marked, cut and bent on the ground. Panels may be cut with a guillotine, tin snips, or circular saw with metal cutting blade. A portable brake press or hand bender is used to bend the cut edge of the panel for hips, ridges, and valleys.
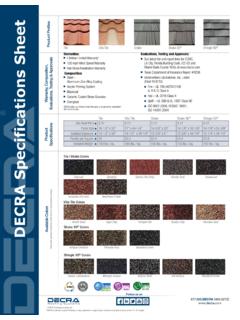
9 Panels: The DECRA panels are formed from corrosion resistant aluminum-zinc alloy Coated steel with a protective coating of ceramic Coated Stone granules that provide an attractive appearance. The Hip & Ridge used at the ridge, rake/gable and hip is produced in a similar manner. Back FlangePansFactory EdgeMid Pan KeywaysNoseOverlapChannelOverlapChannelF actory EdgeDECRA Tile (installed on battens)Installed Exposure:14-1/2 x 50 Panels per Square:20 Installed Weight:150 EdgeFactory EdgeBack FlangeOverlapChannelMid Pan KeywayNoseOverlapChannelDECRA Shake (installed on battens)Installed Exposure: 12-5/8 x 51 Panels per Square: Weight: 150 | 02/186 INSTALLATION with Battens - DECRA Tile & DECRA ShakeStarter Batten (2 x 2)Starter Batten (2 x 2)Counter Battens and Battens: Use counter battens when installing over an irregular surface or skip/spaced sheathing (See diagram 2).
10 Position 1 x 4 counter battens over the framing members (or no more than 24 on center) and secure using a minimum 16d common nail or equivalent into rafters or through sheathing 7 on center. Proceed with batten INSTALLATION as described SPACING DECRA PANEL 12-5/8 DECRA Shake 14-1/2 DECRA TileNOTE: BATTEN SPACING IS MEASURED FROM FRONT OF BATTEN TO FRONT OF NEXT BATTEN AS YOU GO UP THE ROOF. SEE DIAGRAMS Batten must be parallel with the placement of first batten to accommodate uneven batten spacing for accuracy every few rows with tape for Panel INSTALLATION : Set the top front edge of the first batten flush at the edge of the fascia board parallel with the ridge. Install 2 x 2 nominal size battens in standard grade lumber using a 16d minimum common nail or equivalent at a maximum of 24 on center into rafters (See diagram 1).