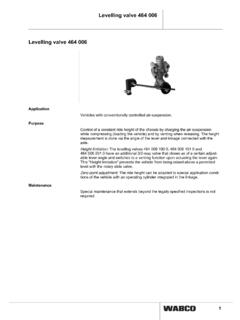
Transcription of Trailer ABS Training - WABCO INFORM Web
1 WabcoWABCOTRAILER ABSTRAILER ABSTRAILER ABSTRAILER ABSTRAILER ABSDate:Name:Company:wabcoCONTENTS page1 .. Tyre/Road Adhesion Characteristics2 .. Typical ABS Control Cycle3 .. Vario-C Basic Concept4 .. self Steering Axles and ABS5 .. Tri-Axle Semitrailer 6S/3M - piping6 .. Tri-Axle Semitrailer 6S/3M - wiring7 .. Boxer Concept8 .. Boxer ABS - Power Supply and W/L Wiring9 .. Sensor and Relay Modulator - plug connections10 .. Sensor and Relay Modulator - channel assignment11 .. ISO 7638 Power Supply12 .. ISO 7638 Assembly Details13 .. Three-way Power Supply14 .. Typical Sensor Installation15 .. Sensor Output Signal - graph16 .. Sensor Output Signal - text17 .. ABS Warning Lamp18 .. Vario-C2 Initialisation19 .. Polewheel Handling20 .. Polewheel and Sensor Check21 .. ECU s and Welding22 .. Common Faults23 .. Helpful Advice24 .. Useful Datawabcopage 1 ABS Control Theorywabcopage 2notes:Typical Tyre/Road Wheel slip (lambda)Braking coefficient BDry concreteWet concreteIcestableregionunstableregion B Wheel slip (lambda)Cornering coefficient SBraking coefficient Bwabcopage 3notes:Typical ABS Control Cycle (ii)Wheel speedReference speedVehicle speed 1 2 Speedstime (t)Solenoidcontrol valveWheel circumferentialaccelerationPressure in wheelcylinderT1T2inlet valveexhaust valve+b-b123 45 6789time (t)time (t)time (t)time (t)wabcopage 4 Typical ABS Control Cycle (i)In the typical ABS control cycle the most important control variables are; wheeldeceleration threshold -b, wheel acceleration threshold + b and slip thresholdsLambda 1 and Lambda the brake pressure increases, the wheel is progressively decelerated.
2 Atpoint 1 wheel deceleration exceeds a value that cannot physically be reached byvehicle deceleration. The reference speed and the wheel speed, which up to thispoint had been the same, now diverge until at point 2 the wheel speed has achieveda high deceleration (exceeding the -b threshold) - typically A maximum valueis derived from the reference speeds of the wheels of a control group and this isgenerally used as the mutual reference speed for the two wheels. Wheel slip iscalculated from actual wheel speed ( sensor output) and the correspondingreference speed which is electronically computed from all sensed deceleration threshold -b is exceeded at point 2. The wheel now moves into theunstable region of the - slip curve at which point the wheel has reached its maxi-mum braking force and any further increase in braking torque increases only the rateat which the wheel decelerates.
3 For this reason brake pressure is quickly reducedand so wheel deceleration decreases. The time taken for wheel deceleration isdetermined by the hysteresis of the wheel brake and by the characteristic of the - slip curve in the unstable after wheel brake hysteresis has been overcome does a continued reduc-tion in pressure lead to a decrease in wheel point 3 the deceleration signal -b drops below the threshold and the brake pres-sure is held at a constant level for a set time T1. Normally, wheel acceleration willexceed the acceleration threshold + b within this set time (point 4). So long as thisthreshold is exceeded, brake pressure is kept constant. If (for example on a lowfriction surface) the + b signal is not generated within time T1, brake pressure isfurther decreased by slip signal Lambda 1. During this control phase the higher slipthreshold Lambda 2 is not falling below the threshold at point 5 the +b signal drops.
4 The wheel isnow in the stable region of the - slip curve and the -value utilised is somewhatbelow the pressure is now rapidly applied for time T2 to overcome brake hyster-esis. This time T2 is fixed for the first control cycle and then calculated anew for eachsubsequent control phase. After the initial rapid phase, brake pressure is then in-creased more gradually by pulses , that is to say by alternating pressure hold andpressure logic described here is not fixed but rather adaptable to the dynamic be-haviour of the wheel for different coefficients of friction. The thresholds for wheeldeceleration, acceleration or slip are likewise not constant, dependent upon severalparameters, such as vehicle speed. The number of control cycles results from thedynamic behaviour of the total control loop of the ABS system wheel brake, wheeland road surface. Here, adhesion is of paramount significance.
5 3 to 5 cycles persecond are normal but significantly less on wet 5 The Vario-C Conceptwabcopage 6notes:Modular System Concept VARIO-CINSR2Ch => 2S/2M= IR4S/2M = MSR6S/3M = MAR/MSR or 4S/3M = MAR/IR2S/1M = MARECU wabcopage 7 With the increased use of self-steering axles on semi-trailers the following must betaken into account when installing WABCO Vario-C ABS. 1. When using 4S/3M or 6S/3M systems the steering axle MUST be controlled bythe MAR ( Modified Axle Regulation ) circuit.( Single modulator controlling both brake chambers on that axle ) - see diagram 12. With 2S/2M and 4S/2M systems, where each side of the vehicle is controlled by asingle modulator, the axle MUST be controlled using Select Low Regulation (SLR).This can be achieved by using a 'select low' double check valve*, which takes inputsfrom both modulators, the lowest being used to control both actuators on the steer-ing axle.
6 - see diagram 2 The purpose of the above is to prevent a steering torque being developed, on splitcoefficient surfaces, across the axle, due to different braking forces being generatedby each wheel, which could cause vehicle instability under braking.* Part No. 434 500 000 0notes:diagram1-6S/3M&4S/3 Mdiagram2-4S/2M&2S/2 MABSRELAYMODULATOR'SELECTLOW'VALVESelf-s teering Axles and ABSwabcopage 8notes:Tri-Axle Semitrailer 6S/3 Msensor csensor asensor esensor dsensor bsensor fmodulator Bmodulator Cmodulator Areservoirmanoeuvringvalverelay emergencyvalveload sensingvalvesupplycontrolECUM odulator A and sensors-Red ECU baseplateModulator B and sensors-Yellow ECU baseplateModulator C and sensors-Blue ECU baseplatewabcopage 9 Component and Power Supply Wiringwabcopage 10notes:Vario C Integral 4(2)S/2 MISO 763824N24 Sheadboardwarning lampBU - EYE - DYE - FBU - C5 core:2 x 6mm23 x core:3 x core:2 x 11notes.
7 6S/3M Wiring DiagramIV-Inlet ValveBK -BLACKOV -Outlet ValveBN -BROWNRD -REDYE -YELLOWGN -GREENBU -BLUEWH -WHITE sensor (F)modulator (B)sensor (D)sensor (B)sensor (E)modulator (C)sensor (C)sensor (A)modulator (A)BUYERDBKTOPECUBNYE/GNBUBNYE/GNBUBNYE/ GNBUWH/RDRDYE/BUBNBN/BU215431st Sensed Axle2nd Sensed Axle3rd Sensed AxleISO 7638 Direction of Travelwabcopage 12notes:1)The blue channel is normally on the vehicle LH side2)The yellow channel is normally on the vehicle RH side3)If the red channel is used it will be controlling both brakes on one axle andnot on one side of the vehicle, as with the yellow and blue )Where the red channel is used both sensor inputs must be connected5)If only one sensor per side is used to control the blue and yellow channelsthey must be connected to Sensor 1 of the respective sensor plug and notto sensor / relay modulator plug connections at the ECU are as below - viewedfrom the wire entry.
8 The brown/black sensor wires are not polarity conscious and can beinserted into the sockets either way SENSOR PLUG (when used)YELLOW AND BLUE SENSOR PLUGSSENSOR 2 SENSOR 1 BROWN WIRE(inlet valve)BLUE WIRE(outlet valve)YELLOW/GREEN WIRE(common return)RELAY MODULATOR PLUGS - all channelsSensors/Relay ModulatorsSENSOR 2 SENSOR 1normally LH wheelnormally RH wheelwabcopage 13notes:MODULATORSARED BASE PLATE-BOTH ACTUATORS ON SINGLE AXLEBYELLOW BASE PLATE-ACTUATORS NORMALLY ON RH SIDECBLUE BASEPLATE-ACTUATORS NORMALLY ON LH SIDESENSORSARED BASEPLATE-SENSOR 2 INPUTBRED BASEPLATE-SENSOR 1 INPUTCBLUE BASEPLATE-SENSOR 1 INPUTDYELLOW BASE PLATE-SENSOR 1 INPUTEBLUE BASEPLATE-SENSOR 2 INPUTFYELLOW BASEPLATE-SENSOR 2 INPUTS ensor/Modulator, channeland Wheel Assignmentswabcopage 14 Sensor/Modulator inputson ECU Baseplatenotes:6S/3M4S/3M4S/2M2S/2 MCBAECFDABCBAABCDCBECFDCBDCBUYERDBUYERDB UYERDBUYERDM odulators (3 pin)Sensors (4 pin)wabcopage 15notes.
9 For tractor units and drawbar trucks not fitted with an ABS power cable toISO 7638, the following shows what is required and how it is 7638 POWER CABLE (12 metre - 24volt)446 010 012 2 PARKING SOCKET (tractors only)446 008 600 2 DASHBOARD WARNING LAMP (red/amber - 2W typical)CUSTOMER SUPPLYFUSESCUSTOMER SUPPLYREDBATTERY POSITIVE THROUGH 25 AMP FUSERED/WHITEIGNITION SWITCHED THROUGH 5 AMP FUSEBROWNCOMMON RETURN TO BATTERY NEGATIVEBROWN/BLUECOMMON RETURN TO BATTERY NEGATIVEYELLOW/BLUEDASHBOARD ABS WARNING LAMPFor vehicles with a supplementary power cable, the dashboard warning lamp canalso be controlled via pin 2 of 24S, thereby removing the need to observe theheadboard warning lamp when the ISO 7638 power cable is absent from the trailerISO 7638 CABLEISO 7638 Power SupplyBAT * Lamp (2w)-DashboardISO7638 PowerCableIgnitionSwitchRed/WhiteBlue/Ye llowBrown/BlueBrown5 AmpFuse5 AmpFuse*wabcopage 16notes:For correct assembly, fit together as shown cable / strip through clamping nut ; back cover ; rubber washer.
10 Clamping plateand rubber wires into relevant : 2 pin sizes for 2 wire full insertion through view hole and crimp the pin wall around barbed pins firmly into the iso connector as detailed 6mm2 6mm2 7638 CABLECLAMPINGNUTBACKCOVERRUBBERWASHERCLA MPINGPLATERUBBERSEALPINS -5 off(2 sizes)ISO 7638 SOCKETISO 7638 - Assemblywabcopage 17notes:24N/24S/ISO7638 Power SupplyHeadboard Warning Lamp24N24 SISO 7638 Chassis MountedJunction Box5-Core Cable5-Core Cable24S/24N Relay24S/ISO7638 RelayTerminalBlockECU Power PlugECU Housing123454112612345wabcopage 18notes:The Boxer unit accepts all three forms of power supply:-The ISO 7638 uses the standard five pin connector. The 24S and 24N both use theWABCO 3 core modulator cables (894 601 .. 2 series) which terminates at screwedconnections on the side of the ECU housing. The colour for the wires is:-BrownPositive SupplyYellow/greenNegative Return * BlueDashboard Warning Light* For 24N, this wire is redundant in diag.