Transcription of USB Driver Installation Guide (USB 3.0 Supported)
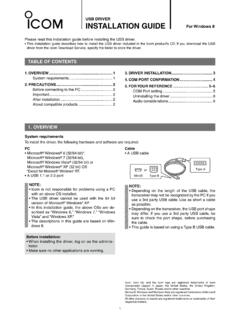
1 PC Microsoft Windows 10 (32/64 bit) Microsoft Windows (32/64 bit)* *Except for the RT version. Microsoft Windows 7 (32/64 bit) A USB , , or portNOTE: Icom is not responsible for problems using a PC with one of the above OSs installed. In this Installation Guide , the above OSs are de-scribed as Windows 10, Windows , and Windows 7. Cable A USB cableType AMini-BType BorNOTE: Depending on the length of a 3rd party USB cable, the radio may not operate properly even if it is rec-ognized by the PC. Use as short a cable as pos-sible. Depending on the radio, the USB port shape may differ. If you use a 3rd party USB cable, confirm the port shape, before purchasing the cable. This Guide is based on using a radio with a Mini-B type USB OVERVIEWUSB DRIVERINSTALLATION GUIDEP lease read this Installation Guide before installing the USB Driver .
2 This Installation Guide describes how to install the USB Driver included in the Icom product s CD. If you download the USB Driver from the Icom Download Service, specify the folder to store the , Icom Inc. and the Icom logo are registered trademarks of Icom Incorporated (Japan) in Japan, the United States, the United Kingdom, Germany, France, Spain, Russia, Australia, New Zealand, and/or other and Windows are registered trademarks of Microsoft Corporation in the United States and/or other other products or brands are registered trademarks or trademarks of their respective OF CONTENTS1. OVERVIEW ..12. PRECAUTIONS ..2 Before Installation ..2 Before connecting to a PC ..2 Important ..2 After Installation ..2 About compatible radios ..23. Driver Installation ..34. FOR YOUR REFERENCE.
3 94-1 COM Port setting ..94-2 Uninstalling the Driver ..124-3 Audio considerations ..14 System requirementsTo install the Driver , the following hardware and software are required:USB SupportedUSB Driver downloadingThe latest Driver can be downloaded from here. the above URL, and download the Driver from the Firmware Updates/Software Downloads * menu. *The menu name may be changed without Installation When installing the Driver , confirm Windows has completed its startup, and then log in as the adminis-trator. Confirm no other applications are running. When a previous version Driver is installed on your PC, the Driver name Silicon Laboratories CP210x USB to UART Bridge ( Driver Removal) is displayed on the Control Panel screen, as shown below.
4 In this case, uninstall it before installing this Driver . See Uninstalling the Driver on page 12 for details. (Windows 10 screen is shown.)Before connecting to a PCThe USB Driver is not supported by the automatic recognition system, so NEVER connect the USB cable between the radio and the PC until AFTER the USB Driver has been Driver Installation on page 3 for details. Once the Driver is installed, a PC software can be used by just connecting the USB Depending on your PC performance (OS, environ-ment, and so on), the USB audio may be interrupted, or a control by the PC software may get delayed. If the CPU has a heavy load, the USB audio is easily interrupted. The settings of the installed audio player may be changed after connecting the radio to the PC.
5 Icom is not responsible for improper operation when connecting the radio and the PC through a USB Installation Uninstalling the USB Driver You cannot uninstall the USB Driver for each individ-ual unit. After uninstalling the USB Driver , none of the radios that require this Driver can be operated with the PC. When another radio is connected The COM port number is automatically added after turning ON the radio s compatible radiosThe radios that require this Driver are shown on the Icom website. PRECAUTIONS3 Windows 103. Driver INSTALLATIONThe displayed dialog, indications, or operations may differ slightly from the following instructions, de-pending on your system version and Confirm that the radio and PC are not Double-click the USB Driver installer in the Driver folder.
6 If you want to install to the 32 bit version OS, double-click If you want to install to the 64 bit version OS, double-click Double-clicke When the User Account Control dialog is dis-played, click <Yes>. Clickr When the install screen is displayed, click <Next>. Clickt The License Agreement dialog is displayed. Read the agreement, and click the radio button next to I accept this agreement, and then click <Next>. w Clickq Clicky Windows starts installing the Driver . u After the Installation has completed, click <Finish>. Click Continued on the next : NEVER connect the USB cable between the radio and the PC until AFTER the USB Driver has been installed. This USB Driver is not supported by the automatic recognition 10 (Continued)3. Driver INSTALLATIONi Connect the USB cable between the radio and the PC, as shown below.
7 Then, turn ON the radio s pow-er. Confirm the USB cable connector a USB portUSB cablePCTo the USB portRadio(Rear panel)o The Installation icons are displayed on the taskbar shown below, then Windows starts installing the Driver . The USB audio Driver is also automatically installed. !0 After the Driver Installation has completed, the in-stallation icons on your system version and settings, you may be prompted to restart the PC. In this case, follow the instructions on the the Driver Installation has been completed, con-firm the port connection and port number.!1 Click the folder icon on the taskbar. Click!2 Right-click This PC, and then click Properties. q Right-clickw Click!3 Click [Device Manager]. The Device Manager screen is displayed. Click!
8 4 Double-click Ports (COM & LPT) on the Device Manager screen. Double-click When the Driver is completely installed, Silicon Labs CP210x USB to UART Bridge (COMM) is displayed. The screen shows the USB serial COM port number 3. The COM port number is displayed instead of M. If the radio has two COM ports, two COM port numbers are displayed. Depending on the PC environment, the COM port number may differ. If ! or is displayed on the Device Manager screen, the Driver may not be properly installed. In such a case, first uninstall the USB Driver , then reinstall Driver INSTALLATIONThe displayed dialog, indications, or operations may differ slightly from the following instructions, de-pending on your system version and Confirm that the radio and PC are not Double-click the USB Driver installer in the Driver folder.
9 If you want to install to the 32 bit version OS, double-click If you want to install to the 64 bit version OS, double-click Double-clicke When the User Account Control dialog is dis-played, click <Yes>. Clickr When the install screen is displayed, click <Next>. Clickt The License Agreement dialog is displayed. Read the agreement, and click the radio button next to I accept this agreement, and then click <Next>. w Clickq Clicky Windows starts installing the Driver . u After the Installation has completed, click <Finish>. Click Continued on the next : NEVER connect the USB cable between the radio and the PC until AFTER the USB Driver has been installed. This USB Driver is not supported by the automatic recognition (Continued)3. Driver INSTALLATIONi Connect the USB cable between the radio and the PC, as shown below.
10 Then, turn ON the radio s power. Confirm the USB cable connector a USB portUSB cablePCTo the USB portRadio(Rear panel)o The Installation icons are displayed on the taskbar shown below, then Windows starts installing the Driver . The USB audio Driver is also automatically installed. !0 After the Driver Installation has completed, the in-stallation icons on your system version and settings, you may be prompted to restart the PC. In this case, follow the instructions on the the Driver Installation has been completed, con-firm the port connection and port number.!1 Click the folder icon on the taskbar. Click!2 Right-click This PC, and then click Properties. q Right-clickw Click!3 Click [Device Manager]. The Device Manager screen is displayed. Click!
