Transcription of USER MANUAL - gopro.com
1 user MANUAL23To download this user MANUAL in a different language, visit t l charger ce manuel de l utilisateur dans une autre langue, rendez-vous sur Wenn Sie dieses Benutzerhandbuch in einer anderen Sprache herunterladen m chten, besuchen Sie Per scaricare questo manuale utente in un altra lingua, visita Para descargar este MANUAL de usuario en otro idioma, visite Para baixar este MANUAL do usu rio em outro idioma, acesse Чтобы загрузить это руководство пользователя на другом языке.
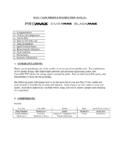
2 посетите страницу Join the gopro Table of ContentsUsing the Mounts85 Troubleshooting88 Customer Support90 Trademarks90 Regulatory Information90 The Basics6 Getting Started8 Camera Status Screen13 Camera Icons14 Camera Menus16 Camera Modes18 Navigating Settings Menus19 Video Mode20 Photo Mode34 Multi-Shot Mode41 Playback Mode50 Setup Mode56 Connecting to the gopro App65 Transferring Files to a Computer66 Protune 67 Battery73 Important Messages78 Camera Housing80/ Table of Contents6710. Microphone11. HERO Port12.
3 Settings/Tag Button [ ]13. Battery Door/ The Basics1. Camera Status Light (red)2. Shutter/Select Button [ ]3. Wireless Status Light (blue)4. Camera Status Screen5. Power/Mode Button [ ]6. Micro HDMI Port (cable not included)7. microSD Card Slot (microSD card not included)8. Mini-USB Port (supports composite A/V stereo mic adapter, not included)9. Audio Alert/ The Basics89/ Getting Started/ Getting StartedSlim housing surfboard mount installationSlim housing remove cameraSlim housing insert cameraSlim housing closedSwapping housing doorsQuick Release Buckle + Thumb Screw + Slim housing = Complete Unit4.
4 Charge the battery by connecting the camera to a computer or other USB charging adapter using the included USB cable. The camera status light turns on during charging and turns off when charging is : Using a wall charger other than a gopro Wall Charger can damage the gopro battery and could result in fire or leakage. Only use chargers marked: output 5V 1A. If you do not know the voltage and current of your charger, use the included USB cable to charge the camera from your charging with a computer, be sure that the computer is connected to a power source.
5 If the camera status light does not turn on, use a different USB included lithium-ion battery comes partially charged. No damage occurs to the camera or battery if used prior to a full more battery information, see Battery. WARNING: Use caution when using your gopro as part of your active lifestyle. Always be aware of your surroundings to avoid injury to yourself and others. Abide by all local laws when using your gopro and related mounts and accessories, including all privacy laws, which may restrict recording in certain THE BATTERY1.
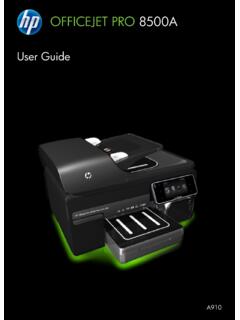
6 Remove the camera from its housing. 2. Remove the camera side door and insert a microSD card (sold separately). The card must have a minimum rating of Class 10 or UHS-I, and a capacity up to 64GB. Visit for the list of gopro -tested microSD Open the bottom door, insert the battery and then close the b ot to m d o o ON + OFF To Power On: Press the Power/Mode button [ ] once. The camera status lights (red) flash three times and the sound indicator emits three beeps. When the camera status screen displays information, your camera is Power Off: Press and hold the Power/Mode button [ ] for two seconds.
7 The camera status lights (red) flash several times and the sound indicator emits seven TIP: When the camera is off and QuikCapture is enabled, you can turn the camera on and immediately begin capturing video or Time Lapse photos just by pressing the Shutter/Select button [ ]. Press once for video, press and hold for Time Lapse photos. Press again to stop recording and power off the camera. For details, see QuikCapture in Setup Getting StartedCAMERA SOFTWARE UPDATES To get the latest features and best performance from your HERO4 camera, make sure you are using the most current camera software.
8 You can update your camera software via the gopro App or gopro software. For more information, visit DEFAULT SETTINGS The HERO4 Black camera powers up with the following default settings:Video1080 p60 Photo12MP, Wide Field of View (FOV)Multi-ShotBurst option (set to 30 photos in 1 second)QuikCaptureOffWirelessOffPRO TIP: To open the settings menu for the current mode, press the Settings/Tag button [ ]./ Getting Started1213 Your HERO4 Black features a status screen that displays the following information about modes and settings:1.
9 Camera Modes/FOV (field of view)2. Camera Settings3. Resolution/fps (frames per second)4. Protune 5. Number of Files Captured6. Time/Storage/Files7. Wireless8. Battery LifeNote: The icons that appear on the camera status screen vary by Camera Status ScreenINSERTING + REMOVING MICROSD CARDS The HERO4 Black camera is compatible with microSD, microSDHC, and microSDXC memory cards with a capacity up to 64GB (sold separately). You must use a microSD card with a minimum rating of Class 10 or UHS-I. (For a list of the gopro -tested microSD cards, visit ) gopro recommends using brand name memory cards for maximum reliability in high-vibration Insert the microSD Card:To Remove the microSD Card:Slide the memory card into the card slot with the label facing the front of the fully inserted, the card clicks into your fingernail against the edge of the memory card and lightly press it further into the card springs out far enough to be : Use care when handling memory cards.
10 Avoid liquids, dust and debris. As a precaution, power off the camera before inserting or removing the card. Check manufacturer guidelines regarding use in acceptable temperature Getting Started1415/ Camera IconsAuto Low LightAuto OffBeepsBurst PhotosColorContinuous PhotosDate/TimeDefault ModeDeleteExposure Value CompensationField of ViewFrames Per SecondIntervalISO LimitLanguageLEDsLoopingMegapixelsMulti- Shot ModeNight LapseNight PhotoOn-Screen DisplayOrientationPhoto ModePlayback ModeProtuneQuikCaptureRateSetup ModeSharpnessShutterSingle PhotoSpot MeterTime LapseTouch DisplayVideoVideo + PhotoVideo FormatVideo