Transcription of Vinyl Fencing Installation Guide
1 Vinyl Fencing Installation Guide Always consult the following Installation instructions as well as the CAD diagrams when installing your fence. Important Tips & Maintenance Thank you for choosing a Weatherables Fence! We are proud to provide the highest quality Vinyl Fencing available and are fully committed to providing you with superior service from the very first time we work together to long after we've delivered your product. This Guide is designed the walk you through the Installation process. If you have any questions, please give us a call at 1-888-743-3673 and welcome to Weatherables. IMPORTANT TIPS. 1. Be sure to thoroughly review these instructions before beginning to install your fence. 2. Prior to purchase and Installation , check with your local regulatory agency for special code requirements in your area and contact your utility supplier to locate and mark underground lines before digging.
2 3. Prior to purchasing, determine your method of Installation (straight, sloped, stepped or a combination). Your method of Installation will depend on the slope/grade change in your yard and the style of fence. See page 4 for more information. 4. Sketch out the layout of your fence and calculate the number of panels, gates and posts required (to finish a fence run, one extra post is needed). Careful planning and measuring of your fence is essential, since it is not possible to move the posts after the concrete sets. 5. Measure and assemble your gates first to determine the width of the gate opening (including space for hardware). Be sure to allow enough clearance on the bottom of the gate to allow it to swing freely. Failure to do so may result in a poor Installation of the entire fence since the gate will set the height for the rest of the fence.
3 6. When installing your fence or gate, we recommend installing 1 post and section at a time. 7. We recommend allowing a minimum 2" clearance between the bottom of the panel and the ground. Resting the bottom rail on a 2x4 to keep it level while assembling the panel, will also make it easier to insert the pickets. 8. We do not recommend gluing post caps in the event you want to upgrade to a different style or need to replace batteries or wiring at a later time. Instead, use a small amount of clear silicone on the inside corner of post cap to secure the cap to the post. MAINTENANCE. Like all outdoor products, Vinyl Fencing will have dirt exposure from atmospheric conditions. Ordinarily, normal rainfall will be adequate to wash the Vinyl . If a more thorough cleaning is required, follow these simple instructions: 1.
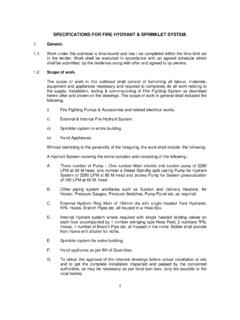
4 To clean the fence, simply wash it down with soap and water. 2. For hard to remove dirt, clean the fence using a formula of 1/3 cup powdered detergent, 2/3 cup household cleaner and 1 gallon water. Rinse thoroughly. 3. For stain removal, you may use lacquer thinner or soft scrub with bleach. Do not scrub vigorously as this may damage the finish. Be sure to rinse thoroughly with water immediately after using either of these. We're happy to help. Call 1-855-224-9761. 2. Layout & Post Installation Layout & Post Installation Figure 1 e 1. Line Stake Step 1 The location of your gate will determine the layout Paint a mark at post centers of the posts for the fence line. The width of your gate will determine the spacing between your gate posts. String line It is important to assemble your gate first since the gate width combined with the space needed for your gate hardware to function correctly will determine 5" posts require a 12" diameter the distance between the gate posts.
5 The hole that is 30" to 36" deep. Use instructions on pages 5-6 will show you how to two 80lb. bags of concrete assemble your gate and determine the spacing 4" posts require a 10" diameter needed for your gate hardware. hole that is 30" to 36" deep. Use two 60lb. bags of concrete Step Step 22 To make sure your fence run is straight, install line stakes and run a string line. The string line should be positioned on the side of the posts and be very tight. String line Step 3 Use a tape measure and mark the location for each post. Most posts are to be installed 72" or 96" from center of post to center of post. Tip: The width of all of our fence panels can be reduced. Step 4 Remove the string line, leaving the stakes and dig the post holes. If installing with concrete, 5" posts will need a 12" diameter hole.
6 4" posts will need 10". diameter hole. The recommended depth of holes is 30" - 36" (40" for 8' tall Fencing ). Tip: If installing with Fast2K concrete alternative, 5 . posts will need a 8 diameter hole and 4 posts will The inside of each post is marked to need a 6" in diameter hole. We recommend the depth identify the specific post definition: of the holes will still be 30"-36". Line Posts - no marking End Posts - red dots Step 5 Next, re-attach the string line to the stakes and place a Corner Posts - green dots post in each hole. As you set the posts, use the string Custom Posts - marked custom line to ensure the fence line is straight (see figure 1). Blank Posts - marked blank Finally, mix the concrete and fill the hole around the Step 6 post with concrete to 3" below ground level ensuring that the post is level and plumb.
7 Best practice is to use two 80 lb. bags of Quickcrete for each 5" post or two 60. lb. bags for each 4" post. Figure 2. Notch Tape TIPS: Drilling a hole (1/4" bit) in the middle of the underside of each rail will allow water to escape. Ribs Concrete or aluminum insert (22" above ground minimum). ADDITIONAL STEPS REQUIRED FOR FENCES. OVER 6' TALL OR HIGH WIND AREAS String Line 2" recommended height off the ground If your fence is over 6' tall or located in a high wind area, you must reinforce the post with either concrete or an aluminum insert to at least 22" above grade. If you choose concrete, fill 3 of soil 30 - 36 . the inside of the post AFTER THE PANELS ARE INSTALLED. Prior to installing the panels into the posts, tape the lower rail Concrete to prevent concrete backflow.
8 If using aluminum inserts, be sure to install them prior to installing the panels. For additional Concrete Hole high wind Installation instructions, please see page 13. We're happy to help. Call 1-855-224-9761. 3. Layout & Post Installation Stepping vs Racking Stepping Racking The Stepping Installation Method Each individual fence style is able to accommodate a defined degree of slope (x inches over x feet). While most yards are fairly level and allow for normal Installation , prior to purchasing your fence, be sure to run a string line to determine the slope of your yard. After determining the slope of your yard, check the spec diagram for your specific style of fence to ensure that it can accommodate the required slope. If you have inclines steeper than the slope allowed for you specific fence style, stepping the fence may be the best method of Installation .
9 You must determine the method of Installation before purchasing as the Installation method will impact the materials required to complete your project. There are several options when installing using the stepping method: Option 1 Use end posts in place of line posts and cut the holes in the blank side of the post (we recommend using a rotozip or dremel tool. Option 2 Use end posts in place of line posts and install u-mount rail brackets of the blank side of the posts at the required height. Option 3 Use blank posts and install u-mount rail brackets on both sides of the posts. IMPORTANT TIPS: 1. Steeper inclines may require longer posts. 2. If installing with u-mount rail brackets, the rails will need to be shortened since they will not be inserted into the posts. 3. Install one panel and one post at a time.)
10 We're happy to help. Call 1-855-224-9761. 4. Gate Assembly Step 1 Step 2. Always start by doing a "Dry Once assembly is complete, Fit" test. Do not use glue for measure to confirm the gate is the initial "Dry Fit" assembly. the same width on the top and This allows for any necessary bottom. adjustments. (Hint: If you have a privacy fence be sure to remember to install the 1 2 3 4 5 6 7 8 9 10 11 12 13 14 15 16 17. u-channels). Step 3 Step 4. Cross measure the gate Leaving the panel assembled, diagonally both ways to make 1 carefully remove the rails from sure the measurements are 2. the socket posts. Turn the first 3. 4. 5. 6. the same or within an 1/8" socket post up and run a 1/8". 7. 8. 9. 10. difference. Be sure to read the 11. bead of Vinyl glue (included). 12. 13. 14.