Transcription of Windows 7: Ethernet Installation - Epilog Laser
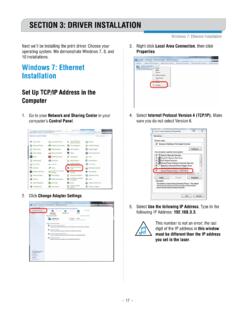
1 - 19 - Windows 7: Ethernet InstallationSECTION 3: DRIVER INSTALLATIONNext we ll be installing the print driver. Choose your operating system. We demonstrate Windows 7, 8, and 10 installations. Windows 7: Ethernet InstallationSet Up TCP/IP Address in the ComputerIn this step we ll be setting the IP address in the computer to a number different than the Laser s IP Go to your Network and Sharing Center in your computer s Control Panel. 2. Click Change Adapter Settings. 3. Right click Local Area Connection, then click Select Internet Protocol Version 4 (TCP/IP). Make sure you do not select Version Select Use the following IP Address. Type in the following IP Address: This number is not an error; the last digit of the IP address in this window must be different than the IP address you set in the Laser .
2 - 20 - Windows 7: Ethernet InstallationSECTION 3: DRIVER INSTALLATIONYou can also download the latest driver from Go to Devices and Printers on your computer and click Add a Printer to start the process. 3. Click Add a local printer. 4. Click Create New Port, then click on the drop-down menu and select Standard TCP/IP Port, then click Enter the IP Address to match the IP Address you set at the Laser in Setting the IP Address on page 16. Most Epilog users will use the IP Address of , which is what we use in this document. After typing in the IP Address, click Next. Wait while the computer identifies the Type in a Subnet Mask of , then click the Driver1. Insert the Driver CD in the computer and select your Laser system. 2. Select the Dashboard 21 - Windows 7: Ethernet InstallationSECTION 3: DRIVER INSTALLATION6.
3 Select Custom and then Set Protocol to LPR. This is a very important step. Your download time will increase significantly if LPR is not selected. Type Legend into the Queue Name, then click Click Next. 9. Click Have Click Browse and go to the folder where you saved the driver and click Open. (The default location is c:/zing_driver.)11. Click EpilogWinALL file and click Open. 12. Click 22 - Windows 7: Ethernet InstallationSECTION 3: DRIVER INSTALLATION13. Click Click Replace the current driver if requested, then click Next. 15. You can rename your printer here. We have not changed it for this document, but many users like to associate the driver name with the IP Address they are using, for example Epilog Helix This is especially helpful if there is more than one Laser connected to a single computer.
4 Click If you see this screen, click Click Next. 18. Click Finish and your driver is installed. 19. You must now restart your computer before you continue. - 23 - Windows 7: USB InstallationSECTION 3: DRIVER INSTALLATIONW indows 7: USB InstallationPlease follow these instructions closely! Using a different process to install the Dashboard driver is likely to fail if you are using Windows Insert the Epilog driver install disc into your computer (or download the files from the website). One of the following screens will appear. For the USB Installation , you will want to close them. We do not want the computer to automatically try to install the driver. 2. With the power of your Laser turned off, connect the USB cable to your computer and your Power on your Laser system.
5 It will take about a minute for the Laser to initialize. After it initializes it will start the process of installing the driver. You will see activity on the USB icon in your system tray (lower right corner of your computer screen).4. A small window will appear in the lower right corner of your computer screen that indicates Installation was successful. This is only partially After a short wait you will see another small window that indicates the Installation was not successful. This is what we hope to see and will lead us to the next step in the process. If your computer is connected to the Internet, it will take a few minutes for your computer to display these Windows . Please be patient during this process and let the computer finish trying to install the drivers . Interrupting the computer at this point will require you to restart the After the failure notification, go to the Windows start key (lower left corner of your computer screen).
6 Click Devices and 24 - Windows 7: USB InstallationSECTION 3: DRIVER INSTALLATION7. Right click on the Zing Laser icon. Then click Select the Hardware Select the device EpilogEngraver then click Click Change Click the Driver Click Update 25 - Windows 7: USB InstallationSECTION 3: DRIVER INSTALLATION13. Click Browse my Computer for driver Use the Browse key to direct your computer to your disc drive that contains the Epilog driver disc that you inserted earlier in this process. (You can also download the latest driver from ) 15. For this document we show the DVD RW drive as the drive where the disc is located. 16. Once you have the proper disc drive showing click on the Next The progress window will If you see this screen, click Your Epilog Laser Dashboard print driver has been successfully installed on the USB port.
7 Click Click Close in the next window and then Close again. You will then see your Laser driver in the Devices and Printers page. Click on the red X in the upper right corner of this page. That s it! You are ready to print to your 26 - Windows 8 and 10: Ethernet InstallationSECTION 3: DRIVER INSTALLATIONW indows 8 and 10: Ethernet InstallationSet Up TCP/IP Address in the ComputerIn this step we ll be setting the IP address in the computer to a number different than the Laser s IP Go to your Network and Sharing Center in your computer s Control Panel. 2. Click Change Adapter Settings. 3. Right click Local Area Connection, then click Select Internet Protocol Version 4 (TCP/IP). Make sure you do not select Version Select Use the following IP Address. Type in the following IP Address: This number is not an error; the last digit of the IP address in this window must be different than the IP address you set in the Laser .
8 - 27 - Windows 8 and 10: Ethernet InstallationSECTION 3: DRIVER INSTALLATION6. Type in a Subnet Mask of , then click the Driver1. Insert the Driver CD in the computer and select your Laser Select the Dashboard Driver. You can also download the latest driver from Go to Devices and Printers on your computer and click Add a Printer to start the process. 3. Windows 8 and have different paths. Choose your operating system: In Windows 8: In Windows and 10: Select The printer that I want isn t listed. Click Add a local printer or network printer with manual settings. Click 28 - Windows 8 and 10: Ethernet InstallationSECTION 3: DRIVER INSTALLATION4. Select Create a new port, then Standard TCP/IP Port. Click Enter the IP Address to match the IP Address you set at the Laser in Setting the IP Address on page 16.
9 Most Epilog users will use the IP Address of , which is what we use in this document. After typing in the IP Address, click Next. Wait while the computer identifies the Select Custom, then Set Protocol to LPR. This is a very important step. Your download time will be greatly increased if LPR is not selected. Type Legend into the Queue Name and click Click Click Have 29 - Windows 8 and 10: Ethernet InstallationSECTION 3: DRIVER INSTALLATION10. Click Browse, browse to the folder where you saved the download. The default location is c:\ Click EpilogWinALL file and click Open. 12. Click Click Click Replace the current driver if requested and click You can rename your printer here. We have not changed it for this document, but many users like to associate the driver name with the IP Address they are using, especially if there is more than one Laser connected to a single computer.
10 For example, we might rename the driver Helix Click Next. - 30 - Windows 8 and 10: USB InstallationSECTION 3: DRIVER INSTALLATION16. If you see this page, click Always trust software from Epilog Corporation then Install. 17. Click Click Finish and your driver is installed. 19. You must now restart your computer before you print to the Laser . Windows 8 and 10: USB InstallationWindows 8 will not automatically walk you through the Installation process so it is important to follow the instructions Insert the Epilog driver install disc into your computer (or download the files from the website). One of the following screens will appear. For the USB Installation , you will want to close them. We do not want the computer to automatically try to install the driver. 2. With the power of your Laser turned off, connect the USB cable to your computer and your Power on your computer, then connect the USB cable to your computer and your Power on your Laser system.