Transcription of Wireless Installing your dimmer Installation for lights ...
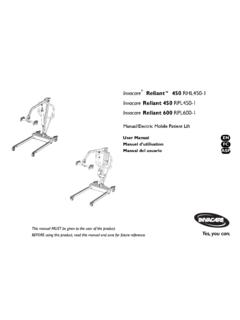
1 Wireless Installing your dimmer Installation for lights with one wall switch (single pole). quick-start guide 1 Turn power off at circuit breaker! 2 Remove existing switch from wall 3 Remove side sections (if necessary) 4 Connect the dimmer 6 Attach the wallplate CAUTION. Use only with permanently installed xtures with dimmable LED, dimmable CFL, halogen, or In-wall dimmer Remove the wallplate from switch. incandescent,lamps. To avoid overheating and Attach the adapter to the dimmer using the 3 possible damage to other equipment, do not use screws provided and snap on the wallplate. Welcome and thank you for purchasing a Cas taTM to control receptacles, motor-driven appliances, Wireless in-wall dimmer . In order to control your lights or transformer-supplied appliances. from an app or remote, you'll need to replace an existing 2. 1. OFF. switch with a Cas taT Wireless in-wall dimmer . Codes 1 Install in accordance with all national and local Bend back 1 electrical codes.
2 Before you install the dimmer , please watch the Installation video at and forth. Ground WARNING: SHOCK HAZARD 2 Grounding May result in serious injury or death. Turn off When no grounding means exist in wallbox, the We hope you enjoy the convenience of Cas taTM Wireless ! power at circuit breaker or fuse before Installing . National Electrical Code (NEC ) allows a control to Double your warranty Remove the switch and pull it away from the wall. Do not remove outside side sections 1 Connect the bare copper (or green) ground wire be installed as a replacement if 1) a nonmetallic, on dimmers at the end of gang. 2 noncombustible faceplate is used with nonmetallic Love Cas taTM Wireless dimmers? Have ideas from the wallbox to the green wire on the dimmer for making them better? Tell us what you think using a wire connector. 3 attachment screws or 2) the circuit is protected by a and we'll extend your warranty by 1 year.
3 Ground fault circuit interrupter (GFCI). When Installing snap' a control according to these methods, cap or remove 3 2 Connect either of the remaining wires from the wallbox to either of the remaining wires on the green wire before screwing control into wallbox. dimmer using a second wire connector. FCC/IC Information This device complies with part 15 of the FCC Rules and Industry Canada 3 Connect the remaining wire from the wall to license-exempt RSS standard(s). Operation is subject to the following two the remaining wire on the dimmer using a third conditions: (1) This device may not cause interference, and (2) this device must accept any interference, including interference that may cause undesired 4 wire connector. Contents supplied Each dimmer dimmer at middle has all operation. Modi cations not expressly approved by Lutron Electronics Co., Inc. could void the user's authority to operate this equipment.
4 Note: This equipment has been tested and found to comply with the limits for In-wall dimmer Disconnect all three wires* from the switch. has inside side side sections removed. a Class B digital device, pursuant to part 15 of the FCC Rules. These limits are designed to provide reasonable protection against harmful interference (PD-6 WCL) sections removed. in a residential Installation . This equipment generates, uses and can radiate 5 radio frequency energy and, if not installed and used in accordance with the instructions, may cause harmful interference to radio communications. However, there is no guarantee that interference will not occur in a particular Important note: 6 Important note: (If you installed the dimmer next to other dimmers Installation . If this equipment does cause harmful interference to radio or 5. television reception, which can be determined by turning the equipment off Mount the dimmer or switches, you'll need to install a wallplate with the and on, the user is encouraged to try to correct the interference by one or Removing side sections reduces the dimmer 's Some lights have one wall switch, while others correct size/number of openings to accommodate all more of the following measures: maximum wattage rating.)
5 See the chart below Reorient or relocate the receiving antenna. have two or more wall switches (such as stair lights , for maximum wattage information. the devices.) Increase the separation between the equipment and receiver. which have a switch at both the top and bottom of Connect the equipment into an outlet on a circuit different from that to which the receiver is connected. Wire connectors (3) Screws (2) the stairs). We've included instructions for lights with Ground Maximum* wattage derating chart one wall switch (called a single pole). If your light has more than one switch (called a 3-way), please visit 7 (120 V~ 50/60 Hz). Side sections Use the screws provided. 7 Turn power on at circuit breaker Consult the dealer or an experienced radio/TV technician for help. for complete None 1 side 2 sides removed Installation instructions and how-to videos. LED & CFL 150 W 150 W 150 W. 1 Warranty Tools you'll need or * For warranty information, please visit Flat-head screwdriver Pliers Incandescent & 600 W 500 W 400 W.
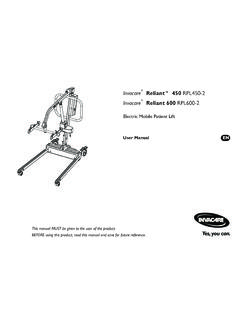
6 Halogen ON. Phillips-head screwdriver Ground 2. * If your switch has more than 3 wires attached, see * For maximum wattage information when Installing Cas ta Wireless in a 3-way switch application mixing light bulb types see video at P/N 0301729 REV B. Works with energy ef cient Using your Cas taT Wireless kit (sold separately) Using your controls Troubleshooting Symptoms Probable cause and action dimmable light bulbs: Light does not Light bulb(s) burned out. With a smartphone or tablet (Bridge required, sold separately) Without a smartphone or tablet (Bridge not required) turn on or in-wall Breaker is OFF or tripped. LED up to 150 W dimmer LEDs do The Cas taT Wireless dimmer can be controlled from a smartphone Light not properly installed. when used with the LutronR Smart BridgeT. Pairing the dimmer and Changing the favorite light level not light up. Wiring error. CFL up to 150 W. If you are using the dimmer and remote control with the LutronR Pico remote control on the Pico remote control On FASSTM switch on the dimmer is Smart BridgeT follow the instructions below.
7 Lutron (sold separately) in the Off position. Halogen up to 600 W. Note: If you are using the dimmer and remote control with another manufacturer's bridge, please refer to that manufacturer's 1 Press and hold off button on dimmer Brighter (with raised icon). Darker Light does not respond to Pico . The dimmer failed to pair with Pico remote control; see instructions for set-up. You can use the round favorite remote control. Pairing the dimmer and Pico . LutronR Smart BridgeT button on the Pico remote Off remote control. LutronR app Incandescent up to 600 W Hold for 6 seconds control to recall a favorite light Favorite The dimmer is already at the FASS . until LEDs start level. We've set it to 50%, but you light level the Pico remote NOTE: You can mix and match dimmable LED and 1 Download the Lutron app Press and hold off button on dimmer blinking can change it to any level you like. Front Accessible Service Switch control is sending.
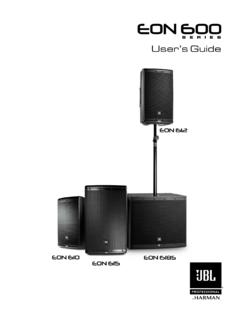
8 The Pico remote control CFLs, as well as halogen and incandescent light is outside the 30 ft (9 m). bulbs, with Cas taTM Wireless dimmers. 3 Set desired light level on dimmer In-wall dimmer operating range. The Pico remote control Dimmable LED and CFL light bulbs vary in their Search for Lutron Caseta . dimming performance. If you're using these battery is low. bulbs and they icker or turn off, please visit The Pico remote control for information battery is installed incorrectly. on adjusting the dimmer for best bulb performance. Replacing light bulbs using FASSTM. For a complete list of compatible dimmable LEDs Lutron Pull the FASSTM switch out on the in-wall dimmer to remove power at the light socket. Bulbs turn off while being Verify bulbs are marked dimmable and visit and CFLs, please visit Apple is a trademark of Apple Inc., registered in the and other countries. App Store is a service mark of Apple Inc.
9 Dimmed. 2 Press and hold off button on remote Bulbs turn on lowend for information on adjusting the dimmer for best Compatible light bulbs include: Cree 2 Launch the hold Press and Lutron app off button on remote Brighter On at high light level but do not bulb performance. turn on at a low BA19-08027 OMF-12DE26-1U100 Favorite CR6-575L Hold for 6 seconds Darker light level. EcoSmart until lights ash 3 times. Bulbs icker x3. ECS BR30 W27 FL 120. ECS 20 WW FL 50WE 120. Feit Lutron The Lutron app will walk you through setting up your devices. 4 Press and hold favorite button on remote Off or ash when dimmed to a low light level. A19/OM/LED Pico remote control (sold separately). Philips Go to for 9290002295 Hold for 6 seconds until LEDs additional troubleshooting suggestions. blink twice on in-wall dimmer . Sylvania . Repeat steps to pair other New favorite level is now saved. Important notes: LED12A19/DIM/O/827.
10 LED21 PAR38/DIM/P/930/FL30 Pico remote controls. 1. For indoor use only. x2 2. Operate between 32 F (0 C) and 104 F (40 C). 3 Press Use theand hold app Lutron off tobutton ALL remaining steps on remote complete Device Ratings Lutron, , and Pico are registered trademarks and FASS, Cas ta, and In-wall dimmer Smart Bridge are trademarks of Lutron Electronics Co., Inc. NEC is a Add devices Control Schedule Connect PD-6 WCL registered trademark of the National Fire Protection Association, Quincy, PicoR remotes three ways your lights while away Massachusetts. Google and the Google logo are registered trademarks of 120 V~ 50/60 Hz Google Inc., used with permission. Lutron Electronics Co., Inc. Dimmers 7200 Suter Road For advanced features, tips for using Cas taTM Wireless dimmers with CFLs and LEDs, the complete Cas taTM Wireless 2014 Lutron Electronics Co., Inc Coopersburg, PA 18036-1299, Shades product line, and more, please visit P/N 0301729 REV B.