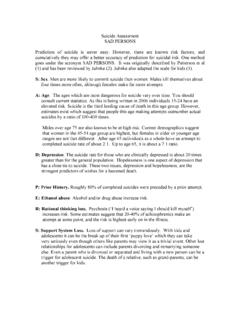
Transcription of Working with Documents in ProjectWise
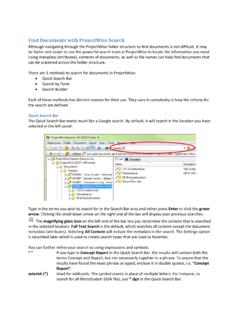
1 Working with Documents in ProjectWise Using ProjectWise is much like using Windows Explorer for storing and Working on Documents . Documents are stored in a folder structure and are associated with the appropriate application for opening and editing. ProjectWise provides much more useful information and functionality than Windows Explorer for your project Documents . There is a wide range of topics about Working with Documents in ProjectWise . This material focuses on the following areas of interest: Creating Documents Assigning document types document attributes Audit Trails Previewing Documents Exporting Creating Documents in ProjectWise There are several ways to create new Documents in ProjectWise .
2 You may save a new document created in an application, drag and drop it from Windows Explorer, or use the ProjectWise New document creation tools. Additional properties or attributes are applied to each document based upon its document type. The method of creating a document in ProjectWise determines how the document type is selected and applied. In certain applications such as Microsoft Office and Bentley products, it is good practice to launch the application, create a new file and then save it into ProjectWise . These applications are fully integrated with ProjectWise so they will always prompt you to save to ProjectWise first.
3 The drawback of creating Documents like this is that you are not prompted for a document type to apply to the new file. An additional step is required to assign the document type, which is explained in the next topic. You may also use the drag and drop method of adding Documents into ProjectWise . Files that are stored outside of ProjectWise can be dragged into the appropriate folder in ProjectWise . You can drag in multiple files simultaneously. You will see a document Info window pop up with three pick list menus for document Group, document Category and document Type.
4 After entering the appropriate information in those pick list menus for your document , you will be prompted to Select a Wizard. Note: If you have checked the box in the past to make one of the wizards the default, this window will not display but your default choice will be used. Selecting No Wizard will just import the document into ProjectWise and not ask for any further information. You will need to open the document Properties (right click on the document and select Properties or select the document and hit the spacebar) to fill in specific document attributes based upon the document type.
5 Selecting Advanced Wizard will step you through several screens of information you need to enter. This is the recommended wizard. The first screen sets the location. It will default to the folder where the document was dropped, but you may change it if that location was incorrect. Click Next. The next screen sets the template to use for the new ProjectWise document . The file you dropped into ProjectWise is automatically selected as the template. Click Next. The next screen displays the document Attributes. The specific attributes shown and the layout of them is based upon the document type selected earlier.
6 The document Group, document Category and document Type fields may be blank but do not fill them in at this time. They will be automatically filled in upon completion of the wizard. The information under the Project Properties heading is automatically filled in from other databases such as TPro and TrnsPort. You should fill in any field listed under the document Properties area on this screen if that information is known. You can always come back to these attributes later using document Properties. Click Next when complete. Do Not Fill In Fill In if Known The next screen gives you the opportunity to rename the document , give it a description, and set an original version name if desired.
7 The Application pick list should automatically choose the appropriate software to use when the document is opened for viewing or editing. Click Next when complete. The next screen displays the summary of all the choices made on previous screens. When you click Next here, the document will be created. The final screen displays the success of the document creation. Click Finish to complete the wizard. Note: If multiple files are dragged into ProjectWise , the same document type will be applied to all of them, so select your group to drag in wisely.
8 The last method of creating Documents in ProjectWise is using the built in tools in ProjectWise Explorer. This method is not recommended since this will only create a database record for the document . The actual file itself would still need to be created using one of the methods above and then a link would need to be created between the new document and the file. Assigning document Types If a document was created in ProjectWise directly from an application, such as Microsoft Office or any Bentley products, you were not given the opportunity to assign a document type.
9 You can assign the document type after the document is in ProjectWise by selecting the document in ProjectWise Explorer, right click on it, and select Assign document Type. The document Info tool will appear with the three pick list menus for document Group, document Category, and document Type. Select the appropriate values and click OK. The Assign document Type tool can be used on any existing Documents in ProjectWise , such as Documents in pilot projects that were in place prior to the availability of the tool. It can also be used to change a document from one type to another if needed.
10 The tool can be used to set the document Type for multiple Documents simultaneously. Select the set of Documents you wish to assign a type, right click, and select Assign document Type. The choices made in the document Info pick lists will be applied to all of the Documents in your selection. document Attributes Each document type has a specific set of attributes. If you created Documents using the Advanced Wizard as explained above, you were prompted to input the attributes for the document during creation. You can always view and edit the document Attributes any time in ProjectWise by looking at the document Properties.