
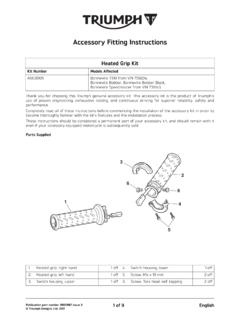
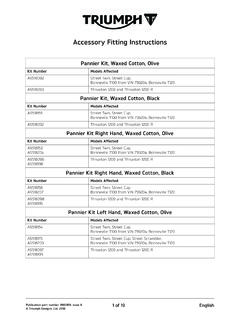
Accessory Fitting Instructions
6 of 15 3. Fit the bracket, with the brace bar facing toward the front of the motorcycle and secure using the M6 x 16 mm screws from the kit. Tighten the
Download Accessory Fitting Instructions

Information
Domain:
Source:
Link to this page:
Documents from same domain
Accessory Fitting Instructions
www.triumphinstructions.com3 of 9 6. Remove the two fixings and detach the switch housing from the clutch lever housing. Without disconnecting any wiring, move the switch housing clear of the clutch lever housing.
Accessory Fitting Instructions - Triumph …
www.triumphinstructions.com2 of 19 Thank you for choosing this Triumph genuine accessory kit. This accessory kit is the product of Triumph's use of proven engineering, exhaustive testing, and continuous striving for superior reliability, safety and

English Fitting Instructions: Speed Triple R, Speed …
www.triumphinstructions.com3 of 6 1. Read and note the eight-digit wheel sensor ID from each sensor label taking care to accurately identify the front and rear sensors. 1. Tyre pressure sensor

English Fitting Instructions: America and …
www.triumphinstructions.com4 of 14 Fitting Kit A9708237, A9708238 and A9838004 1. Disconnect the battery, negative (black) lead first. Note: • For Triumph Speedmaster, continue from step 2

English Fitting Instructions: Bonneville, Bonneville …
www.triumphinstructions.com4 of 4 America and Speedmaster 23. Position the right hand foot control plate to the mounting bar and secure with the new bolt supplied with the kit.

English Fitting Instructions: Tiger XR, Tiger XRT X, …
www.triumphinstructions.com1 of 10 English Publication part number A9900585 issue 11 © Triumph Designs Ltd. 2017 Fitting Instructions: Tiger XR, Tiger XRT, Tiger XRX, Tiger XC, Tiger XCA, Tiger …
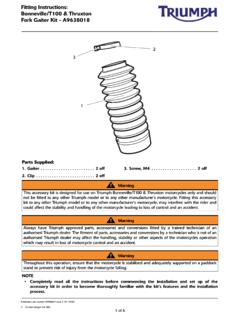
Fitting Instructions: Bonneville/T100 & Thruxton …
www.triumphinstructions.com2 of 6 1. Slacken and remove the front wheel spindle nut and washer. 1. Front wheel spindle fixings (Bonneville shown) 2. Slacken the spindle clamp bolt fitted to the right

English Fitting Instructions: Sprint GT 1050 A9808088
www.triumphinstructions.com3 of 7 Reed-switch Fitment 1. Position the motorcycle on a paddock stand. 2. Remove the seat as described in the owner’s handbook. 3. Disconnect the battery, negative (black) lead first.

Accessory Fitting Instructions - Triumph Instructions.com
www.triumphinstructions.com2 of 4 Note: • Triumph offers a broad range of approved genuine accessories for your motorcycle. We cannot therefore cover all possible equipment variations in these instructions.

Accessory Fitting Instructions - Triumph …
www.triumphinstructions.com4 of 7 Direction Indicator Relay (Not applicable to Street Triple R from VIN 793032, Street Triple R LRH, Street Triple RS, Explorer, Tiger 800 XRX, Tiger 800 XRX LRH, Tiger 800 XCX, Tiger 800 XRT, Tiger 800 XCA, Tiger 1200 models) 1.
Related documents

Tips to Help Install the HPOP Fitting Upgrade Kit
bulletproofdiesel.tvCAUTION: THE BRANCH TUBE ADAPTER MUST BE INSTALLED AT THE CORRECT DEPTH TO PREVENT HIGH PRESSURE OIL LEAKS. Install the branch tube adapter into the high-pressure oil pump by threading it five (5) complete turns to set proper depth and set

HOME-FLEX® Fitting Assembly
homeflex.comHOME-FLEX® CSST Fitting Assembly Troubleshooting Fitting Assembly and Correcting Leaks Step 1: Gradually tighten fitting until leak stops. Step 2: If leak does not stop after reaching maximum torque, stop, open the assembly and check: a. Proper fitting assembly. Make …
Pipe Fitters Handbook - pipe-valve-fitting.com
pipe-valve-fitting.comANVIL® PIPE FITTERS HANDBOOK 3 Gruvlok Installation Pipe and Flange Data Weld Fitting and Steel Flange Data Table of Contents Gruvlok Tech. Data
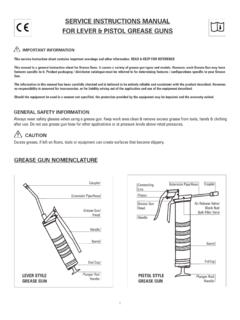
FOR LEVER & PISTOL GREASE GUNS
www.groz-tools.comSERVICE INSTRUCTIONS MANUAL FOR LEVER & PISTOL GREASE GUNS This service instruction sheet contains important warnings and other information. READ & KEEP FOR REFERENCE

Patio Door Fitting Instructions - Origin Aluminium
www.origingroup.co.zaInstallation Instructions for the Origin Patio Door Step 1 Make sure the opening is the correct size, plumb and square. Step 2 Assemble Outer Frame, ensuring Jamb Rails fit snugly into
Tighten fitting by hand, and then turn it 2 turns with a ...
www.websterfuelpumps.comSubject: Desired installation requirements for NPT pump connections. Use of non-hardening oil pipe dope is recommended on threads of all fittings. Do not loosen or ...