
Accessory Fitting Instructions
5 of 15 5. Fit the right hand rear footrest hanger from the kit with the original fixings and spacers provided. Position the spacers between the footrest
Download Accessory Fitting Instructions

Information
Domain:
Source:
Link to this page:
Documents from same domain
Accessory Fitting Instructions
www.triumphinstructions.com3 of 9 6. Remove the two fixings and detach the switch housing from the clutch lever housing. Without disconnecting any wiring, move the switch housing clear of the clutch lever housing.
Accessory Fitting Instructions - Triumph …
www.triumphinstructions.com2 of 19 Thank you for choosing this Triumph genuine accessory kit. This accessory kit is the product of Triumph's use of proven engineering, exhaustive testing, and continuous striving for superior reliability, safety and

English Fitting Instructions: Speed Triple R, Speed …
www.triumphinstructions.com3 of 6 1. Read and note the eight-digit wheel sensor ID from each sensor label taking care to accurately identify the front and rear sensors. 1. Tyre pressure sensor

English Fitting Instructions: America and …
www.triumphinstructions.com4 of 14 Fitting Kit A9708237, A9708238 and A9838004 1. Disconnect the battery, negative (black) lead first. Note: • For Triumph Speedmaster, continue from step 2

English Fitting Instructions: Bonneville, Bonneville …
www.triumphinstructions.com4 of 4 America and Speedmaster 23. Position the right hand foot control plate to the mounting bar and secure with the new bolt supplied with the kit.

English Fitting Instructions: Tiger XR, Tiger XRT X, …
www.triumphinstructions.com1 of 10 English Publication part number A9900585 issue 11 © Triumph Designs Ltd. 2017 Fitting Instructions: Tiger XR, Tiger XRT, Tiger XRX, Tiger XC, Tiger XCA, Tiger …
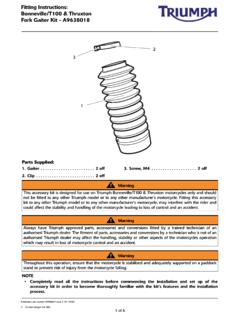
Fitting Instructions: Bonneville/T100 & Thruxton …
www.triumphinstructions.com2 of 6 1. Slacken and remove the front wheel spindle nut and washer. 1. Front wheel spindle fixings (Bonneville shown) 2. Slacken the spindle clamp bolt fitted to the right

English Fitting Instructions: Sprint GT 1050 A9808088
www.triumphinstructions.com3 of 7 Reed-switch Fitment 1. Position the motorcycle on a paddock stand. 2. Remove the seat as described in the owner’s handbook. 3. Disconnect the battery, negative (black) lead first.

Accessory Fitting Instructions - Triumph Instructions.com
www.triumphinstructions.com2 of 4 Note: • Triumph offers a broad range of approved genuine accessories for your motorcycle. We cannot therefore cover all possible equipment variations in these instructions.

Accessory Fitting Instructions - Triumph …
www.triumphinstructions.com4 of 7 Direction Indicator Relay (Not applicable to Street Triple R from VIN 793032, Street Triple R LRH, Street Triple RS, Explorer, Tiger 800 XRX, Tiger 800 XRX LRH, Tiger 800 XCX, Tiger 800 XRT, Tiger 800 XCA, Tiger 1200 models) 1.
Related documents
3267 Fasteners Guide 2016 UK v4a - RS Components
docs-europe.electrocomponents.com5 Can’t find what you need? We have over 9,000 fasteners, fixings, ironmongery and hardware products online Coach Bolts Threaded Rods Rivets Wall Plugs Masonry Anchors
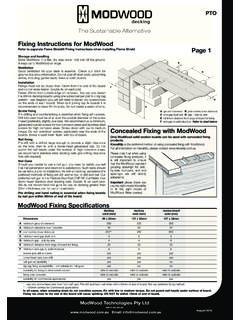
Fixing Instructions for ModWood Refer to separate …
www.modwood.com.auModWood thermal expansion properties – fixing tip ModWood Decking Fixing Instructions over concrete ModWood Screening Fixing Instructions The temperature of a ModWood board sitting in full sun on a warm to

screening - ModWood
www.modwood.com.auscreening Typical Fastenings used with ModWood Up to 23mm thick boards Fixing to timber - 8 gauge x 50mm countersunk head screws ^- 2.8mm x 50 mm dome head twist shank nails

Insulated Corrugated - SolarSpan
www.solarspan.com.auInsulRoof® Install Guide [page 3] Structure Preparation 1. Fit receiver channel to fascia using appropriate fasteners for the fascia type. (Tek screws for steel fascia, Type 17 screws
STANDARD PRODUCTS - Tigges
www.tigges.com.myTable of Contents ID-ii Find out more and place order at www.tigges.com.my Dimensions for brackets, clamps and rope fixings ..... 63 ± 65
Accessory Fitting Instructions
www.triumphinstructions.com3 of 9 6. Remove the two fixings and detach the switch housing from the clutch lever housing. Without disconnecting any wiring, move the switch housing clear of the clutch lever housing.

QUALITY FASTENERS FOR WINDOWS, DOORS & …
www.ukfasteners.co.ukUK FASTENERS. FOR QUALITY, SERVICE & PRICE. HELP & ADVICE Getting precisely the right quality product for the job makes a big difference. Through our experienced and