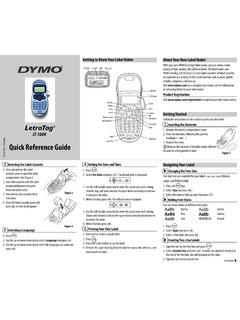
Quick Reference Guide - DYMO
1. Press . 2. Select Style and press . 3. Select a font style and press . Creating Two-Line Labels 1. Type the text for the first line and press . 2. Select Second Line and press . A multi-line symbol is inserted at the end of the first line, but will not print on the label. 3. Type the text for the second line. Selecting a Language 1. Press . 2.
Download Quick Reference Guide - DYMO

Information
Domain:
Source:
Link to this page:
Documents from same domain
User Guide - DYMO
download.dymo.comAbout the LabelWriter Printer 2 Top cover Label spool Label release Label feed path and tear bar Label roll Label guide Reverse label button Form-feed button
LabelWriter 450 Turbo
download.dymo.comLabelWriter ® 450 Turbo High-Speed Label and Postage Printer For PC and MAC® LabelWriter ® 450 Turbo Features: Print faster – and print postage 1 2 3 4 5 Eliminate the hassle of printing sheet labels through a desktop printer

LabelWriter 450 TwinTurbo - DYMO
download.dymo.comLabelWriter ® 450 TwinTurbo Dual Roll Label and Postage Printer For PC and MAC® LabelWriter ® 450 Twin Turbo Features: Double your label capacity and mailing efficiency 1 2 3 4 5

LabelWriter 450 Series Printers Technical …
download.dymo.comLabelWriter®. 450 Series Printers. Technical Reference Manual . Includes LabelWriter 450, LabelWriter 450 Turbo, LabelWriter 450 …

DYMO Label v.8.5
download.dymo.comDYMO Label v.8.5.4 . Read Me — 30 September 2016 . This document contains important information that is not included in any other DYMO Label documentation.

DYMO Label v.8.6
download.dymo.comDYMO Label v.8.6.1 . Read Me — 9 February 2017 . This document contains important information that is not included in any other DYMO Label documentation.
Quick Start Guide - DYMO
download.dymo.com5 4. Loading Labels To load a label roll 1 Press the form-feed button o ject lab ls at protected the printer during shipment. 2 Op en th op cover andremov ny packing ...
LM210D manual US cover1 - DYMO
download.dymo.com7 Using the Label Maker for the First Time The first time you turn on the power, you are asked to select the language. This selection will remain set until you change it, …

User Guide - DYMO
download.dymo.com4 Figure 1 RHINO 5200 Label Printer SHIFT SHIFT BKSP Feed Print/# of copies Escape Backspace Shift Size/CAPS Backlight Serialization Label exit …

LabelWriter 4XL Quick Start Guide - DYMO
download.dymo.com1 For complete information about your label printer, you can view the LabelWriter Printer User Guide from the DYMO Label v.8 Help menu or from the DYMO Web site at www.dymo…
Related documents

How to reduce paper consumption in your office - Panda
awsassets.panda.orgcoatings, plastic windows, bright colours including goldenrod, laser printer inks, adhesive products. 6) Use less paper by effectively using computers and other technology Today’s information and communication technologies provide many opportunities for businesses to function with far less paper. Electronic mail, Intranets, Internet and document

INSTRUCTION MANUAL
02d3287.netsolhost.com2. Turn on the camera and press the Wi-Fi button on the side of the device. The Wi-Fi logo will appear on the screen. 3. Using your smart device’s Wi-Fi settings, locate the camera’s Wi-Fi connection. It will appear as SPORTS DV followed by the camera’s serial number. The default password is 12345678. When you have successfully connected ...

User's Guide - L3210
files.support.epson.com• If you have trouble loading a stack of envelopes, press each envelope flat before loading it or load one envelope at a time. • Do not load envelopes that are curled, folded, or too thin, or that have plastic windows or exposed adhesive flaps. • Check the paper package for any additional loading instructions.

Cut and Press Settings for Products at Adhesive Vinyl
www.143vinyl.comSep 24, 2020 · Cut and Press Settings for Products at Heat Transfer Vinyl (HTV) Continued **These settings were tested on each machine by 143VINYL. Please keep in mind that each machine cuts differently based on sharpness of blade, state of mat, and other factors. Adjust cut and pressing settings and do test cuts as needed.** Last update: 9/24/20

Installation and Operation Guide ... - Consumer Products
www.honeywellstore.com1. Press and hold the Setting button on the doorbell for three seconds. The halo light will circle. 2. Press the push button. 3. Within 12 seconds of pressing the push button, press the Music button to select the ring for that push button. 4. Within 12 seconds of pressing the push button, press the Sunlight button to select a halo light color
Garmin Dash Cam™ Mini 2 Owner’s Manual
www8.garmin.com2 Remove the protective film from the mount adhesive. 3 Position the mount over the mounting location. TIP: The adhesive is extremely sticky. Avoid touching the adhesive to the windshield until the mount is properly positioned and aligned. 4 Press the mount firmly onto the windshield, and maintain pressure for 30 seconds.

GARMINOwner’s Manual DASH CAM MINI
www8.garmin.com2 Remove the protective film from the mount adhesive. 3 Position the mount over the mounting location. TIP: The adhesive is extremely sticky. Avoid touching the adhesive to the windshield until the mount is properly positioned and aligned. 4 Press the mount firmly onto the windshield, and maintain pressure for 30 seconds.