
Troubleshooting Guide
2—Sensor rod acknowledges pilot flame is present before releasing gas to the main burner for ignition. When a pilot flame engulfs the sensor rod it conducts electrical current from the sen-sor through the flame to ground in one direction, which acts …
Download Troubleshooting Guide

Information
Domain:
Source:
Link to this page:
Documents from same domain

The Finishing Touch - Hearth N Home
downloads.hearthnhome.comVerTical VenTing gas TerminaTion cap High Wind Vertical Termination Cap This rugged cap is built to withstand high wind speeds, without sacrificing drafting

Owner’s Manual - Hearth N Home
downloads.hearthnhome.com2 Heat & Glo • COSMO42-IFT, COSMO32-IFT Owner’s Manual • 2491-981 Rev. E • 6/18 Listing Label Information/Location A. This Congratulations
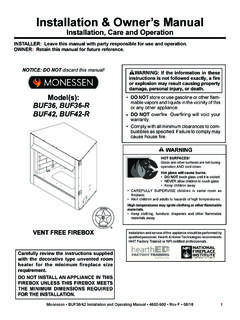
Installation & Owner’s Manual - Hearth N Home
downloads.hearthnhome.comInstallation & Owner’s Manual Installation, Care and Operation INSTALLER: Leave this manual with party responsible for use and operation. OWNER: Retain this manual for future reference.
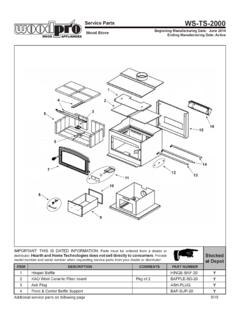
Service Parts WS-TS-2000 - Hearth N Home
downloads.hearthnhome.comService Parts Beginning Manufacturing Date: June 2014 Ending Manufacturing Date: Active WS-TS-2000 IMPORTANT: THIS IS DATED INFORMATION.Parts must …
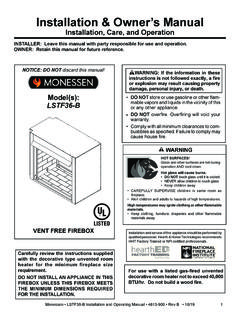
Installation & Owner’s Manual - downloads.hearthnhome.com
downloads.hearthnhome.comInstallation & Owner’s Manual Installation, Care, and Operation INSTALLER: Leave this manual with party responsible for use and operation. OWNER: Retain this manual for future reference.

Installation & Owner’s Manual - downloads.hearthnhome.com
downloads.hearthnhome.comInstallation & Owner’s Manual Installation, Care and Operation INSTALLER: Leave this manual with party responsible for use and operation. OWNER: Retain this manual for future reference.

JADE 42 - downloads.hearthnhome.com
downloads.hearthnhome.comSpecifications JADE42 MAJ_JADE42_1018 Lakeville, MN Phone: (800) 927-6841 Web: www.majesticproducts.com Product information provided is not complete and is subject to change

JADE SERIES - downloads.hearthnhome.com
downloads.hearthnhome.comThe Jade fireplace helps you unwind and rebalance with a ribbon of continuous flame and a soothing style. With its great looks, many features, easy operation and the reliability of Majestic, life is better. Sit back, relax and enjoy your home with the Jade fireplace from Majestic.
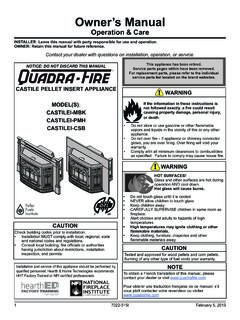
Owner’s Manual - downloads.hearthnhome.com
downloads.hearthnhome.comINSTALLER: Leave this manual with party responsible for use and operation. OWNER: Retain this manual for future reference. Contact your dealer with questions on installation, operation, or service.

Installation Manual - downloads.hearthnhome.com
downloads.hearthnhome.com3 Heat & Glo • MEO36-BST-B, MEO48-BST-B, MEO60-BST-B, MEO72-BST-B Installation Manual • 2300-973 Rev R • 1218 Installation Standard Work Checklist
Related documents

Splendide
www.splendide.com1. Door Switch Test 41 2. Power “in” from the Surge Protector Test 42 3. Pressure Switch Test 43 4. Heating Element Test 44 5. Main Motor Test (Includes Running the Main Motor with AC Voltage) 45 6. Fan Motor / Water Pump Test 46 7. Water Valve / Wash NTC Test 47 8. Control Panel Board Test 48 9. Dry NTC Sensor Test 49 6.

Hall Effect Experiment Manual
d2n0lz049icia2.cloudfront.net14 2-Axis Magnetic Field Sensor PS-2162 1 ... • Do not defeat power cord safety ground feature. • Plug in to a grounded (earthed) outlet. • Do not use product in any manner not specified by the manufacturer. ... • Power switch: Turns the power to the instrument ON or OFF.

Instruction Manual - LMIPumpCatalog.com
lmipumpcatalog.comlevel float switch plus manual control adjustments of control code 1 External control capability through 4-20 mA input and low level float switch plus manual control adjustments of control code 1 See Most Recent Price List for Flow and Pressure Ratings 1 – 110-120V US Plug 2 – 220-240V US Plug 3 – 220-240V DIN Plug 4 – 220-240V Israel Plug

Radio Technology Somfy® Pocket Programming Guide
service.somfy.com1 How Does It Work? Simply press a button on a remote control or wall switch and window coverings move with ease. There is no need to point or …

Decora Wall Switch PIR Occupancy Sensor - Leviton
www.leviton.comODS10-ID Decora Wall Switch Occupancy Sensor G-8333D/K17-aa REV NOV 2017 INSTALLATION The ODS10-ID may replace a single-pole wall switch mounted in a standard wallbox. The unit must be properly grounded in order to operate. The unit’s integral blinders may be used to restrict the field-of-view to prevent unwanted detection of hallway traffic.

Isolation in Electric Vehicle Systems Quick Reference
www.skyworksinc.comloading. The return, or ground, for the low-voltage side is normally connected to the vehicle chassis, so galvanic isolation between the low-voltage side and high-voltage side is required for safety as well as for protection of the LV controller. Isolation between the HV input and the LV output of the converter is accomplished using a transformer.

12K OUTDOOR - solar-electric.com
www.solar-electric.comA. LCD Touch Screen F. Sensor Pin-Out Board B. Power Button G. Comms/Paralleling Ports C. PV DC Disconnect Switch H. AC Breakers (Grid 63A/Gen 50A/Load 63A) D. 250A Battery Breaker I. Neutral/Ground Bus Bar E. Battery Terminals (+/-) J. MPPT Charge Controllers

INSTALLER'S GUIDE
www.trane.comThe pressure switch is factory preset at .45" WC. After a failure situation is detected and corrected, reset the Zone Sensor service light. This is done by either setting the mode switch to "OFF" for 5 seconds, then back to the desired mode or by cycling the power "OFF" then "ON" at the unit disconnect switch.