Transcription of TOSHIBA IP5000-series Telephone Quick Reference Guide
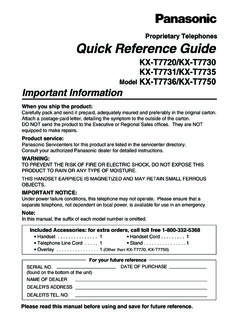
1 IP5000-series Telephone TOSHIBA Quick Reference Guide STRATA Business Telephones TM. CIX Helping You Communicate Better IP5000-series Telephones A. B. D. E. F M. G C. J. I H L K. 10 Programmable Feature Buttons 9-Line LCD. A. B. C. D. E. F. G. H. J. I K. 20 Programmable Feature Buttons 4-Line LCD. 2 Strata CIX IP5000-series Telephone Quick Reference Guide 05/08. A. B. D. C. E. F. G. H. J. I K. 10 Programmable Feature Buttons 4-Line LCD. Legend A. Status LED ( message and ringing). B. LCD Display C. Softkeys D. Programmable Feature Buttons E.
2 message Waiting LED Button F. Microphone LED Button G. Speaker LED Button H. Volume I. Hold Button J. Microphone K. Tilt stand L. Navigation Key M. Toggle button Call Processing screen and HTML browser or Programming screens Strata CIX IP5000-series Telephone Quick Reference Guide 05/08 3. Personal Preferences To customize your Telephone , you can adjust the following settings. Volume Control To adjust handset volume During a call, press down Vol V or Vol W. When you hang up, volume returns to default. To adjust the speaker volume for internal/external calls and background music Press Spkr and use Vol V or Vol W to adjust volume level.
3 Press Spkr to exit. To adjust Ring Tone, Handsfree Answerback and Speaker Off-hook Call Announce With an idle phone and handset on-hook, press Vol V or Vol W. LCD Contrast Available on backlit telephones. To adjust the LCD contrast on the backlit telephones 1. Press and hold down the Mic button. 2. Press and release Vol V or Vol W repeatedly. Note Holding down the Vol key does not continue to change the setting. The key must be pressed for each step of contrast change. Brightness Control To change the LCD back light brightness For the 4-line LCD telephones: 1.
4 Press Hold+3+6+9 (simultaneously). 2. To increase or decrease brightness, press Bright or Dim softkey on the Telephone . 3. Lift the handset off-hook / on-hook to save the settings. For the 9-line LCD telephones: 1. Press Hold+3+6+9 (simultaneously). 2. From the IP Configuration screen, press the W Others softkey. 3. Press the W BL Bright softkey. 4. Enter a number 0:Dim - 3:Bright. 5. Press W Set softkey twice to return to the IP Configurations screen. 6. Lift the handset off-hook / on-hook to save the settings. 4 Strata CIX IP5000-series Telephone Quick Reference Guide 05/08.
5 Backlight On / Off To change Backlight Settings For the 4-line LCD telephones: 1. Press Hold+3+6+9 (simultaneously). 2. Press the Mic button. 3. Press the Hold button to display the LCD Backlight Setting menu. 4. Press Feature Key 1 (FK1: located on the bottom left- hand side row of programmable buttons on the Telephone ). and choose from one of the selections below: Always Off: Press 1 followed by Hold, Hold Always On: Press 2 followed by Hold, Hold On Demand/Synchronized: Press 3 followed by Hold, Hold On Demand/Synchronized setting turns the backlight on when there is any activity on the Telephone , and then keeps the backlight on for 30 seconds (default setting).
6 When On Demand/Synchronized is selected the following steps can be completed to customize the backlight timer: Note From an idle phone perform steps 1~3 first. 5. Press FK2 (located directly above FK1) to display Backlight Timer menu. 6. Enter 2 digit value between 01 and 30 which represents 10 . 300 seconds respectively. 7. Press Hold, Hold to save your entry. 8. Lift the handset off hook / on hook to save settings. For the 9-line LCD telephones: 1. Press Hold+3+6+9 (simultaneously). 2. From the IP Configurations screen, press the W Others softkey.
7 3. Press W BL Mode. 4. Choose the softkey associated with the mode desired: W Always Off W Always On W On Demand 5. Press W Set softkey to save your changes. 6. If On-demand is chosen, press W BL Timer softkey to change the Backlight time, otherwise proceed to Step 8. 7. Enter a number from 1:min - 30:max. 8. Press W Set softkey two times to return to IP. Configurations. 9. Lift the handset off hook / on hook to save settings Strata CIX IP5000-series Telephone Quick Reference Guide 05/08 5. Quick Reference Features Below is a list of features to help you with basic Telephone functionality.
8 Making a Call Handset 1. To make a call, lift the handset, then dial the number. 2. When connected, you can continue to use the handset or switch to speakerphone by pressing Spkr and replacing the handset. Spkr Button 1. To make a call, press Spkr. 2. Dial the number. 3. When connected, you can continue to use the speakerphone or lift the handset and continue the conversation. Dial Directory 1. Press DIR soft key to access the Select Directory menu. 2. Choose the directory you wish to access and use the dial pad to enter the name. The soft keys on the Select Directory are: My = Personal Speed Dial Names EXTR= System Speed Dial Names INTR = Directory Number Names Dial = Cancel directory, get dial tone.
9 Press FIND to start the directory search. Press NEXT to move forward. Press BACK to move backwards. Press CALL to connect to the directory entry selected. Press CNCL to quit the directory search. Notes If a directory is not selected and a name is entered, all directories will be searched. To enter names from the dial pad, press the dial pad button associated with the letter to be entered. Press the button once for the first letter, twice for the second letter, etc. Left and Right Soft Keys are available to move the cursor. Answering a Call Incoming calls will ring on your Telephone and be accompanied by a green flashing PDN button (your extension button).
10 The status light on the top of your phone will also flash: RED for incoming external call GREEN for incoming internal call. Lift the handset or press Spkr. Note If you don't have Ringing Line Preference: press the flashing line or extension button and lift the handset. 6 Strata CIX IP5000-series Telephone Quick Reference Guide 05/08. Caller ID Button To scroll through a list of numbers that called your Telephone The following steps require your Telephone to have a programmed feature button for Caller ID. 1. Press the Caller ID button. 2.