Transcription of PowPak - Lutron Electronics
1 041588 Rev. A04/2017 PowPak | InstallationDimming Module with 0 10 VTestLinkCal.+For each system, ensure that you have:One PowPak Dimming ModuleAt least one Wireless TransmitterAt least one 0 10 V Fluorescent Ballast or LED DriverRequired ComponentsRadio Powr Savr Occupancy/Vacancy Sensor (10 maximum)Radio Powr Savr Daylight Sensor(1 maximum)Pico Remote Control(10 maximum)60 mA maximum for the control lines. Switches up to 8 A total. May be pre-installed in light : All drivers and ballasts used with Vive wireless controls must comply with the limits for a Class A device, pursuant to Part 15 of the FCC Dimming Module with 0 10 V (1 maximum)RaiseToggleLowerLoad Status LEDC onsult third-party 0 10 V fixtures installation guide for fixture-specific mounting and wiring best practices see Lutron Application Note #620 (P/N 048620).
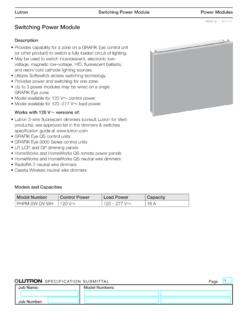
2 +Occupancy SensorsDaylight SensorWireless ControlsOccupied: All lights 100%.Unoccupied: All lights lights dim in response to lights 100%FavoriteAll lights 50%OffAll lights offDefault Functionality2 A PowPak Dimming Module with 0 10 V can be installed in a junction box or marshalling box using the conduit nut (provided) or with mounting screws (not provided). Please consult local and national electric codes for proper installing unit inside a junction box, please see Application Note #423 at B Once installed, energize the PowPak Dimming Module with 0 10 V.
3 C Use the Toggle button u to toggle between high-end and OFF to verify ballast wiring. D Use the Raise and Lower buttons to verify control Wireless Transmitters must be installed within 30 ft (9 m) of the PowPak Dimming Module with 0 10 10 V Control: 10 V- 60 mACompatible with ANSI 2001 (R2006), IEC 60929 Annex E120 / 277 V~ 50 / 60 Hz 8 ARMJS-8T-DV-BURMJS-8T-DV-BRadio Powr Savr Occupancy SensorPico Remote ControlPowPak Dimming Module30 ft (9 m) max40 ft (12 m)33 ft (10 m) PowPak Dimming ModuleInstall in center of room to maximize RF coverage.
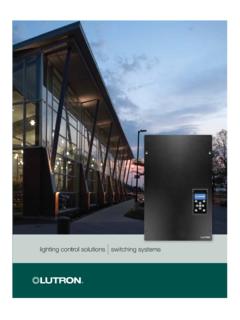
4 A Connect mains wiring (switched hot, neutral) to each fixture. B Connect 0 10 V control (+ and ) to each + NEUHOTC lass 2 MAINSF ixture EarthGreen/YellowTo additional 0 10 V fixturesNeutralSwitched Line/HotVioletGray+ WARNING! Shock Hazard. May result in serious injury or death. Turn off power at circuit breaker before installing the 2043 Plenum RatedSample ballast shownSwitched Line/Hot (Red) Line/Hot (Black)To Fixtures0 10 V to Fixtures*Neutral (White)+NeutralJunction Box1/2 in (21 mm) Knockout OpeningConduit Nut* Use 18 AWG to 16 AWG ( mm2 to mm2) solid wire onlyImportant Notes: Please read before installation by a qualified electrician in accordance with all local and national electrical codes.
5 Note: Use copper conductors only. Check to see that the device type and rating is suitable for the application. DO NOT install if product has any visible damage. If moisture or condensation is evident, allow the product to dry completely before installation. Operate between 32 F and 104 F (0 C and 40 C) ambient. 0% to 90% humidity, non-condensing. For indoor use for Replacement:RMxS and URMxS - the "S" model can replace the non-"S" modelLutron Electronics Co., Inc. 7200 Suter RoadCoopersburg, PA 18036-1299 USA Start with a Vive Hub3 Mount, Wire, and Install 0 10 V Devices and Lighting FixturesConsult third-party device installation guideInstall PowPak Dimming Module with 0 10 VSuggested Installation Location: Center of room to ensure proper RF coverage of area.
6 A Use a smart device to configure the Vive hub. B Open the Wi-Fi setting on the smart device and select the network that is similar to Vive-1a2b3c. C Open a Safari or ChromeTM browser on the smart device. Type in the address bar. D Follow the instructions on the screen to set up your system. Note: For further information on set up, programming, and troubleshooting with a Vive system, please refer to the installation instructions included with the Vive hub or visit Note: For programming the PowPak Dimming Module without a Vive hub see reverse Assistance cannot be controlled locally from PowPak Dimming Module with 0 10 V.
7 Ensure that the breaker(s) to the PowPak Dimming Module with 0 10 V are energized. Ensure that the PowPak Dimming Module with 0 10 V switched hot lead is wired to the lighting fixture(s). Ensure that the PowPak Dimming Module with 0 10 V control lines are wired to the lighting fixture(s). Reset to factory do not dim as expected. Ensure that 0 10 V control lines are wired properly. Ensure that fixture does not require an inverted signal (10 0 V control).Lights do not respond to Wireless Transmitter(s). Ensure that the breaker(s) to the PowPak Dimming Module with 0 10 V and ballasts are energized.
8 Ensure that Wireless Transmitters are associated to the PowPak Dimming Module with 0 10 V. Reset to factory are unstable at low-end or flash/flicker at turn-on or turn-off. Adjust low-end Transmitter(s) cannot be associated to PowPak Dimming Module with 0 10 V. The maximum number of Wireless Transmitters have been associated to the PowPak Dimming Module with 0 10 V. To remove a previously set up Wireless Transmitter, tap a Wireless Transmitter button three times; on the third tap hold for three seconds and then tap three more Rev.
9 A 04/2017 Part of the Vive FamilyPowPak | InstallationProgramming without a Vive HubDimming Module with 0 10 VPart of the Vive FamilyStart HereLutron, Pico, and PowPak are trademarks of Lutron Electronics Co., Inc., registered in the and other countries. Radio Powr Savr and Vive are trademarks of Lutron Electronics Co., Inc. Safari is a trademark of Apple Inc., registered in the and other countries. Chrome is a trademark of Google Inc. NEC is a registered trademark of the National Fire Protection Association, Quincy, Massachusetts.
10 2013 2017 Lutron Electronics Co., Inc. A On PowPak Dimming Module with 0 10 V, hold Toggle button u for 6 seconds until lights Load Status LED will beginflashing twice per Wireless Transmitters to PowPak Dimming Module with 0 10 V Before beginning this step, make sure that there are no other PowPak modules being set up within the same building. It is possible that wireless transmitters from other systems can be incorrectly associated to this C On PowPak Dimming Module with 0 10 V, hold Toggle button u for 6 seconds to save association.