Transcription of T500 Series Programmable Thermostats Product/Technical ...
1 FANs 216, Bulletin T500 Issue Date 0899 1999 Johnson Controls, No. 24-8347-35, Rev. No. LIT-216173T500 Series Thermostats provide an economicalcontrol solution for single-stage, multi-stage, or heatpump systems. Up to four event setpoints can beselected, as well as heat, cool, automatic changeover,and off are available in the following types:T500 HCP-1 (1 heat/1 cool), T500 HPP-1 (heat pump,3 heat/2 cool), T500 HPP-2 (heat pump, 1 heat/1 cool),T500 MSP-1 (2 heat/2 cool). Each thermostat ispackaged with the necessary mounting hardware, andinstallation is simple and fast for reduced 1: T500 Series Programmable ThermostatsFeatures and Benefits!!!!Low-Profile DesignComplements any decor!!!!No Batteries RequiredRetains scheduled events and temperaturesupon loss of power!!!!Lockable Access Cover andKeypad LockoutPrevents unauthorized changes!!!!Full Function Liquid CrystalDisplay (LCD)Makes controls easy to read, easy to use!!!!Remote Sensor TerminalsAllows the T500 thermostat to be mounted upto 300 m (1,000 ft) away from the controlledspace using a SEN-500-1 (sold separately)!
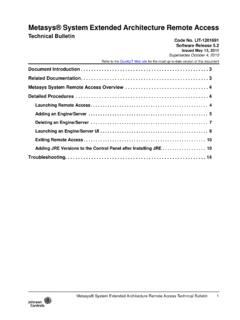
2 !!!Auxiliary OutputEnergizes for auxiliary equipment operation!!!!Fuzzy Logic ControlOptimizes control performance!!!!Smart Fan OptionProvides continous fan operation in theoccupied mode and intermittent operation atnightT500 Series Programmable Thermostats2 T500 Series Programmable Thermostats Product/Technical BulletinIntroductionThe T500 Thermostats use an adaptive control routine,based on fuzzy logic, to determine the heating orcooling load of the controlled space. The routinecalculates load by evaluating recent room conditionsand room reactions to heating and cooling. This load isused to determine the cycle rate of the equipment,giving optimal control of the Needed drill mm (3/16 in.) drill bit 3 mm (1/8 in.) flat-blade screwdriver hammer marking pencil wire stripper T500 MSP-1T500 HPP-1T500 HCP-1T500 HPP-2 Dimn11 (4-1/2)127 (5) (4) (7/8)Figure 2: T500 Dimensions, mm (in.)Location ConsiderationsLocate T500 thermostat as follows: on a partitioning interior wall, and m (5 ft) above the floor in a location of averagetemperature away from direct sunlight or radiant heat, outsidewalls or behind doors, air discharge grills,stairwells, or outside doors away from steam or water pipes, warm air stacks,unheated/uncooled areas, or sources of electricalinterference!
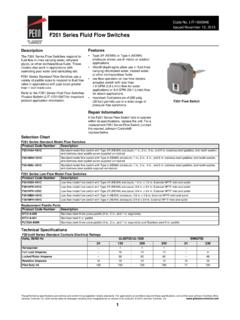
3 CAUTION:Shock power supply beforewiring connections are made toprevent electrical shock orpossible damage to and WiringNote:When replacing an existing thermostat,remove and use wire tags to identify install and wire the thermostat:1. Lift the thermostat cover and insert a small coininto the slot located in the bottom center of thethermostat case and twist 1/4 turn. (See Figure 3.)Grasp the base from the bottom two corners andseparate from the Swing the thermostat out from the bottom, and liftup and out of the base. Place the rectangularopening in the base over the equipment controlwires protruding from the wall and, using the baseas a template, mark the location of the twomounting holes. No leveling is Use the supplied anchors and screws for mountingon drywall or plaster. Drill two mm (3/16 in.)holes at the marked locations, tap nylon anchorsflush to wall surface, and fasten. (See Figure 4.)4. Connect the wires from the existing system to thethermostat terminals according to wiringdesignations in Table 2, Table 3, Table 4, orTable 5.
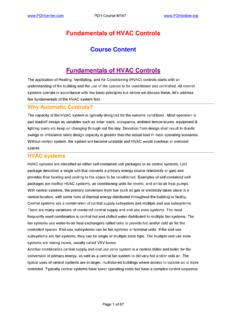
4 Push extra wire back into the wall. Wiresmust be flush to the plastic base. Plug hole with afireproof material to prevent drafts from affectingambient temperature Series Programmable Thermostats Product/Technical Bulletin 3!CAUTION:Equipment Damage applying power, make allwiring connections and checkthe connections. Short-circuitedor improperly connected wiresmay result in permanentdamage to the 3: Separating the T500 from the BaseFigure 4: Mounting the Base4 T500 Series Programmable Thermostats Product/Technical BulletinInstalling the Thermostat Cover LockIf desired, insert the plastic lock piece into the bottomof the mounted base. The ends of the lock pieceshould fit snugly under the lock pins extending from thebottom of the mounted base. The tab in the middle ofthe lock piece should extend downward from themounted base. (See Figure 5.)To release the locking mechanism, press the lockpiece up and into the base while gently prying open thethermostat at the same time. Use caution to avoidcracking the thermostat base or cover.
5 Thermostat BasePlastic Lock PinSnap plastic lock into 5: Installing the Thermostat LockReattaching the Thermostat and Coverto the Installed Base1. Position the thermostat inside the cover, andattach on the hinged tabs located at the top of Swing the thermostat and cover down, and presson the bottom center edge until they snap in place.(See Figure 6.)HingedTa b sFigure 6: Installing the T500 ThermostatT500 Series Programmable Thermostats Product/Technical Bulletin 5 DIP Switch Selections!CAUTION:Equipment Damage selecting a minimumon/off time, ensure theequipment can tolerate thefollowing maximum hourlycycle rates: cycles per hourwhen using 4-minute on/off, or15 cycles per hour when using2-minute 1: DIP Switch SelectionsDIP SwitchSwitchSelectionDescription1 OnAllows 2-event (day, night) 4-event (morning, day, evening, night) (Smart Fan)OnDuring the morning, day, and evening events, the fan automatically cycles with theequipment or runs continuously if the Fan button is pressed.
6 To run continuously, theFan button need only be pressed once during the morning, day, or evening eventafter programming the thermostat. Smart Fan remembers that the fan should runcontinuously during these events after the night event, the fan automatically cycles with the equipment by the Fan button during the night event overrides and causes the fan to runcontinuously for that night the end of the night event, Smart Fan remembers the fan selection (automaticcycling or continuous fan) for the morning, day, and evening events and reverts the fan to cycle with equipment or run continuously if the Fan button ispressed, regardless of the event. Changing between events does not affect the 2-minute minimum on/off time for heating and cooling 4-minute minimum on/off time for heating and cooling the keyboard, disabling buttons to prevent tampering. (Only the Outdoor and and buttons will function. See Programming the Thermostat, MakingProgramming Changes While the Keyboard is Locked, and Temporary [1 Hour][Keyboard Locked] in this bulletin.)
7 OffUnlocks the , T500 HPP-2, T500 MSP-1 only: Allows the fan to delay with the only: Compressor/Auxiliary Interlocked: Turns off the compressor whenthe auxiliary heat is on. The compressor will remain off for 2 minutes after theauxiliary heat is turned off to ensure that the heat pump coil has , T500 HPP-2, T500 MSP-1 only: Allows fan to operate immediately with acall for only: Compressor/Auxiliary Normal: Allows the compressor and auxiliaryheat to be on on next page ..6 T500 Series Programmable Thermostats Product/Technical BulletinDIP Switch(Cont.)SwitchSelectionDescription6 OnT500 HPP-1, T500 MSP-1 only: Allows multi-stage heating or , T500 MSP-1 only: Allows single-stage heating or 1 iconoff/on(See Table 5.)T500 HPP-1, T500 MSP-1 only: Optional selection: LCD icon comes on with LED 2 iconoff/on(See Table 5.)T500 HPP-1, T500 MSP-1 only: Optional selection: LCD icon comes on with LED Events Per DaySmart Fan DisabledHeat/Cool: 4 Minute (Minimum On) Keyboard UnlockedON132452 Events Per DaySmart Fan EnabledHeat/Cool: 2 Minute (Minimum On) Keyboard LockedFan Immediatewith Heat CallFan On withPlenum SwitchFigure 7: T500 HCP-1 Factory-Set DIP SwitchSettings (All Off)RS2RS1W1Y1GR24V24V(c)HeatingCoolingF anCommonHcp-1wireRS+VFigure 8: T500 HCP-1 Wiring TerminalsTable 2: T500 HCP-1 Output TerminalDesignationsTerminalFunctionW1 Energizes on call for heatingY1 Energizes on call for coolingGEnergizes fan on call for heating orcooling or by pressing Fan buttonRIndependent switching voltage24V24 VAC from equipment transformer24V(c)24 VAC (common) from equipmenttransformerRS2RS1RS+VConnection s for outdoor airtemperature or indoor remotesensors.
8 Refer to instructions includedwith Series Programmable Thermostats Product/Technical Bulletin 7 Compressor/AuxiliaryNormalSingle Stage LED 1 Icon Off LED 2 Icon Off 4 Events Per DaySmart Fan DisabledHeat/Cool: 4 Minute(Minimum On)Keyboard UnlockedON1324562 Events Per DaySmart Fan EnabledHeat/Cool: 2 Minute(Minimum On) Keyboard Locked78 LED 1 Icon (Filter) LED 2 Icon (Wrench/Fault)Compressor/AuxiliaryInterl ockedMulti-stage Figure 9: T500 HPP-1 DIP Factory-SetDIP Switch SettingsW21st Stage Compressor24 VACF igure 10: T500 HPP-1 Wiring TerminalsTable 3: T500 HPP-1 Output TerminalDesignationsTerminalFunctionW2 Energizes auxiliary heat assecond-stage heating in emergencyheat modeY2 Energizes compressor No. 2 on callfor second-stage heating or coolingW1 Energizes auxiliary heat aslast-stage heating or first-stage inemergency heatY1 Energizes compressor No. 1 on callfor heating or coolingGEnergizes fan on call for heating orcooling or by pressing Fan buttonRIndependent switching voltage24V24 VAC from equipment transformer24V(c)24 VAC (common) from equipmenttransformerOEnergizes reversing valve in thecooling modeBEnergizes reversing valve in theheating modeLED 1 LED 2 Input connection that energizesLED 1 or LED 2 from remote statusdevice (See Figure 9 and Table 6.)
9 RS2RS1RS+VConnections for outdoor airtemperature or indoor remotesensors; refer to instructionsincluded with relay coil is de-energized in thenight event. In all other events, therelay coil is energized. (SeeFigure 16.)8 T500 Series Programmable Thermostats Product/Technical BulletinON132454 Events Per Day2 Events Per DaySmart Fan DisabledSmart Fan EnabledHeat/Cool: 4 Minute(Minimum On)Heat/Cool: 2 Minute(Minimum On)Keyboard UnlockedKeyboard LockedFan Immediatewith Heat CallFan On withPlenum SwitchFigure 11: T500 HPP-2 Factory-Set DIP SwitchSettings (All Off)RS2RS1RS+VW1 BHpp-2wireCompressorFanCommon24 VACF igure 12: T500 HPP-2 Wiring TerminalsTable 4: T500 HPP-2 Output TerminalDesignationsTerminalFunctionSing le-StageHeat PumpThermostatConventionalSingle-StageHe at/CoolThermostatW1*Jumpered to Y1(See Note.)Energizes on callfor heating(See Note.)Y1 Energizescompressorcontactor(See Note.)Energizes on callfor cooling(See Note.)GEnergizes fan on call for heating orcooling or by pressing Fan buttonRIndependent switching voltage(See Note.)
10 24V24 VAC from equipment transformer24V(c)24 VAC (common) from equipmenttransformerRS2RS1RS+VConnection s for outdoor air temperatureor indoor remote sensors; refer toinstructions included with sensorsOEnergizesreversing valve inthe cooling modeNot usedBEnergizesreversing valve inthe heating modeNot usedNote:Single-Stage Heat Pump:Leave the factory-installed jumper connectedbetween W1 and Y1 and wire O or B as shown inFigure Single-Stage Heat/Cool:Remove the factory-installed jumper between W1and Y1 and wire as shown in Figure 12. Note thatthe O and B terminals are not used in Series Programmable Thermostats Product/Technical Bulletin 9 Single Stage LED 1 Icon Off LED 2 Icon Off 4 Events Per DaySmart Fan DisabledHeat/Cool: 4 Minute(Minimum On)Keyboard UnlockedON1324562 Events Per DaySmart Fan EnabledHeat/Cool: 2 Minute(Minimum On) Keyboard Locked78 LED 1 Icon (Filter) LED 2 Icon (Wrench/Fault)Multi-stage Fan Immediatewith Heat CallFan On with Plenum SwitchFigure 13: T500 MSP-1 Factory SetDIP Switch SettingsW2 RNOCOMNC2nd Stage Heating2nd Stage Cooling1st Stage Heating1st Stage CoolingFan24 VACC ommonFigure 14: T500 MSP-1 Wiring TerminalsTable 5.