Transcription of INSTALL RADIORA 2 RRD-PRO (044357a)
1 DimmerP/N 044357 REV AEnglishPlease read before the compatible bulb list, please visit dimming LED or CFL bulbs, they must be Lutron compatible for optimal performance! Use our mobile friendly self-paced installation tool: more product Videos- Frequently Asked Questions- Online Chat (8 am 5 pm EST)Call us: | Canada | Caribbean ( ) (24/7)Mexico + + Warranty: FCC/IC information:Please visit: )Lutron, Lutron; Claro, FASS, LED+, Maestro, Pico, RADIORA , RADIORA 2, RA2 Select, and Satin Colors are trademarks or registered trademarks of Lutron Electronics Co., Inc. in the US and/or other countries.
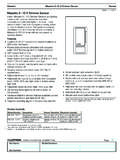
2 App Store is a service mark of Apple Inc., registered in the and other other product names, logos, and brands are property of their respective owners. 2013 2020 Lutron Electronics Co., : ELECTRIC SHOCK result in Serious Injury or Death. Turn off power at circuit breaker or fuse before Turn power OFF at circuit breaker3 Determine wiring configurationGround wire (bare or green)IMPORTANT Ground wire (bare or green)Ground wire (bare or green)Green wireGreen wireBrassBlueBlackDimmer OR Companion DimmerBlueBlackBrassMarked wireMarked wireDimmer OR Companion DimmerOne to breaker and one to light(s)FOR ILLUSTRATION PURPOSES ONLY (DO NOT DISCONNECT)For lights switched from one location:3 AORFor lights switched from two locations:NOTE: Only one dimmer can be used per : Dimmer may be wired on the line side, load side, or in the middle.
3 Neutral has been excluded from this diagram for clarity. Connect Neutral to the dimmer as required. Up to nine companion dimmers may be used. For additional wiring assistance go to wrap the wires around the screw and tighten (A), or strip insulated wires to 1/2 in (13 mm) and insert into the push-in terminals (B). Solid copper wire only. OR14 AWG ONLY ( mm2)1/2 in (13 mm) BORD ifferent-colored screwGround wire (bare or green)IMPORTANT: Tag or mark the common wire on both existing devices. This is usually connected to a darker (or different) colored screw than the others. This does NOT include the ground screw.
4 14 / 12 AWG ( / mm2)A(continued on next page)Maestro LED+ RF DimmerRRD-PRO120 V~ 50 / 60 HzCompanion Dimmer (for 3-way wiring)RD-RD 120 V~ 50 / 60 Hz A250 W LED / CFL500 WInc. / Hal. / ELV400 VAMLV2 Load Types and OperationNote: For dimming MLV fixtures, the maximum lamp wattage is typically 70%-85% of the transformer s VA rating. For actual transformer efficiency, contact the manufacturer. The total VA rating of the transformer(s) shall not exceed the VA rating of the TypeMinimum LoadMaximum LoadNeutralRequired Phase Mode 3 Single GangEnd of GangMiddle of GangLED1 bulb 2250 W200 W150 WOptional 1 EitherCFL1 bulb 2250 W200 W150 WOptional 1 ForwardM LV Transformer with LEDsSee Application Note #559 (P/N 048559) at No Derating RequiredRequiredForwardE LV Transformer with LEDsReverseM LV Transformer with Halogen10 W400 VA (300 W)
5 No Derating RequiredRequiredForwardE LV Transformer with Halogen10 W500 W400 W300 WRequiredReverseIncandescent / Halogen5 W 2500 W400 W300 WOptional 1 EitherDimmable Fluorescent Ballast1 A (400 VA)No Derating RequiredRequiredForwardHi-lume 1% 2-wire (LTE) LED Driver1 A (400 W) 20 drivers Derating RequiredRequiredForwardPHPM-PA / 3F and GRX-TVI1 interface3 interfacesNo Derating RequiredRequiredForward1 Neutral is recommended for best dimming performance, if available, but is not required for this load Minimum load shown is for neutral connected operation. If no neutral is used, minimum load is 2 LED/CFL bulbs, or 25 W of See Section 6C on page 2 of this guide for phase-select CAUTION: Use only with permanently installed fixtures with dimmable screw-in LED, dimmable self-ballasted compact fluorescent, halogen, or incandescent lamps.
6 Use only to control the primary side of permanently installed transformer supplied low-voltage lighting, or in combination with incandescent lamps. To reduce the risk of overheating and possible damage to other equipment DO NOT use to control receptacles, fluorescent lighting fixtures, non-ballasted or externally ballasted compact fluorescent lamps, motor operated appliances or transformer supplied If connecting loads other than Incandescent / Halogen, screw-in CFLs, or screw-in LEDs, the neutral wire must be connected. See the Load Types and Operation chart for more Neutral is highly recommended for INSTALL in accordance with all national and local electrical codes.
7 5. When no grounding means exist within the wallbox, the NEC 2011, Article allows a dimmer without a grounding connection to be installed as a replacement, as long as a plastic, noncombustible wallplate is used. For this type of installation , twist a wire connector onto the green ground wire or remove the green ground wire on the dimmer and use an ap pro pri ate wallplate such as Claro or Satin Colors series wallplates by Protect the dimmer from dust and dirt when painting or spackling the This dimmer is not compatible with standard 3-way or 4-way switches. Use only with Lutron companion dimmers listed In any 3-way / 4-way circuit use only one dimmer with up to 9 companion Maximum wire length between the dimmer and the farthest companion dimmer is 150 ft (45 m).
8 Between 32 F and 104 F (0 C and 40 C).11. It is normal for the dimmers to feel warm to the touch during the dimmer with a soft damp cloth only. Do not use any chemical indoor use screw terminals securely to 5 in-lb ( N m).AAGround wire (bare or green)Brass BlackGreen wireDimmer Neutral (as required)SilverLoad Line/ Hot Blue120 V~50/60 HzNeutralBrassBlackSilverGreenGroundRRD- PROLine / HotLoadBlue120 V~50/60 HzBlueBrassBrassBlackBlackSilverGreenGre enGroundLine / HotGroundDimmer or Companion DimmerDimmer or Companion DimmerLoad** For more information please go to FASS FASS FASS FASS FASS ONOFF5 Turn power ON at circuit breaker4 Mount all devices using the provided screwsAdjust Low-End TrimPhase-Select ModeRaise lightsTa p to toggle lights on / to turn lights on to full & hold for delayed lightsTRDisplays the current light levelIndicator Lights (IL)
9 6 Dimmer OperationThis control can be used in a RADIORA 2 or RA2 Select system for control from keypads, Pico wireless controls, schedules, and RADIORA 2, use the system programming software to set up the system (training is required to access the software).For RA2 Select, download the Lutron App from the App Store or Google Play Store, open the App and follow the instructions to setup the SetupNOTE: Resetting a device to its factory settings will remove it from the system and erase all of its 1: Triple tap 2: Press and hold T. Continue to hold T for approximately 3 seconds until the indicator lights flash up and 3: Triple tap T.
10 Load (light) will turn OFF and turn back ON to full intensity. This indicates a successful factory to Factory SettingsTroubleshootingSymptomsCause and ActionLEDs do not operate well or they flicker/buzz. Is the load from the Lutron compatible lamp tool? Please visit See Phase-Select Mode. Adjust low-end trim. Connect Neutral do not dim low enough. Perform low-end trim adjustment in Step 1 and 7 are Voltage Protection Verify that the control is set correctly for the load. Check Phase-Select Mode three ILs 1, 2, and 3 are FET Detection Wiring error. Product may be permanently damaged.