Bracket Installation
Found 10 free book(s)
FRONT LICENSE PLATE BRACKET INSTALLATION …
www.mycarworx.comFRONT LICENSE PLATE BRACKET INSTALLATION INSTRUCTIONS Using a top-mount sample – page 1 – After following instructions on pages 1-5 for the top-mount installation, there are additional instructions more specific to center-mount installations beginning on page 6. For best results, installation temperature should be above 60º F.

Counter Bracket Installation 2017 - Rakks
rakks.comTo provide for a fully recessed installation, the drywall must be Installed and patched around the bracket supporting arm. Once the drywall has been installed, it should be plastered around the bracket. to provide a finished installation. Anodized aluminum face plates, with adhesive backing, eliminate time consuming patching and finishing. 3-1/4”
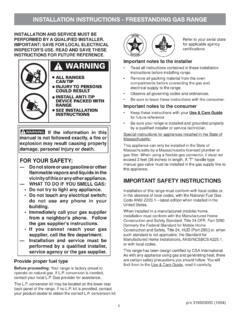
INSTALLATION INSTRUCTIONS - FREESTANDING GAS RANGE
pdf.lowes.comAnti-tip bracket installation instructions a. Locate the bracket using the template - (Bracket may be positioned on either the left or right side of the range. Refer to Figs. 4, 5, & 7 to position the bracket if template is not available). Mark the floor or wall where left or right side of the range will be located. If rear of range is against ...

PERSPECTIVE PANOPTIX LIVESCOPE MODE MOUNT …
static.garmin.combracket, rotate the bracket, and tighten the screws. Setting the Viewing Mode. After installation, you should adjust the position of the transducer to the desired viewing mode (Viewing Modes, page 2). 1. Set the transducer orientation: • From the GPSMAP ® chartplotter, select Sonar > LiveScope > Menu > Sonar Setup > Installation ...

Setup and Installation Guide - Ring
static.ring.comMar 21, 2016 · Install the Mounting Bracket Take everything that came in the box, along with a power drill if you’re installing on stucco, brick or concrete, to the spot where you’ll be installing your Ring Doorbell. Snap the provided level onto the mounting bracket and use it to help position the bracket. Then remove the orange tape, and

Throttle Cable Installation Instructions - Lokar
www.lokar.commounting bracket onto the back side of the Cable Mounting Bracket first.) Then, position the rear adjuster nut so that the threaded part of the throttle cable adjuster is approximately centered in the Cable Mounting Bracket. Reinstall the front adjuster nut. Fig. 3 Step 6: Make sure that the inner wire is removed from the cable housing.
Transom-Mount Transducer Installation Instructions
static.garmin.com2. Pull the cable back and slide the transducer into the mounting bracket . 3. Place a 5 mm flat washer on the 10-32 x 1.75 in. screw and insert the screw through the mounting bracket, transducer, spacer, and rubber washer. 4. Place a 5 mm flat washer on the exposed end of the 10-32 x 1.75 in. screw, and fasten it with the 10-32 lock nut .
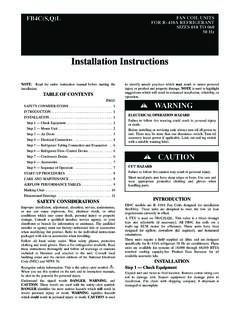
Installation Instructions - Carrier
www.carrier.comInstallation Instructions FAN COIL UNITS FOR R-410A REFRIGERANT SIZES 018 TO 060 50 Hz NOTE: Read the entire instruction manual before starting the installation. TABLE OF CONTENTS PAGE ... BRACKET DRAIN PAN SUPPORT BRACKET COIL BRACKET A00072 Fig. 3 - A-Coil in Horizontal Left Application
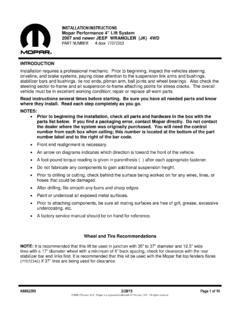
INSTALLATION INSTRUCTIONS Mopar Performance 4” Lift …
starparts.chrysler.comrelocated to allow installation on the opposite side. Once vehicle is a flat surface you can tighten the lower shock bolts to 65 ft-lbs. and tighten the upper nut to 20 ft-lbs 9) TRACK BAR RELOCATION… Remove the axle side track bar bolt (1) and save (figure -5). Install the new track bar bracket on the front axle by sliding it on the tube.

INSTALLATION INSTRUCTIONS - Fisher & Paykel
www.fisherpaykel.cominstallation, the installer must perform the final Checklist. remove all packaging materials supplied with the dishwasher. this dishwasher is manufactured for indoor use only. ensure all water connections are turned Off. it is the responsibility of the plumber and electrician to ensure that each installation complies with all