Transcription of 2. ANSYS Basics - Unicamp
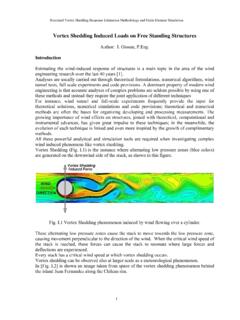
1 2. ANSYS Basics 3. ANSYS Basics In this chapter, we will discuss the Basics of how to enter and exit ANSYS , how to use the GUI and on-line help, and the database and files created by ANSYS . Topics Covered: A. Starting ANSYS . B. The GUI. C. Graphics & Picking D. On-Line Help E. The Database and Files F. Exiting ANSYS . ANSYS Basics A. Starting ANSYS . There are two ways to start ANSYS : By Launcher By Command Line Unix launcher Launcher Allows you to start ANSYS and other ANSYS utilities by pressing buttons on a menu. On Unix systems, issue xansys56 & to Windows bring up the launcher. launcher On Windows systems, press Start >. Programs > ANSYS ANSYS Basics ..Starting ANSYS . Launcher (cont'd). Automatically brings up the GUI (Graphical User Interface) when ANSYS is started in interactive mode. A note on Interactive vs. Batch mode: Interactive mode allows you to interact live with ANSYS , reviewing each operation as you go. Batch mode works on an input file of commands and allows you to run ANSYS in the background.
2 No live interaction, therefore any errors in input will cause the batch run to stop. Best suited for operations that don't need user interaction, such as a solve. We will mainly cover interactive mode in this course. ANSYS Basics ..Starting ANSYS . Launcher (cont'd). Pressing the Interactive button on the launcher brings up a dialog box containing start-up options, : ANSYS product Working directory - the directory in which all files will be stored. Graphics device - set to 3-D if you have a 3-D graphics device card. Otherwise, set to X11 on Unix, win32. on Windows. Jobname - file name prefix, up to 32. characters, assigned to all files produced by this session. Defaults to file or last specified name. Amount of memory - default values should suffice in most cases. ANSYS Basics ..Starting ANSYS . Launcher (cont'd). After choosing the desired start-up options, press the Run button to start ANSYS . Command Line ANSYS is started by typing a command at the system level.
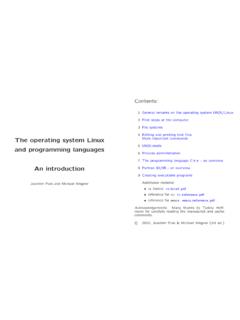
3 For example: ansys56. ansys56 -g ansys56 -g -j plate ansys56 -g -p ANE3FL -d 3d -j proj1 -m 128. ANSYS Basics ..Starting ANSYS . Command Line (cont'd). Typical start-up options, commonly known as command line options, are: -g (to automatically bring up the GUI upon start-up). -p product_code -d graphics_device -j jobname -mmemory The working directory is the directory in which the command is issued. Refer to your ANSYS Installation and Configuration Guide for details on the command line options. ANSYS Basics B. The GUI. Entering ANSYS brings up the following GUI windows: Input Utility Menu Displays program Contains functions prompt messages which are available and a text field for throughout the typing commands. ANSYS session, such All previously typed as file controls, commands appear for selecting, graphics easy reference and controls, parameters, access. and exiting. Main Menu Toolbar Contains the primary Contains push ANSYS functions, buttons for executing organized by commonly used processors ANSYS commands (preprocessor, and functions.)
4 Solution, general Customized buttons postprocessor, etc.) can be created. Output Graphics Displays text output Displays graphics from the program. It created in ANSYS or is usually positioned imported into ANSYS . behind the other windows and can be raised to the front when necessary. ANSYS Basics ..The GUI. Main Menu Contains the main functions required for an analysis. Independent, sticky windows allow you to complete all necessary steps before moving on to the next function. Conventions: indicates a dialog box + indicates graphical picking > indicates a submenu (blank) indicates an action ANSYS Basics ..The GUI. Utility Menu Contains utilities that are generally available throughout the ANSYS session: graphics, on-line help, select logic, file controls, etc. Same conventions as Main Menu: indicates a dialog box + indicates graphical picking > indicates a submenu (blank) indicates an action ANSYS Basics ..The GUI. Input Window Allows you to enter commands.
5 (Most GUI functions actually send commands to ANSYS . If you know these commands, you can type them in the Input Window.). Also used for prompts during graphical picking. ANSYS Basics ..The GUI. Toolbar Contains abbreviations -- short-cuts to commonly used commands and functions. A few predefined abbreviations are available, but you can add your own. Requires knowledge of ANSYS commands. A powerful feature which you can use to create your own button menu system! ANSYS Basics ..The GUI. Layout Input Three predefined menu layouts are available (Launcher > Interactive > GUI Configuration): Input window on left (default). Input window on right Input Input window on bottom You can also create your own layout and then save it using Utility Menu > MenuCtrls > Save Menu Layout. Unix systems store the layout in an ASCII. resource file called ANSYS56, located in $HOME. Windows systems store the layout in the system registry. Input ANSYS Basics .
6 The GUI. Preferences The Preferences dialog (Main Menu >. Preferences) allows you to filter out menu choices that are not applicable to the current analysis. For example, if you are doing a thermal analysis, you can choose to filter out other disciplines, thereby reducing the number of menu items available in the GUI: Only thermal element types will be shown in the element type selection dialog. Only thermal loads will be shown. Etc. ANSYS Basics ..The GUI. Other GUI Notes Some dialog boxes have both Apply and OK buttons. Apply applies the dialog settings, but retains (does not close) the dialog box for repeated use. OK applies the dialog settings and closes the dialog box. The Output Window is independent of the ANSYS menus. Caution: Closing the output window closes the entire ANSYS . session! Remember that you are not restricted to using the menus. If you know the command, feel free to enter it in the Input Window! ANSYS Basics C.
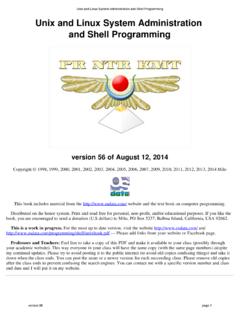
7 Graphics & Picking The most heavily used interactive capabilities are graphics and graphical picking. Graphics is used to visualize the model, loading, results, and other input and /replot output data. kplot lplot Picking is used for model creation, aplot meshing, loading, etc. vplot nplot Use Plot in the Utility menu to produce eplot plots, or issue the commands shown. gplot ANSYS Basics ..Graphics & Picking The PlotCtrls menu is used to control how the plot is displayed: plot orientation zoom colors symbols annotation animation etc. Among these, changing the plot orientation (view) and zooming are the most commonly used functions. ANSYS Basics ..Graphics & Picking The default view for a model is the front view: looking down the +Z axis of the model. To change it, use dynamic mode a way to orient the plot dynamically using the Control key and mouse buttons. Ctrl + Left mouse button pans the model. Ctrl + Middle mouse button: zooms the model spins the model (about screen Z).
8 Ctrl + Right mouse button rotates the model: about screen X P Z R. about screen Y. Ctrl ANSYS Basics ..Graphics & Picking If you don't want to hold down the Control key, you can use the Dynamic Mode setting in the Pan-Zoom-Rotate dialog box. The same mouse button assignments apply. On 3-D graphics devices, you can also dynamically orient the light source. Useful for different light source shading effects. ANSYS Basics ..Graphics & Picking Other functions in the Pan- Front +Z view, from (0,0,1). Zoom-Rotate dialog box: Back -Z view (0,0,-1). Top +Y view (0,1,0). Preset views Bot -Y view (0,-1,0). Right +X view (1,0,0). Zoom-in on specific regions Left -X view (-1,0,0). of the model Iso Isometric (1,1,1). Obliq Oblique (1,2,3). Pan, zoom, or rotate in WP Working plane view discrete increments (as specified by the Rate slider). Zoom By picking center of a Rotation is about the square screen X, Y, Z Box Zoom By picking two corners of a box coordinates.
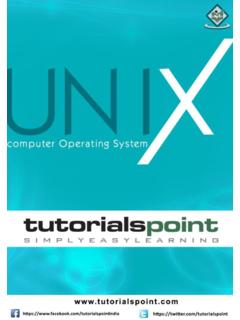
9 Win Zoom Same as Box Zoom, but box is proportional Fit the plot to the window to window. Back Up Unzoom to previous Reset everything to default zoom. ANSYS Basics ..Graphics & Picking Picking Picking allows you to identify model entities or locations by clicking in the Graphics Window. A picking operation typically involves the use of the mouse and a picker menu. It is indicated by a + sign on the menu. For example, you can create keypoints by picking locations in the Graphics Window and then pressing OK in the picker. ANSYS Basics ..Graphics & Picking Two types of picking: Example of Retrieval picking Retrieval Picker Picking existing entities for a subsequent operation. Allows you to enter entity numbers in the Input Window. Use the Pick All button to indicate all entities. Locational picking Locating coordinates of a point, such as a keypoint or node. Allows you to enter coordinates Example of in the Input Window. Locational Picker ANSYS Basics .
10 Graphics & Picking Mouse button assignments for picking: Left mouse button picks (or unpicks). the entity or location closest to the mouse pointer. Pressing and dragging Apply allows you to preview the item being Toggle picked (or unpicked). Pick Pick / Unpick Middle mouse button does an Apply. Saves the time required to move the mouse over to the Picker and press the Apply button. Use Shift-Right button on a two-button mouse. Right mouse button toggles between pick and unpick mode. ANSYS Basics D. On-Line Help ANSYS uses an HTML-based documentation system to provide extensive on-line help. You can get help on: ANSYS commands element types analysis procedures special GUI widgets such as Pan-Zoom-Rotate ANSYS Basics ..On-Line Help There are several ways to start the help system: Launcher > Help System Utility Menu > Help > Help Topics Any dialog box > Help Type HELP,name in the Input Window. Name is a command or element name. ANSYS Basics .