Transcription of 2. Motion Analysis - Sim-Mechanics
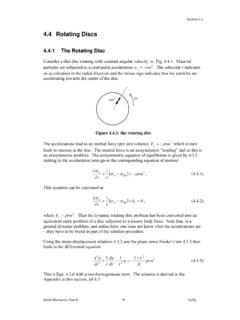
1 2. Motion Analysis - Sim-Mechanics Figure 1 - The RR manipulator frames The following table tabulates the summary of different types of Analysis that is performed for the RR manipulator introduced in the theory section. DOF Forward Kinematics Inverse Kinematics Inverse Dynamics Forward Dynamics Input , , known unknown unknown Unknown Accelerations, Others known as initial conditions Input , , Output , , unknown known known Output , , - - unknown known Internal forces - - unknown unknown This tutorial will cover how to model a mechanism in Sim-Mechanics and how to configure the model for the different types of Analysis given above.. For this exercise the COG are placed at the middle of each link, and each link is assumed to be a cylinder with radius 10mm.
2 The parameters of the mechanism are given below: Link 1: = 300 , = Link 2: = 500 , = 1 The moment of inertia of a cylinder with height h, radius R, and mass M, with axis aligned at the middle of the cylinder is given by the following equation. Modelling the mechanism Open a new sim mechanics model by selecting new> simulink model in the Matlab home tab. Save the model with the name manipulator_example. Select the simulink library browser button . Navigate to Simscape>SimMechanics> Second generation to find the blocks used to model the mechanism. First let`s model the first link of the manipulator. Figure 2 . The configuration block is used to specify gravity.
3 The transform block is used to apply a fixed transformation between a base and a follower frame. Therefore, the lines in a sim mechanics model relates to a frame in the mechanism. Revolute joints in sim mechanics always apply rotation about the z axis of the base frame. Therefore, you have to introduce an initial rotation to align the z axis of the base frame, such that its coming out of the screen. The solid block is used to attach a mass to a rigid body. Implement the set of blocks shown in the figure 2. Use the following parameters for the blocks Block Base frame Follower frame Rotation Translation (mm) Transform 1 WA WB Y,90 [0,0,0] Transform 2 1A 1B 0 [150,0,0] Transform 3 1B 1C 0 [150,0,0] solid Center of Gravity (mm) Mass (kg) Moment of Inertia (kg mm^2) Product of Inertia (kg mm^2) solid [0,0,0] [25, , ] [0, 0, 0] You should be able to figure out the parameters from the sketch of the mechanism given in figure 1.
4 The moment of inertia values were found by assuming that the link is a cylinder. To give visual properties for the link, open the geometry block and select brick under geometry and specify the parameters [300 20 20]mm. Set gravity to [0 0 ] in the configuration block and press run. A mechanics explorer will open up. Select view> show frames and show COMs. Click the front view button to see the mechanism. You can select view>background color to change the background. The link should perform a free vibration (non-decaying swinging).. Lets add some damping to the link. Open Revolute joint 1 and under internal mechanics > damping coefficient enter m*s*N/rad. The link should now perform a damped free vibration (decaying swinging).
5 Complete the model as shown in figure. Use the parameters given in the table. The planar joint is used to close the loop. But it does not constraint frame {2C} in this planar mechanism.. Block Base frame Follower frame Rotation Translation (mm) Transform 1 WA WB Y,90 [0,0,0] Transform 2 1A 1B Z,0 [150,0,0] Transform 3 1B 1C Z,0 [150,0,0] Transform 4 2A 2B Z,0 [300,0,0] Transform 5 2B 2C Z,0 [300,0,0] solid Center of Gravity(mm) Mass (kg) Moment of Inertia (kg mm^2) Product of Inertia (kg mm^2) solid 1 [0,0,0] [25, , ] [0,0,0] solid 2 [0,0,0] 1 [50, 20858, 20858] [0,0,0] Add link geometry and joint damping to link 2 and run the model. Initializing the mechanism The state target tab in the joint block allows to specify the initial condition of each joint.
6 The state target should be specified as a high priority (exact) or low priority(approximate) value. Let's try to initialize the mechanism as shown. Configuration 1: = 30 , = 30 Open each joint block and specify the following state targets.. DOF Position State target value Priority setting Initialized value Revolute 1 30 High Revolute 2 30 High Planar 1 x disabled m Planar 1 y disabled m The initialized value is found by clicking tools>model report in the mechanics explorer Configuration 1: = , = , > 45 There are two solutions for x,y= Let`s say you want to initialize as given in figure 3. For this, the value can be set approximately. Open each joint block and specify the following state targets.
7 DOF Position State target value Priority setting Initialized value Revolute 1 50 Low Revolute 2 Disabled Planar 1 x High Planar 1 y High Figure 3 Notice that sim mechanics will give an error if you try to specify revolute 2 as well. In sim mechanics you cannot specify state targets to all the joints around a loop.. Performing different types of Analysis To do a forward dynamics study first go to file>save as and save the model with the filename manipulator_example_FD. Open the revolute joints. under actuation torque select provided by input. Attach a sine wave as the torque signal with amplitude. You must use a simulink to physical signal converter block.
8 Give a torque of 0 to joint 2. run the model to see results. select file>save. For a forward kinematic study, first go to file>save as and save the model with the filename manipulator_example_FK. Disable all initialization of joints. Since we are specifying all input kinematic variables which fully define the configuration, there is no need of specifying initialization. Open the two revolute joints and under actuation select provided by input for Motion and automatically computed for torque for both revolute joints. Add sine signals as input Motion with an amplitude of 1rad for both. You need to tell sim mechanics to automatically compute the velocity and acceleration of the input position signals.
9 Open the simulink to physical signal converter blocks and under the input handling tab select filter inputs in the first drop down, and select second order filtering in the second drop down. Run the model to see results. select file>save. " The forward kinematic setup is good to verify trajectory plans where we can validate that a given Motion profile to the joints would generate desired results. ex: tool path simulation. The forward dynamic setup is good to verify controllers where we can validate different controllers to see the response. The following table summarizes the settings used for the two Analysis . DOF Forward Kinematics Forward Dynamics Revolute 1 Motion Input computed Torque computed Input Revolute 2 Motion Input computed Torque computed Input Planar 1 x Motion computed computed Torque none none Planar 1 y Motion computed computed Torque none none Inverse studies Similarly for the inverse studies the settings for each joint can be summarized as follows: DOF Inverse Kinematics Inverse Dynamics Revolute 1 Motion computed computed Torque computed computed.
10 Revolute 2 Motion computed computed Torque computed computed Planar 1 x Motion Input Input Torque none none Planar 1 y Motion Input Input Torque none none Both looks identical, The only difference is that in inverse kinematics we are looking for the Motion of the revolute joints for the given output Motion . And in the inverse dynamics study we are looking for the torques of the revolute joints. So it`s a difference in where we connect the scopes. Sim mechanics has the following rule: Each kinematic loop must contain at least one joint that has no Motion from input and no automatically computed forces or torques among its primitives. So setting up the the joints as in table would give an error.