Transcription of 900X70 Refractor Telescope Instruction Manual - ioptron.us
1 900X70 Refractor Telescope Instruction Manual For products #6001 & #6002 2 Table of Contents Table of Contents .. 2 1. Telescope Assembly .. 3 900X70 Assembly 3 Telescope 5 2. Understanding Celestial Motion and Coordinates .. 7 3. Getting Started .. 8 Selecting an 8 Focusing 8 Aligning Finderscope: .. 8 Balancing the Telescope .. 8 Polar Alignment of the Equatorial mount .. 9 4. Using the Telescope .. 10 Getting familiar with you mount and 10 Star observation .. 10 Observation Tips .. 10 How to use setting 10 Calculating the Power .. 11 5. 12 6. Technical Specifications .. 13 IOPTRON ONE YEAR LIMITED WARRANTY .. 14 3 1. Telescope Assembly 900X70 Assembly Terms Figure 1. 900X70 (1). Accessory holder tray (2). Aluminum tripod (3). Leg lock brackets (4). Tripod base (5). Diagonal mirror (6). Eyepiece (7). Finderscope bracket (8). Finderscope (9).
2 Finderscope collimation screws (10). Scope mounting ring (11). Main optical tube (12). Declination locking knob (13). Declination setting circle (14). Right ascension locking knob (15). Right ascension gear (16). Right ascension setting circle (17). Counterweight shaft (18). Counterweight (19). Counterweight safety washer (20). Counterweight locking knob (21). Equatorial mount head (22). Lens cell (23). Azimuth adjustment knob (24). Latitude adjustment knob (25). Eyepiece holder tube (26). Focusing knob (27). Right ascension control cable (28). Declination control cable (29). Sunshade (30). Sliding inner tripod leg extension (31). Leg extension locking knob (32). Tripod leg bolts (33). Front lens dust cap DEC Axis RA Axis 4 Figure 2. Parts List 5 Telescope Assembly The numbers in brackets refer to the keys shown in Figures 1 & 2. 1. Unpack and identify the components of your Telescope using the list shown in previous page.
3 2. Take the tripod legs (2) out of the package. Make sure the locking knobs (31) are tightened. 3. Mount three tripod's legs (2) to the tripod base (4) using the three long tripod leg bolts (32) with their washers and wing nuts. Make sure that the three hinged leg lock brackets (3) are facing inside (as shown in figure. 1 ) 4. Stand the Telescope 's tripod mount upright by spreading the tripod's legs out uniformly. Attach the accessory holder tray (1) to the leg lock brackets (3) using the short screws and wing nuts supplied. 5. Unlock the tripod leg extension locking knob (31). Extend tripod legs to desired height and lock the leg locks afterwards. 6. Insert the base of the equatorial mount head into the hole of the tripod base (4) and secure it using azimuth adjustment knob (23). Make sure the right ascension ( ) gear (21) is below the setting circle (13).
4 7. Put the optical tube mounting (10) onto the equatorial mount and secure it using 2 supplied hex head screws. 8. Slide counterweight (18) onto the counterweight shaft (17) and secure the counterweight by tightening the counterweight locking knob (20). Screw counterweight shaft (17) onto the base of the declination (Dec) axis on the equatorial mount. Once this shaft is firmly in place, release the locking knob (20), adjust the counterweight up some 50 mm from the end of the shaft and retightening the locking knob (20). Counter weight is heavy. Please handle with care to avoid injury! (31) Tripod base (4)Tripod leg bolts and nuts (32) Accessory tray (1)Short screw Leg lock brackets (3) gear (21) setting circle (13)Equatorial mount Head (15) Azimuth Adjustment knob (23) 6 9. Assemble the right ascension ( ) control cable (27, short cable) and declination (Dec) control cable (28).
5 These cables are locked into position by firmly tightening the screws at the end of each cable. 10. Place the optical tube assembly (OTA) (11) into the scope mounting rings (10) and tighten the two wing screws on the tube mounting to secure the OTA. 11. Loosen two screws at the end of the OTA. Mount the finderscope bracket (7) onto the Telescope using these two knurled screws. 12. Insert the diagonal (5) into the eyepiece holder tube (25) and the eyepiece (6) into the diagonal. Tighten the thumbscrews to a firm feel only. If the 3X Barlow lens is needed, insert the Barlow into the eyepiece holder tube first. The Telescope is now fully assembled and ready to use. You can move the Telescope in altitude direction (up and down) and azimuth direction (left or right) by slightly release the latitude adjustment knob (24) and azimuth adjustment knob (23).
6 Or you can move the Telescope along the right ascension and declination direction by loosen the right ascension locking knob (14) and declination locking knob (12). control cable (27)Lock trench Screws to mount finderscope Eyepiece (6) Diagonal (5) Eyepiece holder tube (25) Finderscope OTA Mounting Rings 7 2. Understanding Celestial Motion and Coordinates Understanding where to locate celestial objects and how these objects move through the sky is fundamental to fully appreciating astronomy as a hobby. Most amateur astronomers use the same visual path (or star-hopping) method for locating celestial objects. To do this they use maps of the sky or an astronomy program that identifies bright stars and constellations of stars that serve as "roadmaps" and "markers" in the sky. These visual reference points guide amateur astronomers in their search for astronomic objects and although the visual path method is the preferred approach giving thought to whether or not to use circles of digital coordinates for locating objects is desirable as your Telescope offers this function.
7 Be warned however, when compared with a visual path approach, looking for objects using circles of digital coordinates requires a greater investment in terms of patience and time in order to achieve a more precise alignment of the Telescope 's polar axis on the celestial pole. This is partially why the visual path approach is preferred since it s the simplest (and quickest) way to get started. Understanding how astronomic objects move Given the earth's rotation, celestial bodies (stars) appear to move from east to west along a curved trajectory across the sky. The trajectory that they follow is known as the right ascension line ( ). The angle of the trajectory that they follow is known as the declination line (Dec.). The right ascension and the declination form a system that is similar to the terrestrial system of latitude and longitude. In the system of and Dec.
8 Coordinates, stars are projected onto the "celestial sphere", onto the imaginary sphere where all of the stars appear to be located. Understanding celestial coordinates In the system of celestial coordinates, the poles are defined as being the two points where the earth's rotation axis, when prolonged infinitely to the north and to the south, intersects with the celestial sphere. Consequently, the celestial North Pole is the point in the sky where the prolongation of the earth's axis passing through the North Pole intersects the celestial sphere. In fact this point in the sky is located close to the North Star or pole star (Polaris). So-called "longitude lines" are drawn on the earth's surface between the north and south poles. In the same way, "latitude lines" are drawn along an east-west direction, parallel to the earth's equator. The celestial equator is simply a projection of the earth's equator into the celestial sphere.
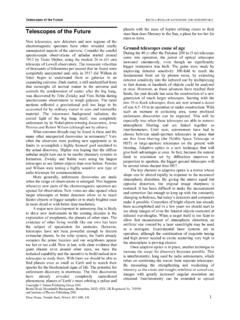
9 Just like on the earth's surface, imaginary lines have been drawn on the celestial sphere to form a grid of coordinates. The positions of the stars on the earth's surface are specified by their latitude and longitude. The celestial equivalent to terrestrial latitude is called "Declination" or simply "Dec", expressed in degrees, minutes, and seconds north ( + ) or south ("-") of the celestial equator. Consequently any point located along the celestial equator ( passing through the constellations of Orion, Virgo and Aquarius) is specified by its declination of 0 0 0 . The declination of the North Star or pole star located very close to the North Celestial Pole is + . The celestial equivalent to terrestrial longitude is called "Right Ascension" or " ", expressed in hours, minutes and seconds from a "zero" line defined arbitrarily and which passes through the constellation of Pegasus.
10 The coordinates of the Right Ascension range from 0h 0mn 0s to 24h 0mn 0s (not inclusive). Therefore, there are 24 primary Celestial North Pole (close to the North Star (Polaris)) Star Declination Earth's rotation Right ascension Celestial equator Celestial South Pole Figure 2: Celestial Sphere 8 lines located at 15 degree intervals along the celestial equator. The objets that are further away, eastwards, from the primary Right Ascension grid line (0h 0mn 0s) carry rising coordinates. Consequently, once it is possible to specify the position of all of these celestial objects using their Right Ascension and Declination coordinates the task of searching for objects (especially low brightness stars) using the astronomer's Telescope may be simplified. The digital, (16) and Dec. (13) setting circles for your Telescope can be made up, in practice to read the object's coordinates, by positioning it close to the Telescope 's telescopic field of view (FOV).