Transcription of Access 2016 Basic - Excel Courses | CustomGuide
1 2022 CustomGuide , Inc. Click the topic links for free lessons! Contact Us: The Access 2016 Program Screen Keyboard Shortcuts Access basics Open a Database: Click the File tab and select Open, or press Ctrl + O. Save a Database: Click the Save button on the Quick Access Toolbar, or press Ctrl + S. Choose a location where you want to save the file. Give the file a name, then click Save. Use the Navigation Pane: Click the All Access Objects button at the top of the Navigation Pane and select the type of object(s) you want to display. Open a Database Object: Double-click an object in the Navigation Pane. Modify a Database Object in Design View: Click the View button list arrow and select Design View. Switch Object Tabs: If you have multiple objects open, click the tab for the object you want to display. Rename a Database Object: In the Navigation Pane, right-click the object you want to rename and select Rename.
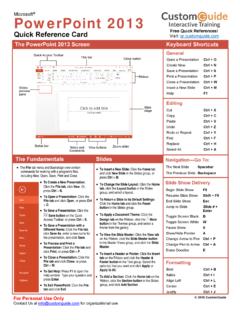
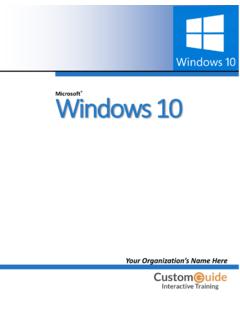
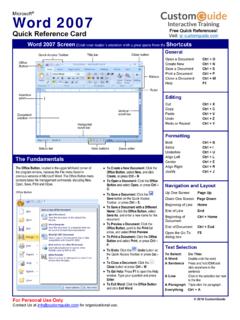
2 Type a new name, and press Enter. Delete a Database Object: Select the object you want to delete in the Navigation Pane, press the Delete key, and click Yes. Get Help: Press F1 to open the Help pane. Type your question in the Search field and press Enter. Close a Database Object: Click the object s Close button in the upper-right corner of the window. Close a Database: Click the File tab and select Close. Database Objects Tables store a database s data in rows (records) and columns (fields). Queries ask a question of data stored in a table. Forms are custom screens that provide an easy way to enter and view data in a table or query. Reports present data from a table or query in a printed format. Macros automate several tasks into a single command. Modules automate commands using Visual Basic . Modules are similar to macros, but are more complex. Microsoft Access 2016 Basic Quick Reference Guide Quick Access Toolbar Title Bar Close Button Ribbon Status Bar Navigation Pane Scroll Bar View Buttons Open Database Object Record Navigation Bar General Create a new database.
3 Ctrl + N Open a Ctrl + O Close a database .. Ctrl + W Close Access .. Alt + F4 Print current view .. Ctrl + P Help .. F1 Delete record .. Ctrl + - Cancel changes .. Esc Insert date .. Ctrl + ; Insert time .. Shift + Ctrl + ; Insert value from same field in previous position .. Ctrl + Spell check .. F7 Switch applications .. Alt + Tab Navigation Move between query or table rows .. , Move between query or table columns .. , Next field .. Tab Previous field .. Shift + Tab Next screen .. Page Down Previous screen .. Page Up First record .. Ctrl + Last record .. Ctrl + Go to a specific record .. F5 Toggle Navigation Pane .. F11 Editing Cut .. Ctrl + X Copy .. Ctrl + C Paste .. Ctrl + V Undo .. Ctrl + Z Redo .. Ctrl + Y Find .. Ctrl + F Replace .. Ctrl + H Design View View properties .. Alt + Enter Open object in Design view .. Ctrl + Enter Save object .. Ctrl + S Switch to Form view.
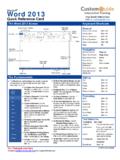
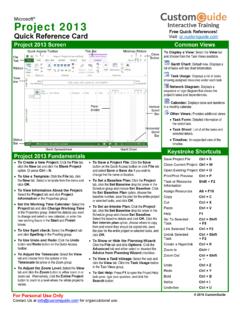
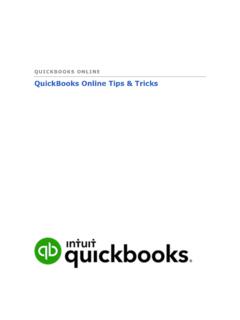
4 F5 Free Cheat SheetsVisit 2022 CustomGuide , Inc. Click the topic links for free lessons! Contact Us: Databases Determine the Purpose of a Database: Planning a database is an important step in the creation process. Consider: Fields you need Tables you need The primary key Relationships between fields Create a Database from a Template: Click the File tab and select New. Type a word/phrase that describes the database you want to create in the Search for online templates field and click Search . Select the template you want to use, name the new database, and click Create . Create a New Blank Database: Click the File tab, select New, and click the Blank database button. Type a name for the new database, and click Create . Add a Record: In Datasheet view, click the New Record button on the record navigation bar. Or, begin adding data in the blank bottom row of the table.
5 Record selector Start adding a new record here Select a Record: Click the record selector (gray box to the left of the record) for the record you want to select. Edit a Record: Click the field you want to edit and make the necessary change. Press Enter to commit the change. Delete a Record: Click the record selector next to the record you want to delete, click the Delete button on the ribbon, and click Yes. Select Multiple Records: Click the record selector for the first record you want to select and drag to the last record you want to select. Select a Field: Click the field (column) header for the field you want to select. Copy and Paste: Select the data you want to copy, click the Copy button on the Home tab, then click where you want to paste the data, and click the Paste button. Check Spelling: Click the Home tab and click the Spelling button, or press F7. Print Preview a Database Object: Display the object you want to preview.
6 Click the File tab, select Print, and click Print Preview . Print a Database Object: Display the object you want to print. Click the File tab, select Print, and click Print . Find and Filter Data Find Data: Select the column header or click in any cell in the field you want to search, and click the Find button on the Home tab. Type the text you want to find in the Find What field, and click the Find Next button. Replace Data: Select the column header or click in any cell in the field where you want to replace text, and click the Replace button on the Home tab. Enter the word you want to find in the Find What field, then enter the text that will replace it in the Replace With field. Click Replace or Replace All. Sort Records: Click anywhere in the column you want to sort and click either the Ascending or Descending button on the Home tab of the ribbon. Remove a Sort: Click the Clear All Sorts button on the Home tab.
7 Apply a Filter: Click anywhere in the column you want to filter and click the Filter button on the Home tab. Uncheck the boxes for any data you want to hide and click OK. Filter by Selection: Click in the column you want to filter, click the Selection button on the Home tab, and select an option from the menu. Filter by Form: Click the Advanced Filter Options button on the Home tab and select Filter by Form . Click the empty cell below the field you want to filter, then click the list arrow and select the value you want to use to filter the records. Repeat this to filter by any additional fields, and click the Apply Filter button on the Home tab to filter the records. Clear Filters: Click the Advanced Filter Options button on the Home tab of the ribbon and select Clear All Filters . Adjust Column Width: Click and drag the column header s right border to the left or right.
8 Or, double-click a header s right border to auto-size the column. Adjust Row Height: Click and drag the row header s bottom border up or down. Freeze a Column: Click the header for the column you want to freeze, click the More button on the Home tab, and select Freeze Fields . Unfreeze a Column: Click the header for the column you want to unfreeze, click the More button on the Home tab, and select Unfreeze All Fields. Hide a Column: Click the header for the column you want to hide, click the More button on the Home tab, and select Hide Fields. Unhide a Column: Click any column header, click the More button on the Home tab of the ribbon, and select Unhide Fields. Tables Create a New Blank Table: Click the Create tab on the ribbon and click the Table button. Click the Click to Add field heading, select a field type, type a name for the field, and enter the data for the new field.
9 Click the next Click to Add field heading to add another field. Create a Table in Design View: Click the Create tab on the ribbon and click the Table Design button. Enter a name in the Field Name column and click in the first Data Type field. Click the Data Type list arrow, and select a data type for the field. Insert a Field: In Design view, click the record selector for the field that will be below the new field, and click the Insert Rows button on the Table Tools Design tab. Enter a field name for the new field, press Tab, click the Data Type list arrow, and select a data type. Reorder a Field: In Design view, click the record selector for the field you want to move, then click and drag the selected row up or down to the desired location. Delete a Field: In Design view, click the record selector for the field you want to delete, and click the Delete Rows button on the Table Tools Design tab.
10 Change a Field Type: Open the table whose field(s) you want to modify in Design view, click in the field s Data Type box, click the Data Type list arrow, and select a data type. Add a Primary Key: In Design view, select the field you want to use as your primary key, and click the Primary Key button on the Table Tools Design tab. Change a Field s Properties: In Design view, select the field that you want to change the properties for, click in the property field you want to change, and enter the new settings. Change the Field Size: In Design view, select the field whose size you want to change. Click in the Field Size field and type or select the field size. Index a Field: In Design view, select the field you want to index, click in the Indexed property field, click its list arrow, and select an indexing option. Add a Description to a Field: In Design view, click in the field s Description box and type the description.