Transcription of App Inventor Beginner Tutorials
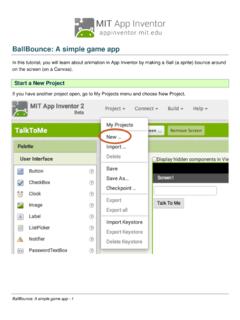
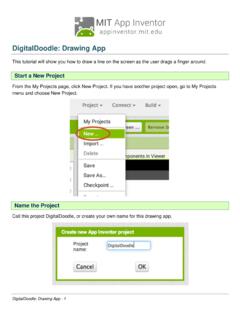
1 App Inventor Beginner Tutorials1 Four Simple Tutorials for Getting Started with App : Your first App Inventor Part 2: Shaking and User : A simple game : Drawing App47 Four Simple Tutorials forGetting Started with AppInventorApp Inventor Beginner Tutorials - 3 TalkToMe: Your first App Inventor appThis step-by-step picture tutorial will guide you through making a talking get started, go to App Inventor on the web. Go directly to , or click the orange "Create" button from the App Inventor Beginner Tutorials - 4 Log in to App Inventor with a gmail (or google) user name and an existing gmail account or school-based google account to log in to set up a brand new gmail account, go to Inventor Beginner Tutorials - 5 Click "Continue" to dismiss the splash Inventor Beginner Tutorials - 6 Start a new the project "TalkToMe" (no spaces!)
2 Type in the project name (underscores are allowed, spaces are not) and click Inventor Beginner Tutorials - 7 You are now in the Designer, where you lay out the "user interface" of your Design Window, or simply "Designer" is where you lay out the look and feel of your app, andspecify what functionalities it should have. You choose things for the user interface things like Buttons,Images, and Text boxes, and functionalities like Text-to-Speech, Sensors, and a ButtonOur project needs a button. Click and hold on the word "Button" in the palette. Drag your mouse overto the Viewer. Drop the button and a new button will appear on the Viewer. App Inventor Beginner Tutorials - 8 Connect App Inventor to your phone for live testingOne of the neatest things about App Inventor is that you can see and test your app while you're buildingit, on a connected device.
3 If you have an Android phone or tablet, follow the steps below. If you donot have a device, then follow the instructions for setting up the on-screen emulator (opens a newpage) and then come back to this tutorial once you've gotten the emulator connected to App Inventor Beginner Tutorials - 9 Get the MIT AI2 Companion from the Play Store and install it on your phone preferred method for getting the AI2 Companion App is to download the app from the Play Storeby searching for "MIT AI2 Companion".App Inventor Beginner Tutorials - 10To download the AI2 Companion App to your device directly (SKIP THIS STEP IFYOU already got the app from Play Store)If for some reason you can not connect to the Google Play store, you can download the AI2 Companionas described , you will need to go into your phone's settings (#1), choose "Security", then scroll down to allow"Unknown Sources", which allows apps that are not from the Play Store to be installed on the , do one of the following:A) Scan the QR code above (#2)orB) Click the "Need help " link and you'll be taken to the download page.
4 From there you candownload the file to your computer and then move it over to your device toinstall it. App Inventor Beginner Tutorials - 11 Start the AICompanion on your deviceOn your phone or tablet, click the icon for the MIT AI Companion to start the app. NOTE: Your phoneand computer must both be on the same wireless network. Make sure your phone's wifi is on andthat you are connected to the local wireless network. If you can not connect over wifi, go to the SetupInstructions on the App Inventor Website to find out how to connect with a USB Inventor Beginner Tutorials - 12 Get the Connection Code from App Inventor and scan or type it into yourCompanion appOn the Connect menu, choose "AI Companion".
5 You can connect by:1 - Scanning the QR code by clicking "Scan QR code" (#1).or2 - Typing the code into the text window and click "Connect with code" (#2).App Inventor Beginner Tutorials - 13 See your app on the connected deviceYou will know that your connection is successful when you see your app on the connected device. Sofar our app only has a button, so that is what you will see. As you add more to the project, you will seeyour app change on your Inventor Beginner Tutorials - 14 Change the Text on the ButtonOn the properties pane, change the text for the Button. Select the text "Text for Button 1", delete it andtype in "Talk To Me". Notice that the text on your app's button changes right Inventor Beginner Tutorials - 15 Add a Text-to-Speech component to your appGo to the Media drawer and drag out a TextToSpeech component.
6 Drop it onto the Viewer. Notice thatit drops down under "Non-visible components" because it is not something that will show up on theapp's user interface. It's more like a tool that is available to the Inventor Beginner Tutorials - 16 Switch over to the Blocks EditorIt's time to tell your app what to do! Click "Blocks" to move over to the Blocks Editor. Think of theDesigner and Blocks buttons like tabs -- you use them to move back and forth between the two areas ofApp Inventor Beginner Tutorials - 17 The Blocks EditorThe Blocks Editor is where you program the behavior of your app. There are Built-in blocks that handlethings like math, logic, and text.
7 Below that are the blocks that go with each of the components in yourapp. In order to get the blocks for a certain component to show up in the Blocks Editor, you first have toadd that component to your app through the Inventor Beginner Tutorials - 18 Make a button click eventClick on the Button1 drawer. Click and hold the when do block. Drag it over to theworkspace and drop it there. This is the block that will handle what happens when the button on yourapp is clicked. It is called an "Event Handler".App Inventor Beginner Tutorials - 19 Program the TextToSpeech actionClick on the TextToSpeech drawer. Click and hold the call block. Drag it overto the workspace and drop it there.
8 This is the block that will make the phone speak. Because it isinside the , it will run when the button on your app is clicked. App Inventor Beginner Tutorials - 20 Fill in the message socket on BlockAlmost done! Now you just need to tell the block what to say. To do that, click onthe Text drawer, drag out a text block and plug it into the socket labeled "message". Specify what the app should say when the button is clickedClick on the text block and type in "Congratulations! You've made your first app." (Feel free to use anyphrase you like, this is just a suggestion.)App Inventor Beginner Tutorials - 21 Now test it out!Go to your connected device and click the button.
9 Make sure your volume is up! You should hear thephone speak the phrase out loud. (This works even with the emulator.)Great job! Now move on to TalkToMe Part 2 to make the app respond to shaking and to let users put in whateverphrase they Inventor Beginner Tutorials - 22 TalkToMe Part 2: Shaking and User InputThis tutorial shows you how to extend the basic TalkToMe app so that it responds to shaking, and sothat the user can make the phone say any phrase s/he types to App Inventor on the web and log to and click "Create" or log in directly at Inventor Beginner Tutorials - 23 Open the "TalkToMe" project that you worked on in the last Inventor will always open the last project you worked on, so you may automatically be taken intoyour TalkToMe to the Designer TabYour project may open in the Designer.
10 If it does not, click "Designer" in the upper Inventor Beginner Tutorials - 24 Add an Accelerometer SensorIn the Sensors drawer, drag out an AccelerometerSensor component and drop it onto the Viewer. (It'sa non-visible component, so it drops to the bottom of the screen.) NOTE: emulator users should skipthis part and proceed to the next section of this tutorial called "Say Anything". (The emulator can notrespond to shaking!)App Inventor Beginner Tutorials - 25Go to the Blocks EditorClick "Blocks" to program the new Accelerometer Sensor that you just the Accelerometer Shaking eventClick the AccelerometerSensor1 drawer to see its blocks. Drag out the do block and drop it on the Inventor Beginner Tutorials - 26 What do we want the app to do when the accelerometer detects shaking?