Example: confidence
AUTOMATIC FRONT LOADING WASHING MACHINE USER …
the own er ther for material or lab our any pa rto fthe Product, theerial number of wh ich appears on Pro duct,w ic is fou nbe defective it i TWO ... resulting from water tests in the factory. DESCRIPTION ... place heavy objects or sources of heat or damp on top of the appliance.
Tags:
Information
Domain:
Source:
Link to this page:
Documents from same domain

QUICK START GUIDE SETTING THE CLOCK - Fisher …
www.fisherpaykel.comsetting the clock the control panel first use 1 remove all cable ties & packaging holding the shelving in place ... quick start guide built-in oven 1 control panel

591090E FP PRO Range installA4 USCA - fisherpaykel.com
www.fisherpaykel.comInstallation, electrical connections, and grounding must comply with all applicable codes. In the absence of local codes, the range should be installed in accordance with the latest edition of National Fuel Gas Code ANSI Z223.1 and National Electrical Code ANSI / NFPA 70.

SINGLE / DOUBLE BUILT IN OVEN (OB60 models only)
www.fisherpaykel.comCOOKING *Actual labels may di˜er from shown SINGLE / DOUBLE BUILT IN OVEN (BI models only) Serial label located under the control panel in the interior of the oven.

and User guide - Fisher & Paykel
www.fisherpaykel.com2 Installation instructions Unpacking To ensure the best performance from your new washer please follow the instructions below. Removing the packaging 1 Remove the outer packaging. 2 Tilt the machine backwards and walk it off the bottom packer one foot at a time.

Installation instructions - Fisher & Paykel
www.fisherpaykel.comflammable propellant in this appliance. Never store volatile or flammable materials in your refrigerator as they may explode. Never freeze liquids in glass containers. Liquid expands during freezing, which may cause the container to explode. Never freeze carbonated drinks. They may explode. Do not consume food if it is too cold. Food removed ...

INSTALLATION INSTRUCTIONS - Fisher & Paykel
www.fisherpaykel.comIf the Drain hoses supplied are not long enough to reach your services, you must use a Drain Hose Extension Kit P/N 525798 which will extend the drain hoses by 3.6 m. The kit is available from the nearest Fisher & Paykel Authorised Service Centre or our local website listed at the end of this document. Clamp (1) (for securing Drain hose joiner)

FRONT LOADING CLOTHES WASHER - Fisher & Paykel
www.fisherpaykel.comclothes are receiving the best possible care. Take the time to read these instructions carefully before you begin using your washer. Follow the instructions in this User guide to ensure you get the performance you expect from your washer and the best possible wash results. Keep this manual for future reference. We hope you enjoy your new washer.

DishDrawer® User guide - Fisher & Paykel
www.fisherpaykel.comWARNING! - When using your dishwasher, follow basic precautions, including the following: Read all instructions before using the DishDrawer®. The information in this manual must be followed to minimise the risk of fire or explosion or to prevent property damage, personal injury or …

WATER FILTER REPLACEMENT INSTRUCTIONS
www.fisherpaykel.compressure. Ensure the supplied pressure-reducing valve is installed before ... 100°F (38°C) or drop below 33°F (0.6°C). ... 3 to remove dust in the ice tray collected during manufacture Repeat step 2 and transport. 4Empty the water from the ice bin and return it correctly.

E372B, E402B, E442B, E522B, RF372B ... - Fisher & Paykel
www.fisherpaykel.comINSTALLATION GUIDE / USER GUIDE NZ AU GB IE EU AE HK SG E372B, E402B, E442B, E522B, RF372B, RF402B, RF442B, ... about model and specification availability in your country, please go to our website ... product and cabinetry ventilation must be followed
Related documents

Understanding your MULTIPLE MYELOMA LAB TESTS
www.ninlarohcp.comMULTIPLE MYELOMA LAB TESTS ... heavy and light chains bind together to form whole Igs. Typically producing more light chains than required, the plasma cells then enter the blood as free light chains. The activity of myeloma or plasma cell
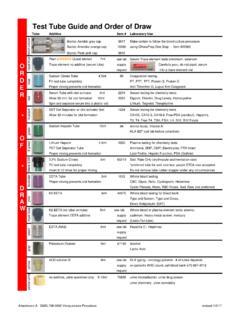
Test Tube Chart and Order of Draw Guide Sept 2016
www.guthrie.orgK2 EDTA (no label on tube) 5ml see lab Whole blood or plasma element tests: arsenic, Trace element EDTA additive supply cadmium, heavy metal screen, mercury request (Lead=Tan tube) EDTA (NA2) 6ml see lab Hepatitis C - Heptimax supply request Potassium Oxalate 5ml …

Automotive Electrical & Electronics
www.fmcet.inA heavy-duty (HD) discharge tester as shown in Figure is an instrument consisting of a low-value resistor and a voltmeter connected to a pair of heavy test prods. The test prods are firmly pressed on to the battery terminals. The voltmeter reads the …
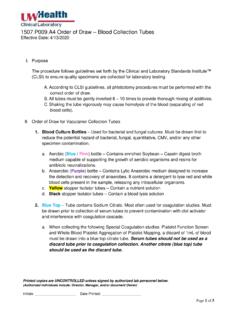
1507.P009.A4 Order of Draw Blood Collection Tubes
www.uwhealth.orgblood heavy metal testing (lead, manganese, chromium, cobalt). 6. ACD Solution A or B (Yellow stopper) 7. PICO syringe – Used for blood gas and other whole blood POC testing. 8. Research Kits – Collected after all diagnostic labs have been obtained. Printed copies are UNCONTROLLED unless signed by authorized lab personnel below.
CHAPTER 9 Identification and Characterization of ...
www.cdc.gov1 CHAPTER 9 . Identification and Characterization of Haemophilus influenzae. H. influenzae are small, pleomorphic, gram-negative bacilli or coccobacilli with random arrangements. H. influenzae is a fastidious organism which grows best at 35-37°C with ~5% CO 2 (or in a candle-jar) and requires hemin (X factor) and nicotinamide-adenine-dinucleotide (NAD, also known as …

0Collaboration Policy - GitHub Pages
cs144.github.iotrouble merging the Lab 4 starter code otherwise. 2. While inside the repository for the lab assignments, run git fetch to retrieve the most recent version of the lab assignments. 3. Download the starter code for Lab 3 by running git merge origin/lab4-startercode . 4. Within your build directory, compile the source code: make (you can run, e.g.,