Transcription of Avaya 4610 IP Phone Quick Reference Guide
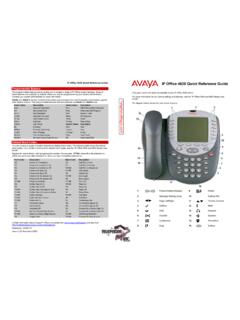
1 IP Office 4610 Quick Reference Guide Programmable Buttons The programmable feature buttons enable you to access a range of IP Office system features. Some of these features are available by default, others can only be programmed by your system administrator. Contact your system administrator for more information. Admin and Admin1 are two functions that enable you to program the most frequently used features against other feature buttons. The programmable features that are available via Admin and Admin1 are: Admin Name Description Admin Name Description Acct Account Code Entry Park Call Park to Other Extension AD Abbreviated Dial Prog Abbreviate Dial Program Admin Self-Administer SAC Send All Calls AutCB Automatic Callback Spres AD Suppress CFrwd Call Forwarding All Timer Timer CPark Call Park TmDay Time of Day CPkUp Call Pickup Admin1 Name Description Dir Directory Park Park DPkUp Directed Call Pickup <User> User GrpPg
2 Group Paging <Group> Group HFAns Internal Auto-Answer Flash Hook Flash HGNS+ Set Hunt Group Night Service AD Abbreviated Dial Default Short Codes You can access a variety of system features by dialling short codes. The following table shows the default short codes. For a full list of your Phone s default short codes, see the "IP Office 2410 and 5610 User Guide ". Replace N, where shown, with an appropriate number. For example, *07*N#, where N is the extension to which you want your calls forwarded to, when you have forwarding switched on.
3 Short Code Description Short Code Description *00 Cancel All Forwarding *30 Call Pick Up Any *01 Forward Unconditional On *31 Call Pick Up Group *02 Forward Unconditional Off *32*N# Call Pick Up Extension *03 Forward On Busy On *33*N# Call Queue *04 Forward On Busy Off *34 Hold Music *05 Forward On No Answer On *35*N# Extn Login *06 Forward On No Answer Off *36 Extn Logout *07*N# Forward to Number *37*N# Park Call *08 Do Not Disturb On *38*N# Ride Call *09 Do Not Disturb Off *39 Relay On *10*N# Do Not Disturb Exception Add *40 Relay Off *11*N# Do Not Disturb Exception Delete *41 Relay Pulse *12*N# Follow Me Here *45*N# Call Steal *13*N# Follow Me Here Cancel *46 Call Steal *14*N# Follow Me To *47 Conference Add *17 Voicemail Collect *48 Voicemail Ringback On *18 Voicemail On *49 Voicemail Ringback Off *19 Voicemail Off *50 Forward Hunt Group Calls On *20*N# Set Hunt Group Night Service *51 Forward Hunt Group Calls Off *21*N# Clear Hunt Group Night Service *53*N# Call Pickup Members *29 Toggle Calls *57*N# Forward On Busy Number Further information about Avaya IP Office is available from and also from Reference : 15-601113 Issue 2 (22 November 2006) IP Office 4610 Quick Reference Guide This Guide covers the basic functionality of your IP Office 4610 Phone .
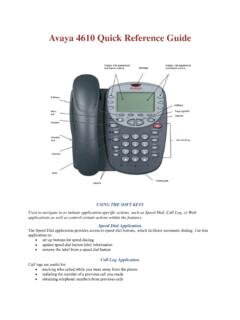
4 For more information on your Phone settings and features, see the "IP Office 4610 and 5610 User Guide ". The diagram below shows the main Phone features: 1 Feature Buttons/Display 10 Redial 2 Message Waiting Lamp 11 Dialling Pad 3 Softkey 12 Volume Controls 4 Options 13 Mute 5 Page Left/Right 14 Headset 6 Hold 15 Headset Jack 7 Transfer 16 Speaker 8 Conference 17 Phone /Exit 9 Drop IP Office 4610 Quick Reference Guide Answering Incoming Calls Pick up the handset or press to use the speakerphone. Making a Call Pick up the handset or press to use the speakerphone.
5 Dial the number, including any outside line digits and/or area codes. Accessing Voicemail To retrieve your voicemail, press MESSAGES or, if Visual Voice is configured, press Voice. For more information about Visual Voice see the "IP Office 2410 and 5610 User Guide ". Hold To place a call on hold, press HOLD. To retrieve a held call, press corresponding to the held call. Transferring a Call 1. With the call active, press TRANSFER. The call is placed on hold; is displayed and you hear a dial tone. Dial the number you want to transfer the call to. 2. To transfer without announcing the call, if the line is free, hang up. If the line is busy or if no one answers, press corresponding to the held call. OR To announce the call, remain on the line and wait for an answer. Announce the call and hang up.
6 If the line is busy or if no one answers, press corresponding to the held call. Conference 1. To establish a conference call, dial the first party and wait for an answer. 2. Press CONFERENCE. The current call is placed on hold, is displayed and you hear a dial tone. 3. Dial the number of the next party and wait for an answer. 4. To add the new party to the call, press CONFERENCE again. 5. Repeat Steps 2 to 4 to add further participants. To drop yourself from the conference, hang up. Speakerphone To use the speakerphone, press . Make or answer the call. To adjust the volume, press and . To end the call, press again. To change from speakerphone to handset, pick up the handset and continue talking. To change from handset to speakerphone, press and hang up the handset. Do Not Disturb To switch Do Not Disturb on, dial *08.
7 An N is displayed. To switch Do Not Disturb off, dial *09. Note: The short codes documented in this Guide refer to the use of default short codes only. IP Office 4610 Quick Reference Guide Mute To prevent the other person on the line from hearing you, press MUTE. To reinstate two-way conversation, press MUTE again. Redial To redial a previously dialed number, press REDIAL. If set, the last three dialed numbers are displayed (see below); in that case, press the associated feature button. To change the Redial number selection: 1. Press Options and then press Application Options. 2. Press Redial to toggle between Last 3 Numbers and Last Number. 3. Press Save. To restore the previous setting without changing it, press Cancel. Speed Dials To Dial a speed dial: 1.
8 Press SpDial to display your speed dials. If there are more stored numbers than can be displayed on one screen, press and to see more. 2. When the speed dial you require is shown, press or adjacent to the speed dial name. Your Phone dials the number automatically. To Add a speed dial: 1. Press SpDial and then press Add. 2. The cursor, a | symbol, is displayed in the name field. Each key is marked with the letters it provides. Depending on the character you require, you may have to press the key more than once. For example: The 2 key is also marked as A, B and C. To enter a C, press the key until C is displayed. If the next character you want is on the same key, press and then enter the next character. 3. Press Number. The cursor is displayed in the Number field. Enter the number or extension number.
9 If the next number you want is on the same key, press and then enter the next number. 4. Press Save. To Add a short code to a speed dial, simply enter the short code name in the name field, and the prefix * followed by the short code number in the number field as above. Diverting Calls To divert calls at another extension using the Follow Me codes, dial *12*N# (where N is your extension number). All calls to your extension will be diverted to the extension you are using. To re-direct your calls back to your own extension, dial *13*N#. To divert calls at your own extension, dial *14*N# (where N is the extension to which you want your calls diverted). To cancel divert calls from your own extension, dial *14*#. Call Forwarding To set the number to which your calls are forwarded, dial *07*201# (forwarding to 201 in this example).
10 To switch Forward Unconditional On, dial *01. A D is displayed. To switch it off, dial *02. To switch Forward On Busy On, dial *03. To switch it off, dial *04. To switch Forward On No Answer On, dial *05. To switch it off, dial *06.