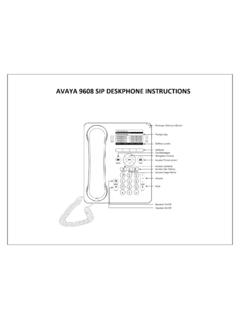
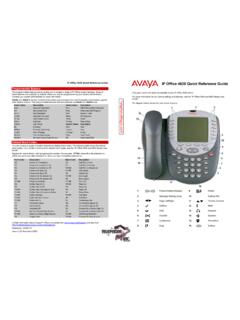
Transcription of Avaya 4610 Quick Reference Guide - Clayton State University
1 Avaya 4610 Quick Reference Guide USING THE SOFT KEYS Used to navigate to or initiate application-specific actions, such as Speed Dial, Call Log, or Web applications as well as control certain actions within the features. Speed Dial Application The Speed Dial application provides access to speed dial buttons, which facilitate automatic dialing. Use this application to: set up buttons for speed dialing update speed dial button label information remove the label from a speed dial button Call Log Application Call logs are useful for: tracking who called while you were away from the phone redialing the number of a previous call you made obtaining telephone numbers from previous calls The ip telephone also allows you to set up a Speed Dial button for any call listed, facilitating dialing of frequently-called numbers.
2 All calls made to or from your ip telephone are added to one of three Call Logs - Outgoing Calls, Incoming Answered Calls, and Missed (unanswered) Calls. The Missed Call Log displays automatically whenever you access the Call Log application, but you can quickly access a different log if desired. Each log has a main screen, which lists the calls in chronological order (newest to oldest), and a details screen. The main screens provide the Name and Number of the calling or called party, if available, and a time (for the current date) or date (for calls prior to the current date). The details screen displays all this information (in a wider format), shows what type of call it was, and allows you to take certain actions with that entry.
3 Each Call Log can contain a maximum of 15 entries. When a log contains more than three entries, Page Right and Page Left buttons are available to help you scroll through the log three entries at a time. Calls are listed in order from top to bottom, the most recent call first. Two additional telephone Feature buttons are: Phone/Exit - used to exit call-related features and restore the Phone screen to the display, and Options - used to access the Options function to set certain telephone parameters and view telephone /server/connection status and other information for troubleshooting. ip telephone Options Access the Options function using the Options button below and to the right of the display area.
4 Using Options menus, you set certain phone parameters, such as display area contrast, how you want the Redial button to work, when you want your saved information backed up or restored, the language you want displayed, or how you want your Feature buttons labeled. You can also view telephone status screens for troubleshooting or information purposes. The Page Left and Page Right buttons between the Phone/Exit and Options buttons are also considered telephone buttons. Use the Right Arrow to move forward or the Left Arrow to move backward from one display screen to another. These paging buttons work in conjunction with the paging indicators ( ) you might see on an application screen.
5 Paging indicators show that a screen has more than one page, and help you navigate forward and back through those additional pages. To activate the function or feature represented by a telephone button, just press the appropriate button. Line/Feature buttons ( ) appear on both sides of the display area. These buttons provide call appearance Lines and other call-related features in the Phone Applications. Line/Feature buttons also serve as application-specific buttons in the Call Log or other applications. For example, pressing a Line/Feature button in the Call Log Application selects the corresponding entry, so you can take further action with your selection.
6 When you enter text on a screen, for example labeling a Speed Dial button, several Line/Feature buttons provide editing features like backspacing or hyphenation. Here is an example of the difference between Line/Feature button functionality in the Phone Application as opposed to other applications. To call someone from the Phone Application, which is the default display screen, you press the first Line/Feature button and dial your party. In the Call Log Application, pressing the first Line/Feature button selects or highlights the first call log entry and displays detailed call information. Standard/Fixed Features Call Appearance: In the Phone application, both call appearance lines and administered feature buttons take up half the display width.
7 The half-width display area allows more Line/Feature buttons per screen. With half-width call appearances, only the Line/Feature buttons on the appropriate left or right side of the button can be used to select that call appearance. Any call-associated messages for that call appearance show on the top display line. When placing a call outside the office, the phone number must be preceded by a 9 . Hold: The Hold feature puts a call on hold until you retrieve it. Placing a call on hold Press the Hold () button. The line's display area changes to white text with a dark gray background, and the Hold () icon displays. Retrieving the held call Press the Line/Feature button on which the call is being held, or press the Hold () button.
8 The call is now active. Conference: The Conference feature allows you to conference up to the maximum number of 6 parties. Adding another party to a call 1. Dial the first party, then press the Conference () button. The line's display area changes to white text with a dark gray background. The current call is placed on hold, the Soft Hold () icon displays, and you hear a dial tone. 2. Dial the number of the next party and wait for an answer. 3. Press the Conference () button again to add the new party to the call. 4. Repeat Steps 1- 3 for each party you want to conference in to the call. Adding a held call to the current call 1. Press the Conference () button.
9 The icon on the current line changes to the Soft Hold () icon. 2. Press the Line/Feature button of the held call. 3. Press the Conference () button again. All parties are now connected. Press the Drop () button. The last party connected to the conference call is dropped from the call. Manual Dialing Dial a call manually by picking up the handset, activating your headset, pressing the Speakerphone button or simply starting to dial with the handset on-hook. 1. Pick up the handset, activate your headset, or press the Speakerphone button and dial. You may also start dialing with the phone on-hook. In this case, the phone automatically goes off-hook and activates the speaker after you press the first keypad digit.
10 If the Phone screen is active, the first available call appearance line displays the off-hook () icon and the background appears shaded. If the Phone screen is not active, the top display line provides call-related messages. If applicable, the Call Timer displays at the top of the display area. (See Application Options to activate/deactivate call timer) A. To change this option, press the corresponding Line/Feature button. B. Press the Line/Feature button for the next setting you want to change or save this setting by pressing the Save softkey. (To restore the previous setting without changing it, press the Cancel softkey.) After saving or canceling, the first Options Main screen displays.