Transcription of back stabilization and core strengthening
1 Back stabilization and core strengtheningEXERCISE BOOKLET back stabilization and core strengtheningTABLE OF CONTENTSI ntroduction 1 Hook-lying stabilization Progression Neutral position 2 Hook-lying with Arm Movements 3 Bent Knee to Side 4 Heel Slides 5 Bent Knee Leg Lift (small steps) 6 Alternate Arm and Leg Marching 7 Curl-up 8 Curl-up with Rotation 9 Hands and Knees stabilization Progression Neutral Position 10 Rocking Forward and Backward 11 Arm Slide and Reach 12 Leg Slide and Reach 13 Opposite Arm and Leg Slide and Reach 14 Face-down stabilization Progression Neutral Position 15 Face-down One-arm Lift 15 Face-down Knee Bend/Lift 16 Face-down Arm/Leg Lift 17 Bridging stabilization Progression Basic Bridge 18 Bridge with Arm Lift 18 Bridge with Leg Lift 19 Plank Exercises Side Support Plank 20 Face-down
2 Plank 21 HEALTH EDUCATION1 INTRODUCTIONThe deep muscles of your stomach and low back are the core mus-cles of your body. They support and protect your low back and also help your leg and arm muscles work well. Doing the exercises in this booklet will strengthen your core read the instructions and follow the advice of your doctor or physical therapist when you start or progress to more difficult exercises. There are 4 basic starting positions: Hook-lying Face-down lying Hands and knees BridgeThe exercises get progressively more challenging in each position.
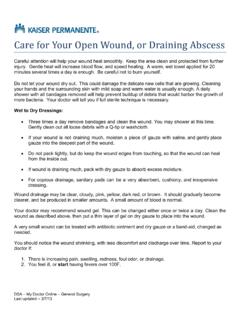
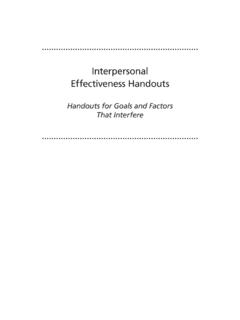
3 Do not move to the next exercise in a series if you can t do the one before it. If your symptoms get worse while doing these exercises, talk to your doctor or physical therapist. 2 NEUTRAL POSITIONHook-lying stabilization ProgressionLie on your back with your knees bent and your feet flat on the floor, which is the hook-lying is the starting position for the hook-lying exercises in this series. Find your neutral position by gently arching and flattening your back until you find a position where you are most comfortable. This is your neutral position. Gently tighten your stomach muscles without moving your back out of neutral EDUCATION3 HOOK-LYING WITH ARM MOVEMENTSHook-lying stabilization ProgressionLie on your back with your knees bent and arms by your sides.
4 Find and hold your neutral position throughout the One arm: Lift one arm overhead slowly. Return it to the start position while lifting the other arm overhead slowly. Continue by alternating right and left Both arms: Lift both arms overhead and return slowly to the start position while keeping your neutral : A B Frequency AB4 BENT KNEE TO SIDEHook-lying stabilization ProgressionA. One knee bent: Lie on your back with one knee bent and the other leg straight. Find and hold your neutral position through-out the exercise. Slowly let your bent knee move out to the side without moving your other hip.
5 B. Both knees bent: Progress by doing the same exercise with both knees bent. Continue by alternating right and left : A B Frequency ABHEALTH EDUCATION5 HEEL SLIDESHook-lying stabilization ProgressionLie on your back with your knees bent and your feet flat on the floor. Find and hold your neutral position throughout the exercise. A. Heel slide: Keep your heel on the ground and slowly slide your foot forward until your leg is almost straight. Return to the start position by sliding your heel back. Repeat the movement with your other leg. B. Heel lift and slide: Repeat exercise A with your heel lifted 1 to 2 inches from the floor.
6 Continue by alternating right and left : A B Frequency ABSTARTFINISH6 BENT KNEE LEG LIFT (SMALL STEPS)Hook-lying stabilization ProgressionLie on your back with your knees bent and your feet flat on the floor. Find and hold your neutral position throughout the exercise. A. One leg: Slowly lift one foot about 3 to 5 inches from the floor. Lower slowly. Repeat with the other foot and continue alternat-ing legs as if taking small steps. B. Both legs: Slowly lift one foot about 3 to 5 inches from the floor. Hold that position as you bring your other foot up.
7 Slowly lower one leg, then the other. Continue this pattern: lift, lift, lower, lower. Do: A B Frequency ABHEALTH EDUCATION7 ALTERNATE ARM AND LEG LIFTHook-lying stabilization ProgressionLie on your back with your knees bent and your feet flat on the floor. Find and hold your neutral position throughout the exercise. Slowly lift one arm overhead and lift your opposite foot 3 to 5 inches up from the floor. Slowly lower your arm and foot back to the floor. Repeat with your other arm and leg. Continue to alternate sides. Frequency STARTFINISH8 Lie on your back with your knees bent and your feet flat on the floor.
8 Find and hold your neutral position throughout the exercise. Do not do this exercise if you have osteoporosis (thinning bones).A. Hands on thigh: Place your hands on your thighs. Gently tight-en your stomach muscles. Slowly lift your shoulders as you slide your hands toward your knees. Keep your neck muscles relaxed by holding your chin tucked in. Return to the start position. B. Hands behind head: Place your hands behind your head. Gently tighten your stomach muscles. Slowly lift your shoulders up from the floor. Support your neck with your hands but do not pull on your head.
9 Return to the start : A B Frequency CURL-UPHook-lying stabilization ProgressionABHEALTH EDUCATION9 CURL-UP WITH ROTATIONHook-lying stabilization ProgressionLie on your back with your knees bent and your feet flat on the floor. Find and hold your neutral position throughout the exercise. Do not do this exercise if you have osteoporosis (thinning bones).A. One hand behind head: Place one hand behind your head. Gently tighten your stomach muscles. Lift your shoulder and reach with your free hand toward the opposite knee. B. Both hands behind head: Place both hands behind your head.
10 Gently tighten your stomach muscles. Lift one shoulder and bring it toward the opposite knee. Support your neck with your hands but do not pull on your head. Return to the start : A B Frequency AB10 NEUTRAL POSITIONHook-lying stabilization ProgressionThis is the starting position for the hands and knees exercises in this series. Get on your hands and knees. Your hands should be directly below your shoulders and your knees should be directly below your hips. Find your neutral position by gently moving your back up and down until you find the most comfortable position.