Transcription of C L A S S I C - V I E W Storm/Screen Doors INSTALLATION ...
1 Congratulations!You ve purchased a quality-built Storm/Screen door from Larson. Please take a moment tofill out and mail in your product warranty card for years of trouble-free service. Larson offers you one of the mostliberal warranties in the industry (see page 6 for warranty information). NOTE: Modification of door will void instruction booklet and sales receipt forfuture you have any questions regarding the INSTALLATION of your Larson storm door or need to order replacement parts,don't go back to the store, call our HomeownerHelplineat 1-888-483-3768. Our staff of storm door experts areon hand to answer any questions you may have.
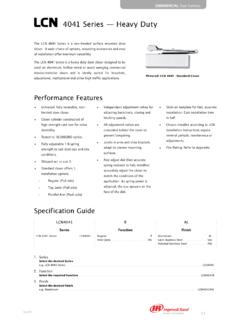
2 Please have the following information on hand when you call:(1) Warranty Registration number the number is on the decal located on the hinge z-bar (door must be open toview once installed). (2) Door model (3) Opening size of door (4) LM 8/05 FIGURE 1 PARTS IDENTIFICATIONCAUTION: READ THE WARNING BELOW The door requires caution while installing and during its total operational life. 2. The door is heavy and requires two people to lift and install on yourhome or Pinch points are indicated in the instructions by this symbol. Childrenshould not be allowed to play with the door and should be made aware ofthe pinch points by the owner.
3 Failure to properly instruct the user of thisproduct could result in the loss of a finger or other Do not operate the storm door without closer (s) installed and adjusted toprevent door Eye protection must be used during the INSTALLATION to prevent injury fromflying particles. 6. Do not modify or alter the INSTALLATION and specified use of the Read the complete INSTALLATION instructions before proceeding : Larson Manufacturing Company is not responsible for accidents and injuryresulting from the use or INSTALLATION of this You Get 2 INSTALLATION 2 7 closer 8-9 General Care and 11 Visit our web site at.
4 Larger parts may need to be ordered at the L A S S I C - V I E W Storm/Screen DoorsINSTALLATION INSTRUCTIONS2202220565 CLASSIC-VIEW SERIESYour Larson storm door is R E V E R S A - H I N G E meaning that the door is designed for either right handor left hand hinge INSTALLATION . Looking at your dooropening from the outside, determine which side youwant the hinge on. Turn your new door upside down tohave the hinge on the opposite NOTICE: If you choose to have thestorm door handle on the same side as your primedoor hardware, you MUST verify that there will beNO interference between the two handles hinged Z-bar assembly (or hinged door frame) is packaged can be mounted to either side of the the door flat on saw horses (outer front face of door facing up).
5 Place the hinge Z-bar assembly on the edge of the door as shown with each hingeleaf turned down (see Figure 4). Check to see that the aluminum Z-bar isorientated as shown in illustrations (Figure 6 for a left-hand hinged door, orFigure 7 for a right-hand hinged door).Move hinge Z-bar assembly up or down until the top of the z-bar hangs overthe top edge of the door 1/16" 1/8". (See Figure 5) Mark the top hole of thetop hinge and drill an 1/8" pilot hole. Fasten with one screw, using screw AorB depending on door thickness of model being installed. The top end of theZ-bar MUST overhang the top of the door 1/16" to 1/8".
6 The bottom endwill be cut to length each hinge leaf along the edgeof the door, drill 1/8" pilot holes, andcomplete the attachment of eachhinge to the door using screw AorB again depending on the O T E :Hinged Z-bar must swingafter securing hinges to the per Figure 2 FIGURE 4 Determine Left orRight Hinge Side1 Install Hinge on NEEDED1. Power drill with assorted and level 7/8" spade bit (for models hardware) 8. Pencil2. Phillips head screwdriver,9. Pliersregular screwdriver10. Saw horses3. wood chisel4. Caulking gun with caulking (optional)5. Tape measureLarson recommends having another person help you installyour Classic-View storm drill with a screwdriver bit is recommended.
7 Assembly may require shimming to fitexisting opening (shims not included).BEFORE YOU GET STARTED Verify opening size with size shown on the boxlabel. Do not take protective tape off door until instructedto do so (only applies to select models). Make sure house door trim is securely nailed tosupport your new storm 3 FIGURE 5202220565 CLASSIC-VIEW SERIES 3 Facing the house from the outside, measure the height of theopening as illustrated in Figure 8. This measurement is takenfrom the top of the door opening (underside of the trim board)down to the bottom two measurements (Aand B) as shown to determine thethreshold angle to cut the the Opening3 FIGURE 8 FIGURE 7 FIGURE 6 The top of the z-bar should be at the correct position 1/16 to1/8" above the bottom of the z-bar must be cut to thecorrect length (opening height), taking into account the angle ofthe threshold.
8 See Figure the measurements taken in step 3, determine the angle tocut the this measurement to the Z-bar, then makea cut 1/16" less than your measurement to allow room for top dripcap. Save the z-bar cut-off scrap for steps 6 and 9 Cut Hinge-Side Z-Bar to Length4 HINT:Measure once!4202220565 CLASSIC-VIEW SERIESWith the door properly fit in the opening, open the door to exposethe hinges. You will see two (2) pre-punched holes at each hingeplate. Using eight (8) #8x1" flathead screws (Figure 14), attacheach hinge plate to the wood jamb. Screw heads must be flushwith the hinge the remaining #8x1" painted panhead screws (Figure 15)in the outside of the hinge-side Hinge-Side Z-Bar7 FIGURE 14 FIGURE 15 Secure Door to Opening6 FIGURE 12 Place the door in the opening with the hinge-side Z-bar tightagainst the door trim or wood frame.
9 Temporarily install just twoof the painted #8 x 1" pan head screws (Figure 11) on the frontof the hinge-side Z-bar. Install one screw next to the top hingeand one next to the bottom hinge. Be sure not to over tighten thescrews and crush down the the cut-off scrap piece of Z-bar in place between the doorand up against the wood trim on the latch side of the door asshown in Figure the outside of the house with the door closed, check thedistance between the side of your Larson storm door and thescrap Z-bar. If this distance is greater than 1/4", a wood spacercan be placed between the hinge-side or latch-side Z-bar and thewood jamb (Figure 13).
10 If a wood spacer is needed, remove the door, add the spacer andreinstall. Spacer thickness should not exceed 1/4" and longerscrews should be used to properly secure the door to the jamb.(Awood spacer can also be used on the latch side Z-bar.) NOTE: Wood spacers and longer screws are not 13 Remove the expander from the door. Some models come with a single sweep, others come witha double sweep not install the sweep, simply thread the sweep into the channel of the expander. With the sweepinstalled, crimp both ends of the expander channel with a pliers.(Figure 10)NOTE:For best results crimp the inner leg of the channel only, at both ends of the :You must bend the rubber sweep out of the way expander on the door, but do notinstall screws until step 10 Install Expander Sweeps5 The drip cap goes above the door and z-bars.