Transcription of CALIFORNIA STATE UNIVERSITY NORTHRIDGE ELECTRICAL ...
1 CALIFORNIA STATE UNIVERSITY NORTHRIDGE ELECTRICAL engineering fundamentals laboratory EXPERIMENTS 1-12 ELECTRICAL engineering ECE 240L laboratory MANUAL Prepared By: Benjamin Mallard Department of ELECTRICAL and Computer engineering (Revised 12/11) 1 Introduction The main objective of this manual is to relate the theory of circuit analysis and practice. Each laboratory experiment consists of the "equipment needed", theory, preliminary calculations and procedure. Students are required to review the theory and complete the preliminary calculations before the lab period and perform the actual experiment . The theory is presented in brief and is to assist students with basic equations and in-formation needed to complete the calculations and perform the measurements. The last experiment in this manual is optional. It is intended for students to gain design expe-rience in using the theories, practices, and measurement techniques used in the prior experiments.
2 2 ECE 240 EXPERIMENTS 1) laboratory INSTRUMENTS AND REPORTS 2) OSCILLOSCOPES 3) DC CIRCUITS 4) COMPUTER SIMULATION 5) NETWORK THEOREMS 6) OPERATIONAL AMPLIFIERS 7) FIRST ORDER CIRCUITS 8) SECOND ORDER CIRCUITS 9) IMPEDANCE AND ADMITTANCE 10) FREQUENCY RESPONSE 11) PASSIVE FILTERS 12) DESIGN experiment 3 experiment ONE laboratory INSTRUMENTS AND REPORTS 1) EDUCATIONAL laboratory VIRTUAL INSTRUMENTATION SUITE (ELVIS) 2) BREADBOARD STRUCTURE AND LAYOUT 3) POWER SUPPLIES 4) GROUNDING 5) DIGITAL MULTIMETERS 6) OSCILLOSCOPES 7) FUNCTION GENERATORS 8) laboratory REPORTS ELVIS FEATURES AND LAYOUT Insert the Prototyping Board (breadboard) into slots on top of the Benchtop Worksta-tion. Find and identify the following features on the Benchtop Workstation (Front Panel): 1) Prototyping Board Power Button 2) System Power Indicator Light 3) Communications Bypass/Normal Switch 4) Variable Power Supply Switches and Knobs 5) Function Generator: i) Manual Select Switch ii) Waveform Select Switch iii) Frequency Select Knob iv) Fine Frequency Adjustment Knob v) Amplitude Adjustment Knob 6) Digital Multimeter (DMM): i) Input Current Measurement Terminal (HI) ii) Input Current Measurement Terminal (LOW) iii) Input Voltage Measurement Terminal (HI) iv) Input Voltage Measurement Terminal (LOW) 4 7) Oscilloscope (SCOPE): i) Channel A Input (CH A) ii) Channel B Input (CH B) iii) External Trigger Input (TRIGGER) Find and identify the following features on the Prototyping Board: 1) Analog Pins.
3 I) Differential Analog Inputs (6) ii) Analog Sense Input iii) Analog Ground 2) Oscilloscope Pins: i) Oscilloscope Signal Inputs ii) Oscilloscope Trigger Input 3) Programmable Function Pins: i) Programmable Functions Inputs (5) ii) Scan Clock (Scanclk) iii) Reserved (External Strobe Pin) 4) Digital Multimeter (DMM) Pins: i) 3 Wire Transistor Measurements (3-Wire) ii) Input Current Measurement Pin (+) iii) Input Current Measurement Pin (-) iv) Input Voltage Measurement Pin (+) v) Input Voltage Measurement Pin (-) 5) Analog Outputs (2) i) DAC0 ii) DAC1 6) Function Generator i) Output Signal (FUNC_OUT) ii) Synchronization Signal (SYNC_OUT) iii) Amplitude Modulation Input (AM_IN) iv) Frequency Modulation Input (FM_IN) 5 7) User Configurable I/O (8): i) Banana Connector A (BANANA A) ii) Banana Connector B (BANANA B) iii) Banana Connector C (BANANA C) iv) Banana Connector D (BANANA D) v) BNC Signal 1 (BNC 1+) vi) BNC Signal 1 Ground or Reference (BNC 1-) vii) BNC Signal 2 (BNC 2+) viii) BNC Signal 2 Ground or Reference (BNC 2-) 8) Variable Power Supplies: i) Positive Output of 0V to 12V (SUPPLY+) ii) Power Supply Ground or Common (GROUND) iii) Negative Output of 0V to 12V (SUPPLY-) 9) DC Power Supplies: i) Fixed +15V Output (+15V) ii) Fixed -15V Output (-15V) iii) Power Supply Ground or Common (GROUND) iv) Fixed +5V Output (+5V) Although there are more features on the Prototyping Board, the connections, pins, and terminals listed above are the only items of importance for the ECE240 laboratory .
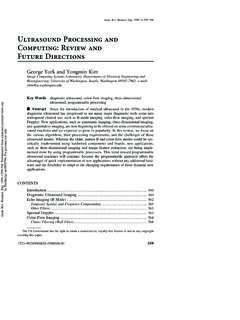
4 6 BREADBOARD STRUCTURE AND LAYOUT Figure + - A B C D E F G H I J + - + - 5 10 15 20 25 30 35 40 45 - + I II III 7 The diagram shown on the previous page is that of the circuit construction area on the prototyping board. In the laboratory , this area is used to construct a preliminary circuit according to the circuit schematic or wiring diagram. An explanation on its use is as follows. SECTIONS I and III The holes in these sections are connected vertically. Moreover, the column of holes between the + signs are connected. These are the holes adjacent to the red vertical stripe. Likewise the holes located between the - signs are connected. These holes are adjacent to the vertical blue line. There is no ELECTRICAL connection of these holes hori-zontally. It is suggested that the holes in this section be reserved for direct connections to laboratory equipment.
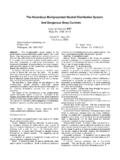
5 This enables the user to distributed common connections throughout the circuit that is suggestively constructed in section II. SECTION II The holes at this location are electrically connected horizontally. Each row of holes is connected on each side of the groove or trough. The groove isolates one row of holes from the other horizontally. There is no ELECTRICAL connection of any of these holes in the vertical direction. Each column of holes in this section is not connected. Since there are more holes in this section, construction of the circuit to be analyzed or de-signed is reserved for this area. 8 ELECTRICAL components are placed in holes where other connections can be made. An example is shown below. Figure + + - - A B C D E F G H I J + - + - 5 10 15 20 25 30 35 40 45 R1 R2 to COM Of Power Supply from +6V terminal of Power Supply 9 Schematic (circuit diagram) A schematic is a drawing of a circuit comprised of symbols and lines representing the connection scheme.
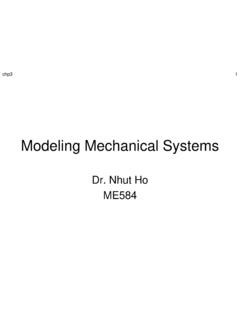
6 In figure , the circuit connection shown in figure is illu-strated. Figure Circuit Layout The diagram shown below depicts what is called a circuit layout. This type of diagram shows physical components, the terminals associated with them, and a wiring scheme showing how each component of the circuit is connected. In the diagram below, the triple power supply is connected in series with resistors R1 and R2. This depiction is the associated circuit layout of the circuit shown schematically above in figures and The series loop terminates on the COM (ground) terminal of the power supply thus completing the circuit. All power supplies have a power on switch that allows electricity to flow into the com-ponent from the wall or bench supply. Locate this switch and become familiar with its locality. The power supply also has indicator lights, LEDs, and numerical displays which provide information regarding over voltage and short circuit current protection, and values of dialed voltage and current respectfully.
7 Locate these features and be-come familiar with them. COR2 R1 610 Figure GROUNDING The concept of grounding is quite simple. Although some may think grounding is a concept whereby a path is chosen for electrons (or charge carriers in general) to dis-appear into the physical or earth ground, nothing is farther from the truth. The ground point in any circuit is a reference point or connection from which all voltages are meas-ured. The ground node in a circuit by convention has a voltage of zero. Therefore the voltage measured at any other node registers a measurement of the voltage differ-ence from that node to the reference or ground node. In establishing the ground node in a circuit, typically this node is located at the power source of the circuit. On all power supplies this is labeled as the COM socket or con-nector as mentioned previously. After the ground node has been designated in a cir-cuit schematic, this node should physically be the COM connection on the power supply of the circuit.
8 If more than one power supply is used, then all COM connectors of each power supply should be connected together. +6V +20V -20V COM VOLTS AMPS TRIPLE POWER SUPPLY R1 R2 11 PROCEDURE 1. Turn the power supply off. Make sure there is nothing connected to the output voltage terminals. 2. Connect one banana lead to the +6V output of the power supply and the other end to the voltage input of a digital multimeter. Connect another banana lead to the COM terminal of the power supply and the other end to the COM terminal of the digital multimeter. 3. On the power supply, turn all voltage adjustment knobs all the way to the left. 4. Turn on the power supply and digital multimeter. Make sure the voltage display on the power supply and the digital multimeter reads approximately 0 volts. The amp display on the power supply should read 0 amps. 5. Slowly turn the voltage adjustment knob to the right until the digital multimeter displays +6V.
9 6. Turn the power supply off. 7. Connect the power supply to the circuit illustrated in the circuit diagram above. Make sure the COM terminal of the power supply is connected to R2. 8. Turn on the power supply. 9. Measure voltages using the digital multimeter at each resistor lead and record them. 10. Turn off the power supply. 11. Repeat steps 1 through 10 with power supply voltage outputs of +5V, +3V, and +1V. 12. Turn on the computer and select the NI ELVIS icon. 13. From the NI ELVIS menu on the monitor, select the DIGITAL MULTIMETER. 14. Turn off the Benchtop Workstation power supply. Verify that the power indicator light is off. Connect a wire from the 0V to 12V (SUPPLY+) output pin of the pro-totype board to the HI input voltage measurement pin of the digital multimeter. Connect another wire from the Power Supply Ground or Common (GROUND) pin of the prototype board to the LOW input voltage measurement pin of the digital multimeter.
10 12 15. On the front panel of the Benchtop Workstation, turn all voltage adjustment knobs to the zero volt setting. 16. Turn on the Benchtop Workstation power switch. Make sure the voltage dis-play on the DMM window reads approximately 0 volts. The amp display should read 0 amps. Select the NULL icon on the DMM virtual instrument to reset the reading to zero volts if necessary. 17. Slowly turn the voltage adjustment knob to the right until the digital multimeter displays +6V. 18. Repeat step 17 for +5V, +3V, and +1V. 13 DIGITAL MULTIMETER The digital multimeter or DMM is used to measure ELECTRICAL quantities of voltage, cur-rent, and resistance. For voltage and current, the meter measures both DC and AC quantities. For AC voltages and currents, the meter measures what is typically called RMS quantities. These measurements are internally calculated by the meter using the following formulas for sinusoidal voltages and currents.