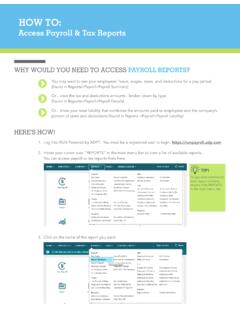
Transcription of Changing Employee Information - ADP
1 Copyright 2011 ADP, Inc. All rights reserved. The ADP Logo is a registered trademark of ADP, Powered by ADP is a service mark of ADP, Inc. Rev. 0830101 Performing Employee Maintenance for Clients Using ezLaborManager with RUN Powered by ADP Quick ReferenceNote: For more detailed Information about the tasks described below, see the online help. To access the online help, click in the upper right corner of any Employee InformationWhen you change any of the following fields in the payroll application for an Employee who is set up in ezLaborManager, the changes are sent to ezLaborManager : Employee Information changes you make in the ezLaborManager Employee page are not sent to the payroll application. If you want to change any of these fields, you must do so within the payroll application pages. Update Employee and Contractor InformationTo ensure that paychecks are accurate, make sure you update Information for all employees and contractors before you process a payroll .
2 For example, if an Employee moves from one jurisdiction to another, the taxation rules for that new jurisdiction may impact the Employee s paycheck. It is easier to change the jurisdiction before you process a payroll instead of tracking down and correcting any errors later. You should also complete the New Hire Wizard for any new employees or contractors that you want to include in the EmployeesEmployees should never be manually added into ezLaborManager unless the Employee will not be entered into RUN Powered by ADP. If you do have such employees please add them into ezLaborManager using a unique numbering system for their Employee In RUN Powered by ADP , click the Employee tab and select the Employee Directory page. 2 In the Menu list, select Add Employee to open the New Hire Wizard. Each of the pages included in the Wizard is listed in the navigation menu on the left side of the New Hire Wizard guides you through each of the pages that you need to complete to set up your employees successfully.
3 For help on a particular field or page, click Help in the upper-right corner of the page. The Help window includes help for the current page. You can also select the Search tab to search for additional Info First Name Last Name Address E-mail address Home phoneEmployment Info Hire date Employment status Termination date Rehire datePayroll Info Pay rate (if applicable) Department (if applicable)Copyright 2011 ADP, Inc. All rights reserved. The ADP Logo is a registered trademark of ADP, Powered by ADP is a service mark of ADP, Inc. Rev. 08301023 On each page, complete each of the required fields, and any additional fields as necessary for the : On the payroll Info page, be sure to select Yes in the Send to ezLaborManager field so the Employee 's data is transferred automatically from the payroll application to When you complete a page, click Next to go to the next page.
4 As you complete each page, a check mark is displayed in the navigation menu on the left side of the : If you need to take a break, click Finish Later in the bottom-right corner of the page. When you are ready to continue hiring the Employee , click the Complete {Contractor Name} task in the Tasks area on the payroll Home page. The New Hire Wizard opens on the page where you left On the last page of the New Hire Wizard, click the Complete ezLaborManager setup for { Employee name} the payroll Home page, click the ezLaborManager setup: { Employee name} task in the Tasks area. 6 Enter your ezLaborManager User ID and password and then click Login. (If you add another new hire without exiting your current session, you will not need to log into ezLaborManager again.)Note: The Employee Information entered into RUN Powered by ADP has passed to ezLaborManager and created the At the top of the page, complete the required fields and any additional fields as necessary.
5 The fields that are shared between the two applications are filled in automatically and cannot be changed. 8 If the Employee needs to have access to ezLaborManager, make sure to select Access Granted for 'Login Status' and enter a password for the Employee . The password cannot be the same as the User ID you've entered. 9 Complete any other necessary fields in the Access section. The Emulation tab is available only if the Employee is a supervisor. The Pay Cycle Access tab is available only if the Employee is an : When you complete each tab, be sure to click Submit at the bottom of the page to save your changes. 10 Repeat this procedure for each new Employee . Hire Contractors1 In RUN Powered by ADP , click the Employee tab and select the 1099 Directory In the navigation menu on the left side of the page, select Add Contractor to open the New Hire Wizard.
6 Each of the pages included in the Wizard is listed in the navigation menu on the left side of the New Hire Wizard guides you through each of the pages that you need to complete to set up your contractors successfully. For help on a particular field or page, click Help in the upper-right corner of the page. The Help window includes help for the current page. You can also select the Search tab to search for additional On each page, complete each of the required fields, and any additional fields as necessary for the : On the 1099 payroll Info page, be sure to select Yes in the Send to ezLaborManager field so the contractor's data is transferred automatically from the payroll application to When you complete a page, click Next to go to the next page. As you complete each page, a check mark is displayed in the Menu list to the left of the page 2011 ADP, Inc.
7 All rights reserved. The ADP Logo is a registered trademark of ADP, Powered by ADP is a service mark of ADP, Inc. Rev. 0830103 Important: If you need to take a break, click Finish Later in the bottom-right corner of the page. When you are ready to continue, click the the Complete {Contractor Name} task on the payroll Home page. The New Hire Wizard opens on the page where you left Complete Steps 5 - 11 of the Hire Employees section on page 2 to continue the contractor hire Employees1 In RUN Powered by ADP , click the Employee tab and select the Employment Info page for the Employee you want to rehire. Tip: Select Terminated in the Filter by Status field on the Employee Directory page to find the To the right of the Termination Reason field on the Employment Info page, click Rehire. In the Employee Status field, the status changes automatically from Terminated to Active.
8 3 In the Hire Date field, enter the date the Employee was If there is a reason listed in the Termination Reason field, change it to Review the remaining fields and make any changes that are Click Save to save your changes and go back to the Employee Home page. 7 Verify the Employee 's Information on each of the pages on the Employees menu, and make updates as Employee is now included in the payroll Worksheet when you process the r m i n a t e E m p l o y e e s1 In RUN Powered by ADP , open the Employment Info page for the Employee you want to In the Employee Status field, select Terminated as the Employee s new In the Termination Date field, enter the date of the Employee s last day of In the Termination Reason field, select the reason that best explains why the Employee was terminated. 5 Click Save to save your changes and go back to the Employee Home ezLaborManager, the Employee 's status is changed automatically to 'Scheduled for Termination' using the Termination Date you entered in Step 2.
9 The Employee is terminated in ezLaborManager when the termination date is no longer in an open pay period.