Transcription of Chapter 11: Installing and Bracing Trusses
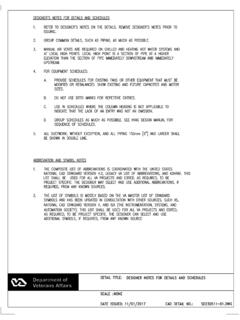
1 Page 109 Chapter 11: Installing and Bracing Trusses Most Common Mistakes: 1. Installing interior ganged wood Trusses at a height other than truss top chord top at eave height on bearing column outside edge. 2. Using bottom chord continuous lateral restraint other than what is specified on building plans. 3. Failing to confirm distance from end truss outside to opposite end truss outside matches overall building length at all points along end Trusses . How to Lift If available, use column cap winch boxes. Otherwise use a Genie lift, crane, boom truck, front-end loader, forklift, or other similar equipment.
2 Small span Trusses can be installed by hand labor. Helicopters have also been used to erect Trusses ! Above two Genie Superlifts are used to raise a truss pair. Below a crane picks up an entire bay with all purlins and ceiling joists installed. Page 110 Use equipment capable of Installing Trusses without risk to equipment operator and erectors. Connect any lifting devices to truss top chords with a closed loop attachment long enough to carry truss. Avoid lifting Trusses greater than 30 foot span by peak! Below is an example of WRONG WAY to lift Trusses : Long-span Trusses present special erection challenges.
3 Prevent any truss, when lifted off ground to be positioned on building, from flexing excessively. Place truss into position as straight and as plumb as possible. There is an inherent danger in attempting to hold a straight position without adequate Bracing . This lessens when ganged wood truss installation is used for excessively long spans. Interior Trusses , in Hansen Buildings, are designed specifically to be installed joined face-to-face in pairs. Avoid, under any circumstances, Installing Trusses spaced apart with blocking between! Page 111 Following are two incorrectly installed truss examples.
4 Any installation method OTHER than what is specified on building plans can critically reduce load-carrying capacity and building s roof system performance. To do so may result in building failure causing damage to contents and potential injury or fatalities to persons in or near structure! Page 112 Installation Start at one gable end using erection equipment to hold truss (with all hangers attached) in alignment while attaching one end into corner column notch. This is done while holding truss eave edge flush to corner column outside edge. After installation, truss top at corner column is at eave mark and outside truss edge is flush with outside column edge.
5 Verify building width at column tops and, when accurate, nail end truss to opposite corner column. Before nailing truss to other endwall columns, verify column spacings at end truss bottom chord level. Nail Trusses to columns according to plan. Good practice is to nail end Trusses to each endwall column, as specified on endwall truss to corner column detail, but in any case, use 6-10d common nails minimum. Before going further - Make certain to fasten all Trusses properly and (prior to fully recessed purlin installation) braced appropriately. Winds can arise with little or no warning and many un-braced or poorly-fastened Trusses have been damaged as a result.
6 Many construction injuries occur as due to improper truss handling, placement and Bracing . Use appropriate temporary Bracing at all times. Assure Trusses are structurally undamaged during erection and maintain in proper alignment before, during and after installation. Prior to raising Trusses , fully recessed purlins for each bay can be cut to length by distance between Trusses measure. Remember, due to truss plate thickness, a truss pair is often thicker than three inches! If equipment is available to lift more than a single truss pair at a time, install all framing members between truss pairs and lift at same time.
7 More work able to done on ground, faster and safer building project will be. Page 113 Raise first truss pair closest to previously installed end truss into place and attach at one end. After verifying building width, fasten into place, according to building plans, using Strong-Drive SDWS TIMBER Screws or bolts and nails, as specified on engineer sealed building plans. Two truss pairs being cranked into place with winch boxes Page 114 This is an unsafe construction practice example! Interior Trusses to Columns (with Strong-Drive SDWS TIMBER Screws) In most cases Strong-Drive SDWS TIMBER Screws are used in interior ganged wood truss to column connection.
8 In most instances, fastener will be driven through column into Trusses . See Figure 11-1 Figure 11-1 Strong-Drive SDWS TIMBER Screws Page 115 Install Strong-Drive SDWS TIMBER Screws through columns, with tip into Trusses , using a high torque, variable speed drill. Bring washer flush to side member avoid countersinking. To avoid splitting during fabrication, drill a 9/64 diameter lead hole 5 deep for each fastener. Then drill a 7/32 clearance hole for shank no greater than 2 deep. Interior Trusses to Columns (with HST brackets) High wind applications may require Simpson HST bracket use to resist uplift forces.
9 In these instances, roof Trusses will most typically be designed with a raised heel to provide an adequate surface area to drill through and bolt to. HST bracket installs on truss side of column. A single washer is provided for each bolt. Place washer on column side of assembly (opposite Trusses ). See Figure 11-2 Figure 11-2 HST brackets Fully recessed purlins Install previously cut fully recessed purlins into hangers between endwall truss and first truss pair. All fully recessed purlins are installed with crown or bow up. Insure purlin ends are tight to truss face at each end.
10 Ridge fully recessed purlins are installed first. On 40-foot or longer Trusses , install a fully recessed purlin half-way between eave and ridge next. Then install rest of fully recessed purlins in this bay, working from eave to ridge. Page 116 Repeat this process until all Trusses and fully recessed purlins have been installed. PRIOR to Installing fully recessed purlins between last truss pair and opposite endwall from where framing started, check overall building length as measured across roof. Distance from end truss outside face to end truss outside face is identical to building length.