Transcription of Configuring Hard Disk Overwrite on the …
1 xerox Multifunction Devices Customer Tips Configuring hard disk Overwrite on the workcentre 7328/7335/7345 dc07cc0433 January 15, 2008 ..for the user Overview This document describes how to configure the hard disk Overwrite feature on the workcentre 7328/7335/7345. The hard disk Overwrite function electronically overwrites data stored on the MFP hard drive using an algorithm specified by Department of Defense Directive The data stored on the hard drive is created during copy, print, scan, and fax operations. This document applies to the stated xerox products. It is assumed that your device is equipped with the appropriate option(s) to support the information within this document.
2 The two options available to Overwrite files are by Immediate Image Overwrite and Scheduled Image Overwrite . The system administrator is able to configure how many times (1 or 3) the files are overwritten. Immediate Image Overwrite Immediate Image Overwrite enables the system administrator to set parameters to automatically Overwrite the job data from the hard disk after each job has completed. Enable Immediate Image Overwrite locally at the device: 1. At the device press the Log In/Out button on the Device s Control Panel. 2. Enter the Administrator password. (The factory default password is 11111 ) 3. Touch Enter. 4. Press the Machine Status button on the Control Panel.
3 5. Touch the Tools Tab. 6. Select Authentication/Security Settings. 7. Select Overwrite hard disk . 8. Select Number of Overwrites. 9. Select either 1 Overwrite or 3 Overwrites. (Note: 3 Overwrites is more secure) 10. Touch Save. 11. Press the Log In/Out button. 12. For the setting to take affect touch the Reboot Now button within the Reboot Machine window. dc07cc0433 Customer Support Page 1 Configuration Verification To ensure that the Image Overwrite function has been configured properly follow these steps: 1. Press the Services button on the Control Panel.
4 2. Touch Copy and place at least 3 originals in the document feeder and press the green start button. 3. Press the Machine Status button and watch the Overwrite hard disk button. 4. When the job is in progress Standby will be displayed, once the job finishes the status will change to In Progress . 5. This confirms that the device has performed the Overwrite function for that particular job. Scheduled Image Overwrite Scheduled Image Overwrite allows a system administrator to configure what time the device conducts the Image Overwrite on the device. This option will Overwrite all areas of the hard disk where job data was stored.
5 Enable Scheduled Image Overwrite locally at the device: 1. Ensure that the number of Overwrite passes have been configured using the Immediate Image Overwrite procedure available on the previous page. 2. At the device press the Log In/Out button on the Device s Control Panel. 3. Enter the Administrator password. (The factory default password is 11111 ) 4. Touch Enter. 5. Press the Machine Status button on the Control Panel. 6. Touch the Tools Tab. 7. Select Authentication/Security Settings. 8. Select Overwrite hard disk . 9. Touch Scheduled Image Overwrite .
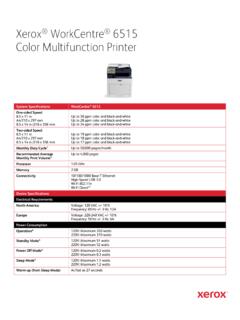
6 10. Select the time interval you would like an Image Overwrite to be performed. The choices are Daily, Weekly, or Monthly. 11. Configuration settings will appear on the right side of the screen, with the choices available dependent on which frequency was chosen. These settings will allow you to configure exactly when you want the Overwrite function to be performed. 12. Touch Save. 13. Press the Log In/Out button. When the Scheduled Image Overwrite is being performed an Overwrite hard disk screen will appear informing users that the Overwrite is in progress . The device will be unavailable during this time. When the Scheduled Image Overwrite has completed a reboot will take place.
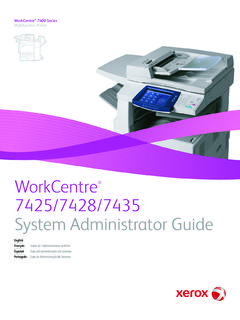
7 Enable Scheduled Image Overwrite remotely: 1. Ensure that the number of Overwrite passes have been configured using the Immediate Image Overwrite procedure available on the previous page. 2. In an internet browser enter the IP address of the device you would like to configure. 3. In the CentreWare Internet Services window click on the Properties tab. dc07cc0433 Customer Support Page 2 4. Click on the Security folder then the Scheduled Image Overwrite link. 5. Click on the Scheduled Image Overwrite checkbox. 6. From the Frequency pull down select Daily, Weekly, or Monthly. 7. Depending on your choice the Day, Week, Hour, Minute items will become active.
8 Using the active fields configure exactly when you want the Overwrite function to be performed. 8. Click the Apply button. dc07cc0433 Customer Support Page 3 When the Scheduled Image Overwrite is being performed an Overwrite hard disk screen will appear informing users that the Overwrite is in progress . The device will be unavailable during this time. When the Scheduled Image Overwrite has completed a reboot will take place. Additional Information xerox Customer Support welcomes feedback on all documentation - send feedback via e-mail to: You can reach xerox Customer Support at 1-800-821-2797 (USA), TTY 1-800-855-2880 or at Other Tips about xerox multifunction devices are available at the following URL: Copyright xerox CORPORATION 2008.
9 All Rights Reserved. dc07cc0433 Customer Support Page 4