Transcription of Connecticut Medical Assistance Program Web Claim Billing ...
1 Professional Web Claim Billing Guide V 15. April 20, 2017. Connecticut Medical Assistance Program Web Claim Billing Guide Professional The Professional Claim Submission, Re-submission, Adjustment and Inquiry processes are real- time transactions, which the provider can perform from this Secure Web site. Providers may submit Professional claims from this page by entering the Claim data directly onto the Web page, or they may perform an inquiry to retrieve previously adjudicated claims to view or use to re-submit claims or adjustments. It is recommended that this Billing guide be printed for easy reference when using the Claim submission tool. Claim Submission Professional Claim submission is used by a provider to enter and submit Claim data, and receive Claim adjudication results in real-time. By clicking on the Professional tab, a provider can enter all of the information required to submit a Professional Claim , with either single or multiple detail lines.
2 When all of the required Claim data is entered, the submit button is clicked. Missing or invalid data submitted will result in an error message being returned that identifies the problem and allows the correction to be made to the Claim . The Claim remains in a Not Submitted yet status and the error message will appear at the top of the Web page. Once the correction(s) is made, the submit button is clicked again. If the Claim has all of the appropriate Claim information, the Claim is processed by the interChange system. The Claim is adjudicated in real-time and the finalized Claim data is returned by the interChange system and populates the Professional Claim screens. The adjudicated Claim will now return a Claim Status Information panel containing an Internal Control Number (ICN), Claim Status, and Paid Amount, if applicable. An EOB Information panel (Explanation of Benefits) will display the detail line of the Claim , the code and the EOB description.
3 NOTE: Once a provider has started entering a Claim , there is no way to save the information and come back to that Claim later. Additionally, there are time limits for entering the Claim (approximately 40 minutes), so it is recommended that the provider gather all information needed to submit a Claim prior to begin entering the data for the Claim . Once a Claim has been submitted and paid, the provider can copy that Claim and modify it, rather than creating a new Claim . This functionality saves providers keystrokes and time. A Claim , for example, can be copied for a client from a prior visit and modified for the current visit, or a Claim with a widely used procedure code can be modified and submitted for different clients. It is important to note that the new Claim will inherit all of the data from the Claim that was copied, including all diagnosis codes, detail lines or prior payments such as other insurance or Medicare.
4 All data on the new Claim must be reviewed for accuracy before it is submitted. 1. Professional Web Claim Billing Guide V 15. April 20, 2017. Claim Re-submission If a Claim that was submitted on paper or electronically was denied due to a Billing error, a provider may also re-submit the Claim by first performing an inquiry on the Claim Inquiry page to retrieve the Claim , update the necessary fields on the denied Claim , and click the re-submit button to re-submit the Claim . The Claim can also be re-submitted with no changes if desired. For example, if the Claim denied because the client was not eligible, and the client was subsequently made retroactively eligible, the Claim can simply be re-submitted with no changes. Claim Adjustments/Voids If the provider wishes to correct or void a previously paid Claim , the provider must first perform an inquiry on the Claim Inquiry page to retrieve the Claim .
5 If a Claim is in a paid status but needs to be adjusted, that Claim information can be changed as needed by first changing the appropriate Claim data and then clicking on the adjust button. Do not click the adjust button without first making the changes to the Claim or the adjustment will process without changes. If a paid Claim needs to be completely recouped, the provider simply clicks the void button. Both of these functions result in the interChange system creating a new Claim and assigning an adjustment Internal Control Number (ICN). Claims that cannot be adjusted via the Web portal: Claims that exceed the timely filing limit will be recouped in full if adjusted via the Web. As a reminder, the timely filing guidelines are as follows: HUSKY C and HUSKY D for all claims ( Medical , FQHC, and behavioral health) - 365. days HUSKY A, HUSKY B and Charter Oak (for claims with dates of service prior to December 31, 2013*) behavioral health services - 120 days HUSKY A, HUSKY B and Charter Oak (for claims with dates of service prior to December 31, 2013*) non-behavioral health services - 365 days Please refer to the Timely Filing Guidelines section in Chapter 5 for additional information, available at by selecting Information, then Publications and scrolling down to Provider Manual Chapter 5.
6 Providers may adjust claims that exceed the timely filing limit only if the Claim adjustment is submitted to pay the same or less than the original claims. These claims will bypass timely filing edits for claims with a date of service or last paid date over the filing limit. 2. Professional Web Claim Billing Guide V 15. April 20, 2017. Claims with an ICN that begins with either 12 or 13. These claims were special handled by DXC Technology. An adjustment to these claims may also need to be specially handled. The provider should contact DXC Technology before attempting to adjust these claims. Paid Medicare crossover claims cannot be adjusted. They must be voided, and then re- submitted. This is easily accomplished by completing the following steps: 1. Void the paid Crossover Claim . 2. Copy the original Crossover Claim . 3. Make the necessary changes to the Claim data.
7 4. Click the submit button. NOTE: There are no restrictions to Claim voids. They can occur at any time. 3. Professional Web Claim Billing Guide V 15. April 20, 2017. Professional Claim Submission Instructions The Professional Claim is completed by entering data in the appropriate fields. The Professional Claim sections are included below. A list of fields, their description, field length, and field requirements are also included for each section. Field requirements indicate whether the field is: R = Required These fields must be completed in order for a Claim to be submitted. S = Situational This indicates that this field is required if another field or a certain value is provided on the Claim . O = Optional This field is not required and is optional for completion of the Claim . Auto-populated This indicates that this field is automatically populated with data.
8 If the required fields are not completed correctly, and the submit button is clicked, the Claim Status will indicate Not Submitted yet. Error messages will appear at the top of the page. The missing or invalid data must be corrected before the Claim can be successfully submitted. Once the Claim is successfully submitted, the Claim will adjudicate and post the Claim status at the bottom of the page. More detailed Billing instructions are located at , by selecting Information, then Publications, and selecting the appropriate provider type from the Chapter 8 drop down field. Additionally, the provider can left click on any field name to obtain field level help. Note: The back button in the top left corner of your Web page should not be used because it will not return the previous Web page. This is for security purposes. Should the back button be clicked, the provider will be required to log back into their Secure Web account.
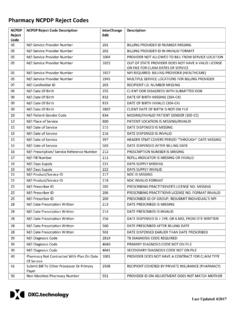
9 In order to return to the search results of the previous Claim search, click on the following Back To Search Results arrow located in the top left portion of the Claim panel, beneath the instructions for submitting professional claims. 4. Professional Web Claim Billing Guide V 15. April 20, 2017. Claim Sections Professional Claim Contains header level Claim information including provider, client, dates of service, total charges, third party liability amount, copay amount, and accident information. Diagnosis Contains diagnosis code entry. To enter diagnosis data, select the Code Set (ICD_9 or ICD. 10) from the drop-down and complete the Principal and Other diagnosis code fields. Click the add more button in the lower left hand corner to allow the entry of more diagnosis codes. A total of 12 diagnosis codes may be entered. To remove a diagnosis code, simply delete the code from the field.
10 Condition Contains the condition code related to the abortion procedure that is entered at the detail level of the Claim . To enter the condition code information, click the add button located on the lower left hand corner to allow the entry of one or more condition codes or the delete button located on the lower left hand corner to allow the removal of an individual condition code. Detail Contains the service detail information such as procedure codes, modifiers, charges, service dates and Medicare data. To add the first detail, complete the fields on the panel as appropriate. Click the add button located on the lower left hand corner to enter additional Claim details. Fifty (50) details are allowed per Claim . Highlight the Detail Item line and click the delete button located on the lower left hand corner to allow the removal of an individual Claim detail.