Transcription of Conveyor Belt Installation, Maintenance & Troubleshooting ...
1 BeltInstallation, Maintenance & Troubleshooting GuideInstallationStorage 1 Handling 1 installation 2 Stringing the belt 5 Tensioning 5 Training the belt 7 Factors Affecting the Training of a belt 8 Sequence of Training Operations 13 Cleaning 15 Loading 17 Curved Chutes 20 Pulley Lagging 20 Types of Lagging 21 Transition Distances 23Tu r n ove r s 24 TroubleshootingProblems, Causes and Solutions 25 MaintenanceFlexsteel belt Repairs 32 Ten Best Practices in Conveyor belt Vulcanized Splicing 33 Shipping 39 Quick Check 40 belt Roll Diameters 41 Terms and Conditions 43 installation , Maintenance & Troubleshooting Guide Table of ContentsTable of ContentsFig.
2 1 Center BarKeeper ChannelsSpreader BarStorageThe methods of storing and handling Conveyor belting and the procedures for tensioning it before making the final splice are just as important as actually making the splice. Protect your Conveyor belt investment with proper storage. Belts should always be stored upright in the factory package until used in a cool, dry building and in an area free from sunlight. If possible, store the belt roll suspended on a tube, bar or support stand. Where suspension is not possible, the roll should be stored on a dry surface and rotated 90 every 6 months. Rotation should be performed in the same direction used to wind up the belt . Rotating in the opposite direction could cause the roll to loosen or telescope. It is particularly advisable to rotate a large roll of belting (over 25 tons) to prevent "flat spotting" (cold flow).
3 This flow under pressure creates a thinner belt . Although this condition may correct itself after several months of operation, it is advisable to take steps for its prevention. If the belt is supplied on a steel reel, the belt would be considered as "suspended," and therefore not need rotation. Under no conditions should a roll of belt , especially raw edge or used, be laid flat on its side. Storing the belt flat on the ground, where moisture can penetrate exposed fabric, or storing the belt roll with weight on one edge may stretch the belt . This can cause belt camber or a bowing in the belt , resulting in serious belt mistracking. Handling The RollDuring extended storage, the belt roll should be covered with a tarp or dark plastic. Exposure to sunlight, rain and ozone can have detrimental effects on the rubber covers. The cover should remain in place for the entire storage is important to make sure the belt is not exposed to extreme temperatures during storage.
4 Ideal temperature for storing a belt is between 40 F (4 C) and 90 F (32 C). Temperatures outside of this range for an extended period of time can have detrimental effects on the rubber the length of time stored increases, and as the size of the roll of belting increases, so does the importance of the following correct storage procedures. Following these procedures will increase the life of the belt once it is installed on the if the precautions outlined in this section are followed, it is still possible that the outside wrap of each roll may suffer excessive hardening or cracking during long-term storage. If this situation occurs, remove the outer turn of the roll to assure that optimum cover/carcass quality material is used for belting is customarily packaged in cylindrical reels, or rolls on a core with the carrying cover side facing out.
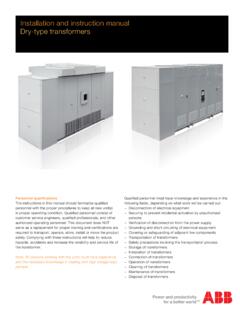
5 If rolling is necessary, it should occur in a direction such that the end of the roll on the outside wrap travels in the direction from which it is wound up. Rolling in the opposite direction tends to loosen and telescope the or rolls should never be dropped from a freight car, truck or other means of conveyance, since their weight will break the packaging and may damage the belt . Reels or rolls should always be rolled or provision should be made for hoisting them. For hoisting, a square lifting bar of the correct size should be placed through the hole in the center of the core. A spreader bar should be utilized to prevent the chains or slings from damaging the edges of the Conveyor belt . Slings or chains of the correct size for the weight of the roll should be used (Fig. 1).1 installation , Maintenance & Troubleshooting Guide InstallationNote: Temporary flat roll at bend point, as roll is pulled onto troughing flat roll at bend pointInstallationThe relative position of the top and bottom covers or surfaces of the belt should be considered when positioning the roll for threading.
6 Once the roll of belting has been transported to the point of installation , it should be mounted on a suitable shaft for unrolling and threading onto the Conveyor . Conveyor belting is normally rolled at the factory with the carrying side out. Consequently, in mounting the roll, the belt must lead off the top of the roll if it is being pulled onto the troughing or carrying idlers, but off the bottom of the roll if it is being pulled onto the return idlers. When pulling the belt onto the Conveyor , the roll will turn opposite the direction indicated by the arrows on the crate. Fig. 2 illustrates a suitable method of mounting, as well as leading off the top of the roll for pulling onto the troughing idlers. Fig. 22 installation , Maintenance & Troubleshooting Guide InstallationNo weight to be placed on topKeep bends together to prevent breaking the carcassFig.
7 3In some cases, such as in mines where headroom does not permit maneuvering a roll, the belt may have to be pulled off the roll and reefed (Fig. 3). Extreme care should be exercised to see that the loops have large bends to avoid kinking or placing undue strain on the belt , and no weight should ever be placed on the belt when it is in this position. Ideally, supports should be placed at each end where the bends third method of handling the roll, where headroom for mounting on a horizontal shaft is lacking, is mounting on a turntable with a vertical spindle. The belt must make a 90-degree twist as it comes off the turntable. This method is sometimes used underground, with the turntable mounted on wheels or skids for transporting the roll of belt as it lies on its side, as well as for unrolling it at the final location. If the belt is for replacement, the new roll can be set up as previously indicated.
8 The old belt is clamped off and cut, and the new belt is spliced to the leading end of the old belt by using approximately one-half the usual number of plate-type fasteners. The trailing end of the old belt is hooked to a truck, tractor, mine locomotive or other means of providing traction. The Conveyor drive motor is used to pull on the new belt while the towing device drags the old belt away and at the same time provides sufficient slack side tension for the Conveyor drive pulley. In all cases, care should be exercised to ensure the carrying side of the Conveyor is placed upward if pulling onto the top run, or downward if pulling onto the return a new Conveyor installation having little or no slope, a rope or cable should be attached to a clamp at the belt end. In clamping to the end of the belt for pulling it on the Conveyor , it is not sufficient to cut a hole through the belt or ears into its corners for tying on a rope.
9 A clamp should be made to distribute the pull applied to the end across its full width. Since the clamp must pass through places of low clearance, it usually is made of two pieces of 1/4-inch to 1/2-inch plate approximately equal to the belt width and 4 inches long. One piece is placed against each surface of the belt at the end, and bolts are placed through both plates at about 6-inch intervals and 2 inches back from the belt end. The rope is then attached to this clamp with a shackle or by welding an eye to one of the plates. The belt roll has been handled as previously described. The rope or cable is then threaded over the Conveyor and attached to a towing device to pull the belt onto the the Belt3 installation , Maintenance & Troubleshooting Guide InstallationSquare to Round ShaftBand Brake MaterialTensioning MeansLet-off StandsFig.
10 4 For installations with a relatively high degree of slope (12 degrees or more), the method of handling is slightly different. The roll of belt is set up as previously described. It is often found most convenient to place it at or near the head pulley, since this generally is the most accessible. Assuming the Conveyor is sufficiently long to require more than one splice, the Conveyor side and the return sides are threaded on separately. Care must be taken to see that Conveyor side or heavier cover is up on the carrying side and down on the return the belt is fed on, the tension at the roll tends to build up due to the weight of the belt on the slope. For this reason, some method of braking is required. Customary practice is to use a belt clamp, mounted on the Conveyor structure, through which the belt is threaded. Where the slope is very long, additional clamps should be spaced approximately 1000 feet apart.