Transcription of Dell Premier Multi-Device Wireless Keyboard and Mouse ...
1 Dell Premier Multi-Device Wireless Keyboard and Mouse KM7321W. User's Guide Mouse Model: MS5320W. Keyboard Model: KB7221W. Regulatory Model: MS5320Wt/KB7221Wt Notes, Cautions, and Warnings NOTE: A NOTE indicates important information that helps you make better use of your computer. CAUTION: A CAUTION indicates potential damage to hardware or loss of data if instructions are not followed. WARNING: A WARNING indicates a potential for property damage, personal injury, or death. 2021 Dell Inc. or its subsidiaries. All rights reserved. Dell, EMC, and other trademarks are trademarks of Dell Inc. or its subsidiaries. Other trademarks may be trademarks of their respective owners. 2021 01. Rev. A00. Contents Notes, Cautions, and What's in the Wireless Wireless Dell Peripheral Setting up your Wireless Pairing your Wireless Pairing your Wireless Mouse with a USB Pairing your Wireless Mouse using Pairing device three using Setting up your Wireless Pairing your Wireless Pairing your Wireless Keyboard with a USB Pairing your Wireless Keyboard using Pairing device three using Wireless Keyboard Physical 3.
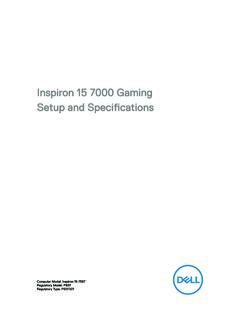
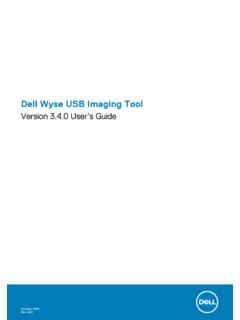
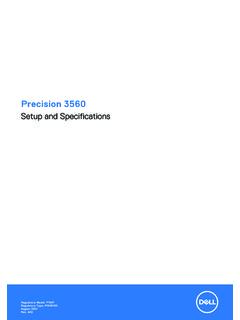
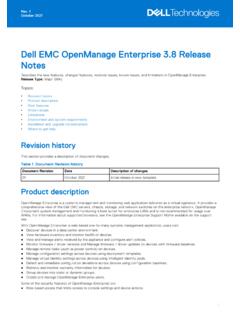
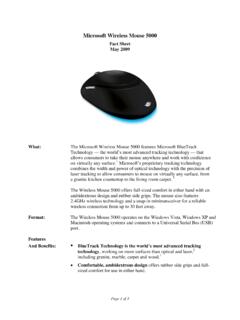
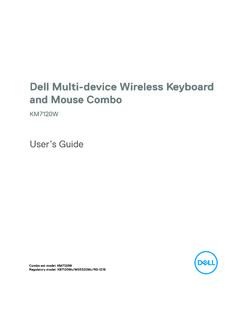
2 Wireless Mouse Physical Statutory Limited warranty and return For customers:..37. For European, Middle Eastern and African customers:..37. For customers:..37. 4 What's in the box 1. 3 4 5. 2. 1 Wireless Keyboard 2 Wireless Mouse 3 Documents 4 USB receiver 5 Batteries (AA-type x1 and AAA-type x2). What's in the box 5. Features Wireless Mouse 7. 1. 6. 2 5. 4 8. 3. 9. 1 Left button 2 Forward button 3 Backward button 4 Connection-mode button 5 Connection-mode lights 6 Scroll wheel 7 Right button 8 Optical sensor 9 Power switch 6 Features Wireless Keyboard 1. 2. 3. 4. 5. 6. 7. 1 Power switch 2 Battery-status light 3 Connection-mode lights 4 Connection-mode button 5 Keyboard feet 6 Battery cover 7 PPID (Piece Part Identification). label Features 7. NOTE: Caps/Num lock LED Behavior: Both Lock LED will be On for 5 seconds once pressed and then goes Off even if user continues to type under current state.
3 LED will only be On for 5 seconds again if user presses the Num Lock/ Caps Lock keys again. The lock state will also be reflected in the OSD (On Screen Display) if the Dell Peripheral Manager is installed on user's PC. 8 Features Dell Peripheral Manager Dell Peripheral Manager software enables you to perform the following: Assign program shortcuts to device programmable buttons or keys through the Action tab. View device information such as firmware version and battery status through the Info tab. Upgrade the latest firmware updates on your devices. Pair additional devices through the radio frequencies (RF) USB receiver or directly to your computer through Bluetooth. For more information, see Dell Peripheral Manager User's Guide on the product page at Dell Peripheral Manager 9.
4 Setting up your Wireless Mouse 1 Locate the slot on the side of the Wireless Mouse cover. Using your fingertip, pry open the Wireless Mouse cover. 2 Remove the USB receiver from its compartment. 10 Setting up your Wireless Mouse 3 Install the AA battery into the battery compartment. 4 Replace the Wireless Mouse cover. Setting up your Wireless Mouse 11. 5 Slide the power switch down to turn on the Wireless Mouse . NOTE: Ensure that the distance between your computer and Wireless Mouse is within ten meters. 12 Setting up your Wireless Mouse Pairing your Wireless Mouse Your Dell Wireless Mouse can be paired with devices using either the USB receiver or Bluetooth. You can pair and switch between a laptop, desktop, or any compatible mobile device. Pairing your Wireless Mouse with a USB receiver NOTE: You can connect a device to your Wireless Mouse using the Dell Universal pairing.
5 1 Connect the Dell Universal USB receiver to the USB port on your computer. NOTE: A USB Type-C to Type-A adapter (sold separately) is required if your computer does not support USB Type-A port. NOTE: The RF (Radio Frequencies) device is pre-paired in the factory. Laptop Desktop 2 The connection-mode light ( ) on the Wireless Mouse turns on to indicate the Dell Universal pairing, and then turns off. Pairing your Wireless Mouse 13. The Wireless Mouse is paired with your computer. Pairing your Wireless Mouse using Bluetooth NOTE: You can connect up to two devices with your Wireless Mouse using Bluetooth. NOTE: Before pairing your Wireless Mouse using Bluetooth, ensure that you unpair the inactive devices on your computer, and update the Bluetooth driver on your Dell computer to the latest version.
6 For more information, see Drivers & Downloads at 1 Press the connection-mode button a few times on your Mouse until the connection-mode light ( BLE-2; Bluetooth Low Energy-2) turns on, indicating that the second-Bluetooth connection is selected. 14 Pairing your Wireless Mouse 2 Press and hold the connection-mode button for 3 seconds to initiate pairing. The connection-mode light ( ) blinks for 3 minutes, indicating your Wireless Mouse is in the pairing mode. 3 Pair your Wireless Mouse with your Bluetooth-enabled Windows computer. Swift Pair: a. In Windows Search, type Bluetooth. b. Click Bluetooth and other devices settings. The Settings window appears. c. Ensure that the Show notifications to connect using Swift Pair box is checked. d. Ensure that the Bluetooth is turned on.
7 E. Place your Wireless Mouse near your computer. The New Dell Mouse found window appears. f. Click Connect and confirm the pairing process on both Wireless Mouse and your computer. Pairing your Wireless Mouse 15. Add Device: a. In Windows Search, type Bluetooth. b. Click Bluetooth and other devices settings. The Settings window appears. c. Ensure that the Bluetooth is turned on. d. Click Add Bluetooth or other device > Bluetooth. e. From the list of available devices, click Dell Mouse . NOTE: If Dell Mouse is not listed, ensure that the pairing mode is enabled on the Wireless Mouse . 4 Confirm the pairing process on both Wireless Mouse and your computer. The connection-mode light ( ) turns solid white for a few seconds to confirm the pairing, and then the light turns off.
8 After your Wireless Mouse and computer pairing is completed, the Wireless Mouse connects to the computer automatically when the Bluetooth is enabled and both devices are within the Bluetooth range. 16 Pairing your Wireless Mouse Pairing device three using Bluetooth NOTE: You can connect a third device to your Wireless Mouse using Bluetooth. NOTE: Before pairing your Wireless Mouse using Bluetooth, ensure that you unpair the inactive devices on your computer, and update the Bluetooth driver on your Dell computer to the latest version. For more information, see Drivers & Downloads at 1 Press the connection-mode button a few times on your Mouse until the connection-mode light ( BLE-3; Bluetooth Low Energy-3) turns on, indicating that the third-Bluetooth connection is selected.
9 2 Press and hold the connection-mode button for 3 seconds to initiate pairing. The connection-mode light ( ) blinks for 3 minutes, indicating your Wireless Mouse is in the pairing mode. Pairing your Wireless Mouse 17. 3 Pair your Wireless Mouse with your Bluetooth-enabled computer. Swift Pair: a. In Windows Search, type Bluetooth. b. Click Bluetooth and other devices settings. The Settings window appears. c. Ensure that the Show notifications to connect using Swift Pair box is checked. d. Ensure that the Bluetooth is turned on. e. Place your Wireless Mouse near your computer. The New Dell Mouse found window appears. f. Click Connect and confirm the pairing process on both Wireless Mouse and your computer. Add Device: a. In Windows Search, type Bluetooth. b.
10 Click Bluetooth and other devices settings. The Settings window appears. c. Ensure that the Bluetooth is turned on. d. Click Add Bluetooth or other device > Bluetooth. e. From the list of available devices, click Dell Mouse . 18 Pairing your Wireless Mouse NOTE: If Dell Mouse is not listed, ensure that the pairing mode is enabled on the Wireless Mouse . 4 Confirm the pairing process on both Wireless Mouse and your computer. The connection-mode light ( ) turns solid white for a few seconds to confirm the pairing, and then the light turns off. After your Wireless Mouse and computer pairing is completed, the Wireless Mouse connects to the computer automatically when the Bluetooth is enabled and both devices are within the Bluetooth range. Pairing your Wireless Mouse 19.