Transcription of Dell U4021QW User’s Guide
1 Model: U4021 QWRegulatory model: U4021 QWtDell UltraSharp 40 Curved WUHD Monitor-U4021 QWUser s GuideNOTE: A NOTE indicates important information that helps you make better use of your : A CAUTION indicates potential damage to hardware or loss of data if instructions are not : A WARNING indicates a potential for property damage, personal injury, or 2020 dell Inc. or its subsidiaries. All rights reserved. dell , EMC, and other trademarks are trademarks of dell Inc. or its subsidiaries. Other trademarks may be trademarks of their respective 12 Rev. A00 ContentsSafety your monitor ..6 Package contents .. 6 Product features..8 Identifying parts and controls..9 Front view.. 9 Back view ..10 Bottom view .. 11 Monitor specifications.. 12 Resolution specifications ..13 Preset display modes..14 Electrical specifications ..15 Speaker Specifications..16 Physical characteristics ..16 Environmental characteristics .. 17 Video - Bandwidth.
2 18 USB - Bandwidth..18 Pin assignments ..19 Plug-and-Play .. 25 LCD monitor quality and pixel policy .. 25 Ergonomics .. 26 Handling and moving your display.. 28 Maintenance guidelines .. 29 Cleaning your monitor ..29 Setting up the the stand .. 30 Using the tilt, swivel, and vertical extension .. 33 Contents | 34 | Contents Tilt, swivel and vertical extension ..33 Connecting your monitor .. 34 Organizing your cables .. 38 Securing your monitor using Kensington lock (optional) .. 38 Removing the monitor stand .. 39 Wall mounting (Optional) .. 40 Operating the monitor ..41 Power on the monitor .. 41 Using the joystick control .. 41 Using the OSD lock function .. 43 Front-panel button ..46 Using the On-Screen Display (OSD) Menu .. 47 Accessing the menu system ..47 OSD warning messages ..60 Setting the maximum resolution..64 Setting the KVM USB Switch ..65 Setting the Auto KVM ..68 Troubleshooting.
3 70 Self-test .. 70 Built-in diagnostics .. 71 Common Problems.. 72 Product specific problems .. 74 Universal Serial Bus (USB) specific problems .. notices ( only) and other regulatory information.. 80 Contacting dell .. 80EU product database for energy label and product information sheet .. 80 Safety instructions | 5 Safety instructions WARNING: Use of controls, adjustments, or procedures other than those specified in this documentation may result in exposure to shock, electrical hazards, and/or mechanical hazards. Place the monitor on a solid surface and handle it carefully. The screen is fragile and can be damaged if dropped or hit sharply. Always be sure that your monitor is electrically rated to operate with the AC power available in your location. Keep the monitor in room temperature. Excessive cold or hot conditions can have an adverse effect on the liquid crystal of the display. Do not subject the monitor to severe vibration or high impact conditions.
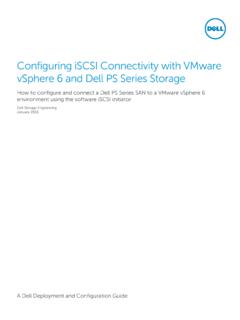
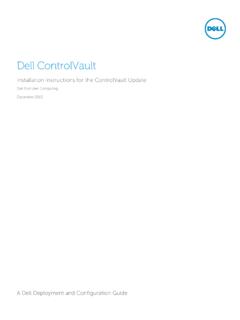
4 For example, do not place the monitor inside a car trunk. Unplug the monitor when it is going to be left unused for an extended period of time. To avoid electric shock, do not attempt to remove any cover or touch the inside of the monitor. For information on safety instructions, see the Safety, Environmental, and Regulatory Information (SERI).6 | About your monitorAbout your monitorPackage contentsYour monitor ships with the components shown in the table below. If any component is missing, contact dell . For more information, see Contact dell . NOTE: Some components may be optional and may not ship with your monitor. Some features may not be available in certain Stand riser Stand base Power cable (varies by country)DisplayPort cable (DisplayPort to DisplayPort)Super Speed USB Gen1 A to B upstream cable (Enables USB Ports on the monitor) About your monitor | 7 HDMI cableThunderboltTM 4 (USB Type-C) Active CablePremierCol orU4021QW Color Calibration Factory ReportEvery dell U4021QW is shipped incorporating pre-tuned Standard modes (sRGB and DCl-P3) wit h Color and Luminance.
5 Uniformity i s adjusted across the screen to meet E2000 < 2 and 97-102% respectivel y. This helps prevent si gni cant color inconsistencies or inaccuracies. In addition, a tighter grey-scale tracking on each U4021QW monitor helps enable ultrasmooth color factory measurement from this very unit are shown assured of Accurate, Precise and ConsistentOnscreen Color with every dell Ultrasharp 2326sRGB 2 DCI- P3 2ammaGgnikcarT elacS-yerG Quick Setup Guide Safety, Environmental, and Regulatory Information Factory Calibration Report 8 | About your monitorProduct featuresThe dell UltraSharp U4021QW Curved monitor has an active matrix, Thin-Film Transistor (TFT), Liquid Crystal Display (LCD), and LED backlight. The monitor features include: cm ( in.) active area display (Measured diagonally) 5120 x 2160 (21:9) resolution, plus full-screen support for lower resolutions. Wide viewing angles with 98% DCI-P3. Tilt, swivel and vertical extension adjustment capabilities.
6 Built-in speakers (2 x 9 W). Removable pedestal stand and Video Electronics Standards Association (VESA ) 100 mm mounting holes for flexible mounting solutions. Ultra-thin bezel minimizes the bezel gap in multi-monitor usage, enabling easier set up with an elegant viewing experience. Extensive digital connectivity with HDMI and DP helps future-proof your monitor. Single Thunderbolt 3 (90 W) to supply power to compatible notebook while receiving video signal. Thunderbolt 3 (90 W) and RJ45 ports enable a single-cable, network-connected experience. Plug and play capability if supported by your computer. On-Screen Display (OSD) adjustments for ease of set-up and screen optimization. Power and OSD buttons lock. Security lock slot. W in Standby Mode. Supports both Picture by Picture (PBP) / Picture in Picture (PIP) Select Mode. Allow user to switch USB KVM function in PBP mode. The monitor adopts Flicker-Free technology, which clears the eye visible flicker , brings comfort viewing experience and preventing users suffer from eye strain and fatigue.
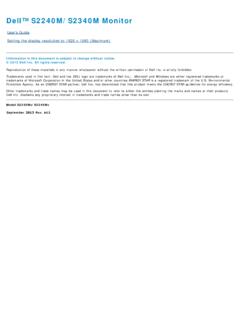
7 Premium Panel Exchange for peace of mind. Optimize eye comfort with a flicker-free screen minimizes hazard blue light emission. The Monitor use Low Blue Light panel and compliance with TUV Rheinland (Hardware Solution) at factory reset/default setting model. Decreases the level of hazard blue light emitted from the screen to make viewing more comfortable for your eyes. WARNING: The possible long-term effects of blue light emission from the monitor may cause damage to the eyes, including eye fatigue or digital eye strain. About your monitor | 9 Identifying parts and controlsFront view1 LabelDescriptionUse1 Power LED indicatorSolid white light indicates the monitor is turned on and functioning normally. Blinking white light indicates the monitor is in Standby | About your monitorBack view 7123456 LabelDescriptionUse1 VESA mounting holes (100 mm x 100 mm-behind attached VESA cover)Wall mount monitor using VESA-compatible wall mount kit (100 mm x 100 mm).
8 2 Regulatory labelLists the regulatory release buttonReleases stand from the On/Off buttonTo turn the monitor on or it to control the OSD more information, see Operating the address, Barcode, serial number, and Service Tag labelRefer to this label if you need to contact dell for technical support. The Service Tag is a unique alphanumeric identifier that enables dell service technicians to identify the hardware components in your computer and access warranty information. 7 Cable-management slotUse to organize cables by inserting them through the slot. About your monitor | 11 Bottom view9235789101341612141411 LabelDescriptionUse1 Security lock slotSecures monitor with security cable lock (sold separately).2 Power connectorConnect the power 1 portConnect your computer with the HDMI 2 portConnect your computer with the HDMI inConnect your computer with the DisplayPort line-out portConnect speakers to playback audio through HDMI or DisplayPort audio two-channel audio is : The audio line-out port does not support 3(90 W)/DisplayPortConnect to your computer using the Thunderbolt 4 (USB Type-C) active cable.
9 The Thunderbolt 3 (90 W) port offer the fastest transfer rate and the alternate mode with DP support the maximum resolution of 5120 x 2160 at 60 Hz PD 20 A, 15 V/3 A, 9 V/3 A, 5 V/3 : USB Type-C is not supported on Windows versions that are prior to Windows Type-B upstream portConnect the USB cable that comes with your monitor to the computer. Once this cable is connected, you can use the USB downstream connectors on the ,1 1 Super Speed USB 10 Gbps (USB Gen2) (4)Connect your USB device. You can use these ports only after you have connected the USB cable from the computer to the monito r. Port with battery icon supports Battery Charging Rev. | About your monitor10RJ-45 connectorConnect Internet. You can surf Internet via RJ45 only after you have connected the USB cable (Type-A to Type-B or Type-C to Type-C) from the computer to the Speed USB Gen2 10 Gbps Type-C downstream portPort with icon supports 5 V/ 3 your USB-C device. You can use these ports only after you have connected the USB cable (Type-A to Type-B or Type-C to Type-C) from the computer to the lockLock the stand to the monitor using a M3 x 8 mm screw (screw not included).
10 14 Built-in speakersTo output the sound from audio specificationsScreen typeActive matrix - TFT LCDP anel TypeIn-plane switching TechnologyAspect ratio21:9 Viewable image dimensions mm ( in.) Active Area mm ( in.) mm ( in.) mm2 ( )Pixel mm x mmPixel per inch (PPI)140 Viewing angle Horizontal178 (typical) Vertical178 (typical)Brightness300 cd/m (typical)Contrast ratio1000 to 1 (typical)Curvature2500 RDisplay screen coatingAnti-glare treatment of the front polarizer (3H) hard coatingBacklightLEDC olor Billion colors About your monitor | 13 Color gamut*98% (typical) DCI-P3 Connectivity 1 x (HDCP ) (10-bit color @ 60 Hz) 2 x HDMI (HDCP ) (10-bit @ 30 Hz) 1 x Thunderbolt 3 (90 W) (Alternate mode with DisplayPort , Super Speed USB Gen2 (10 Gbps) upstream port, Power Delivery PD up to 90 W) 1 x USB Type-B upstream port 1 x USB Type -C downstream (15 W), Super Speed USB Gen2 (10 Gbps) 4 x Super speed USB Type-A 10 Gbps (USB Gen2) 1 x Super speed USB Type-A Gen2 with charging capability at 2 A (max) 1 x Analog audio line out ( mm jack) 1 x RJ45 Border width (edge of monitor to active area)