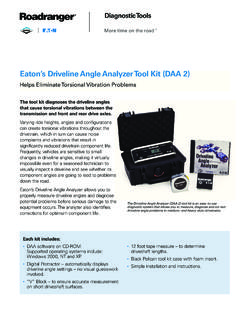
Transcription of Eaton 14 and 15.5 Heavy-Duty Manual Adjust Clutch …
1 Measure Engine Flywheel Housing and Flywheel Engine flywheel housing and flywheel must meet these specifications or there will be premature Clutch wear. Remove old Pilot Bearing. All gauge contact surfaces must be clean and dry. Use a dial indicator and check the following: Measure Set-up and Lubricate Flywheel Face Runout Secure dial indicator base to flywheel housing face. Put gauge finger in contact with flywheel face near the outer edge. Rotate flywheel one revolution. Maximum runout is " ( mm). Pilot Bearing Bore Runout Secure dial indicator base to flywheel housing face. Position gauge finger so that it contacts pilot bearing bore. Rotate flywheel one revolution. Maximum runout is " ( mm). Flywheel Housing Runout Secure dial indicator base to crankshaft.
2 Put gauge finger against flywheel housing pilot Rotate flywheel one revolution. Maximum runout is " ( mm). Flywheel Housing Face Runout Secure dial indicator base to flywheel near the outer edge. Put gauge finger in contact with face of flywheel housing. Rotate flywheel one revolution. Maximum runout is " ( mm). Adjust Bearing Position Verify Clutch Brake Squeeze 2 To change bearing position, you must internally Adjust the Clutch . Push pedal and hold pedal down when adjusting. Follow instructions for Kwik- Adjust or Value Clutches.. Insert " ( mm) feeler gauge between the release bearing and the Clutch brake. Press the pedal down to clamp the gauge. If the gauge does not clamp, Adjust linkage to achieve Clutch brake squeeze then recheck Step 3. 3 Slowly let up on the pedal and check the pedal position at the moment the gauge can be removed.
3 If the pedal is less than 1/2" ( mm) or more than 1" ( mm) from the floor when the gauge can be removed, readjust the linkage. (Repeat Steps 3 and 4.) To change the yoke finger and bearing wear pads clearance, Adjust the upper pedal stop to raise or lower the pedal in the cab. 4 5 6 Check distance between yoke tips and bearing wear pads. This distance should be 1/8" ( mm). 4 1 Verify Free-Play 1/2" 1" ( mm) 1 Feeler gauge Release bearing Clutch brake Upper pedal stop Measure the distance between the release bearing and the Clutch brake. The correct distance should be " " ( mm). If correct go to Step 3. 1/8" ( mm) Transmission Release bearing Clutch brake " " ( mm) TO TURN DEPRESS BOLT Adjusting Nut Yoke tips Bearing wear pads Do not change bearing position.
4 Lockstrap Adjusting Lug Value Clutch Remove lockstrap, then rotate adjusting lugs left to move bearing toward transmission. Replace lockstrap. Kwik- Adjust Clutches Push and turn adjusting nut. Clockwise moves the bearing toward transmission. Installation ProcedureLubricate 8 Apply grease to thecross shaft bushings and linkage pivot Apply grease to theinput shaft and Important: Eaton recommends the use of Roadranger EP2 for release bearing lubrication, or an equivalent Lithium Complex , NLGI #2 or #3 grease with a NLGI LB/GC performance rating and a dropping Point temperature of 220 C (428 F) or higher. Failure to use the proper grease may affect bearing life and void the warranty coverage on your Eaton ample grease that visibly exits the opening and contacts the transmission shaft.
5 This will lube the Clutch brake when pedal is pressed. 9 Grease the release bearing until grease purges from the rear of the release bearing onto the input 14" and " Heavy-Duty Manual Adjust ClutchCLMT1351 US-ENMay 2016 EatonVehicle Box 4103 Kalamazoo, MI 49003 USA800-826-HELP (4357) Eaton , in USAR eference MaterialsCLSM200 and CLSL1511 Install three equally spaced anti-rattle springs3 Super-duty Clutch only:Install TransmissionClutch Transmission For WearReplace any worn " Clutch only:Fasten Transmission To Flywheel HousingTransmission installation and Clutch set-up procedures are the same for the 14" and " transmission in gear. Be sure new Clutch brake has been transmission so it is square to and aligned with splines by moving transmission forward and rotating the output shaft.
6 Do not use excessive force. Do not let the transmission hang unsupported in the mounting bolts and torque to OEM sure that the yoke fingers remain in the up position until they are over the release bearing 14" Clutch only:Install Clutch to FlywheelProgressively tighten mounting bolts in a crisscross pattern starting with a lower bolt. Torque to 40 50 lbs. ft. (54 68 N m).8 Install lock washers and mounting bolts (7/16" x 14 UNC x 2 1/4" grade 5) finger tight. Replace studs with lockwashers and the flywheel bore. Use the Eaton Clutch Selector Guide (CLSL1511) to verify that the damper will fit into the flywheel the correct flywheel depth is 2-15/16".1 Put front disc into flywheel. Flywheel side must be toward engine. Use new slots to put intermediate plate on intermediate plate left.
7 Use " feeler gauge to check left pin clearance on all 6 drive pins. Note: Straighten pins to increase clearance. Do not file 7" (8-spring) " (10-spring) 10" 7 spring 9-spring (Mack engines only)23 Insert aligning tool through second disc onto aligning tool. Follow the orientation instructions on the intermediate plate into slots on the Clutch cover. Flywheel Side must face the disc onto aligning tool. Follow the orientation instructions on the bearing position is 3/8" 5/8" ( ) from the aligning tool. Be sure shipping blocks are a 1/4" (6mm) flat nose punch to lightly tap four pins toward : An assembled Clutch weighs about 150 lbs. (68 kg). Avoid the risk of injury. Use proper equipment when lifting a : Use the Eaton Clutch Selector Guide (CLSL1511) to make sure you have the right TURN DEPRESS BOLT TO TURN DEPRESS BOLT TO TURN DEPRESS BOLT 2 Cross Shaft and BushingsExcessive wear at these points can cause side loading on the sleeve bushing, bushing failures and yoke bridge contact with the Clutch when the pedal is Shaft SplinesAny wear on the splines will prevent the driven discs from sliding freely, causing poor Clutch release ( Clutch drag).
8 Slide discs full length of shaft to check for twisted shaft splin Input ShaftLength should be " ( mm) nominal, and not greater than " ( mm). Ref. 1990 SAE handbook 4 Replace transmission bearing retainer cap if length is greater than " ( mm).Transmission Bearing Retainer CapA worn/rough bearing retainer cap may cause the Clutch brake to wear YokeWorn fingers can cause bushing wear and yoke interference when the pedal is ShaftWear (roughness) can reduce sleeve bushing life and cause it to come two 7/6" x 14 UNC x 5" studs into upper mounting holes. Install assembled tighten mounting bolts in a crisscross pattern starting with a lower bolt. Torque to 25 35 lbs. ft. (34 47 N m).12 Install lock washers and mounting bolts (3/8" x 1 1/4" grade 5) finger tight.
9 Replace studs with lockwashers and cover over aligning disc into flywheel. Follow the orientation instructions on the intermediate plate onto drive second disc into flywheel. Follow the orientation instructions on the the aligning tool. Be sure shipping blocks are two 3/8" x 2 1/2" studs into upper mounting aligning tool through TURN DEPRESS BOLT