Transcription of FEC26 Field Equipment Controllers Installation …
1 FEC26 FieldEquipmentControllersInstallationIns tructionsMS-FEC2611-x, MS-FEC2621-x,MS-FEC2611-xETPart No. 24-10143-144,Rev. LIssuedNovember2017 Referto the QuickLITwebsitefor the mostup-to-dateversionof this FEC26controllersare part of theMetasys systemFieldEquipmentController(FEC)famil y. Thesecontrollersrun pre-engineeredand user-programmedapplicationsand providethe inputsand outputsrequiredto monitorand controla wide varietyof HVAC and FEC controllersoperateon an RS-485 BACnet Master-Slave/Token-Passing(MS/TP)Bus as BACnetApplicationSpecificControllers(B-A SCs)and integrateinto JohnsonControls and FEC26controlleris availablewith or withoutanintegralLCD and pushbuttonuser :InMetasyssystemsmokecontrolapplications ,use only the MS-FEC2611-0 Uand that are UL 864 ,youmustrefer to theMetasysSystemUL 864 UUKLT enthEditionSmokeControlSystemTechnicalBu lletin(LIT-12012487)fordetailedrequireme ntsand proceduresforinstalling,commissioning,an d operatingUL864 UL 864 UUKL listingfor SmokeControlEquipmentis voidedif (1) you do not usethe requiredsoftwaretoolsat the requiredversions;or (2) you do not meettherequirementsor do not followtheproceduresas documentedin theMetasysSystemUL864 UUKLT enthEditionSmokeControlSystemTechnicalBu lletin(LIT-12012487).
2 SwitchableCommunicationsProtocolsBy default,theMetasys systemFEC FamilyControllersand networksensorscommunicateusingeitherthes tandardBACnetprotocolbasedon the ANSI/ASHRAE135-2004,or the BACnetprotocolis a standardfor ANSI,ASHRAE,and the InternationalStandardsOrganization(ISO) , VMA16,VMA18, and mostIOM Field controllersareBTL-listedas BACnetApplicationSpecificControllers(B-A SCs).FAC FieldControllersand the VMA1930 FieldControllerare BTL-listedas BACnetAdvancedApplicationControllers(B-A ACs).The NS SeriesSensorsareBTL-listedas BACnetSmartSensors(B-SSs). and later of the ControllerConfigurationTool (CCT)can be usedto switchthe FieldBuscommunicationsprotocolin supportedFEC FamilyFieldControllersto be eitherthe standardBACnetMS/TPorthe N2 new controllersuse BACnetMS/TPas the the MS/TPmodelsprovidea cost-effectiveupgradeand modernizationpath forcustomerswith existingN2 N2-capableFEC FamilyControllerscan be usedasfunctionalreplacementsfor legacyN2 FamilyControllers: havethe inputand output(I/O) quantitiesandcharacteristicsof the FEC FamilyControllers mustbe programmedwith CCT, whichhas similar,but not identicalprogrammingcapabilitiesasHVACPr o,GX9100,GPL,and otherlegacytools supportSA Bus devices supportWRZwirelesssensorsfrom the controllerusingthe WRZ-7860receiver(mostmodels) are availablein Buy Americanversions(mostmodels) are listedfor UL864 UUKL/UUKLC(somemodels).
3 N2 is supportedas part of theMetasys Tenth Editionlistingfor ,refer to theMetasysSystemUL 864 10thEditionUUKL/ORD-C100-13 UUKLCS mokeControlSystemTechnicalBulletin(LIT-1 2012487).The N2-capablecontrollers: do not supportZoneBus (for example,TMZ sensorsand M100actuators)or XT-Bus(System91) devices(for example,XT, XTM,and XP modules) do not supporta wirelessconnectionto the N2 bus do not supportNxE passthrough1 FEC26 FieldEquipmentControllersInstallationIns tructionsNorthAmericanEmissionsComplianc eCanadaThis Class(A) digitalapparatusmeetsall therequirementsof the appareilnum riquede la Classe(A) respectetoutesles exigencesdu R glementsur le mat rielbrouilleurdu equipmenthas beentestedand foundto complywith the limitsfor a ClassA digitaldevicepursuanttoPart 15 of the FCC designedtoprovidereasonableprotectionaga instharmfulinterferencewhenthis equipmentis operatedin equipmentgenerates,uses,and can radiateradiofrequencyenergyand, if notinstalledand usedin accordancewith the instructionmanual,may causeharmfulinterferenceto this equipmentin aresidentialarea may causeharmfulinterference,in whichcase the userswill be requiredto correctthe interferenceat their own Field controller : Transportthe controllerin the originalcontainertominimizevibrationand shockdamage.
4 Verify that all partsshippedwith the controller . Do not drop the controlleror subjectit to Included one fieldcontrollerwith removableterminalblocks(Power, SA bus, and FC bus are removable) one installationinstructionssheetMaterialsan d SpecialTools Needed threefastenersappropriatefor the mountingsurface(M4 screwsor #8 screws) one 20 cm (8 in.) or longerpieceof 35 mm DIN railand appropriatehardwarefor DIN rail mount(only) smallstraight-bladescrewdriverfor securingwiresinthe terminalblocksMountingObservetheseguidel ineswhenmountinga fieldcontroller: Ensurethe mountingsurfacecan supportthecontroller, DIN rail, and any user-suppliedenclosure. Mountthe controllerhorizontallyon 35 mm DIN railwheneverpossible. Mountthe controllerin the propermountingposition(seeFigure1). Mountthe controlleron a hard,evensurfacewheneverpossiblein wall-mountapplications. Use shimsor washersto mountthe controllersecurelyand evenlyon the mountingsurface. Mountthe controllerin an area free of corrosivevaporsand observethe AmbientConditionsrequirements(seeTable 11).
5 Providefor sufficientspacearoundthe controllerforcableand wire connectionsfor easycoverremovaland goodventilationthroughthe controller (50 mm[2 in.] minimumon the top, bottom,and front of thecontroller). Do not mountthe controlleron surfacespronetovibration,suchas duct work. Do not mountthe controllerin areaswhereelectromagneticemissionsfrom otherdevicesorwiringcan interferewith controllerin a panelor enclosure: Mountthe controllerso that the enclosurewallsdonot obstructcoverremovalor ventilationthroughthecontroller. Mountthe controllerso that the powertransformerand otherdevicesdo not radiateexcessiveheat tothe controller . Do not installthe controllerin an : FieldControllerMountingPositions2 FEC26 FieldEquipmentControllersInstallationIns tructionsDIN Rail MountApplicationsMountingthe Field controllerhorizontalon 35 mm DIN railis the mounta controlleron 35 mm DIN rail:1. Securelymounta 20 cm (8 in.) or longersectionof35 mm DIN rail horizontaland centeredin theappropriatelocationso that the controllermountsinthe Pull the two bottommountingclips outwardfrom thecontrollerto the Hangthe controlleron the DIN rail by the hooksatthe top of the (DIN rail) channelon the backof thecontroller(seeFigure2), and positionthe controllersnuglyagainstthe DIN Pushthe bottommountingclips inward(up) to securethe controlleron the DIN removethe controllerfrom the DIN rail, pull thebottommountingclips out to the extendedpositionand carefullylift the controlleroff the DIN MountApplicationsTo mounta Field controllerdirectlyon a wall or otherflatverticalsurface:1.
6 Pull the two bottommountingclips outwardandensurethey are lockedin the Markthe mountinghole locationson the wall usingthe dimensionsinFigure2and one of the mountpositionsshowninFigure1. Or hold the controllerupto the wall or surfacein a propermountpositionandmarkthe hole locationsthroughthe Drill holesin the wall or surfaceat the markedlocations,and insertappropriatewall anchorsin theholes(if necessary).4. Hold the controllerin place,and insertthe screwsthroughthe mountingclips and into the holes(oranchors).Carefullytightenall of the :Do not overtightenthe screwsmay damagethe : Backof ControllerShowingExtendedMountingClips,D IN Rail Channel,and MountingDimensions,mm (in.)3 FEC26 FieldEquipmentControllersInstallationIns tructionsFigure3: FEC2621 PhysicalFeaturesTable 1: FEC2621 PhysicalFeaturesPhysicalFeature:Descript ionand ReferencesCalloutBinaryOutput(BO)SourceP owerSelectionJumperPin Blocks,3 BO JumperPin 4for DeviceAddressesfor SeeMountingfor (COs) 4for (AOs) 4for VAC, Class2 6for Tab (Oneof Two).
7 SeeRemovingthe ControllerCoverfor an Integralor Local :Not availableon all FEC (LCD)DisplayAreaNote:Not availableon all FEC (FC) Bus TerminalBlock.(SeeFC Bus TerminalBlock.)10 SensorActuator(SA) Bus TerminalBlock.(SeeSA Bus TerminalBlock.)11 SensorActuator(SA) Bus (RJ-126-pinModularJack). (BI) TerminalBlock,2 4for (UI) TerminalBlocks,6 4for 9for (FC) Bus Port (RJ-126-pinModularJack).SeeFC Bus Portfor (BO) ElectricShock:Disconnectthe powersupplybeforemakingelectricalconnect ionsto Garde:Risquede d charge lectrique:D brancherl'alimentationavantde r alisertoutraccordement lectriqueafin d' vitertout risqueded charge PropertyDamage:Do not applypowerto thesystembeforecheckingall improperlyconnectedwiresmay resultinpermanentdamageto the Garde:Risquede d g tsmat riels:Ne pasmettrele syst mesous tensionavantd'avoirv rifi tousles raccordsde c fils formantun court-circuitou connect sde fa onincorrecterisquentd'endommagerirr m diablementl' :Do not exceedthe resultin permanentdamagetothe controllerand void any :Use copperconductorsonly.
8 Makeall wiringin accordancewith local,national, :Electrostaticdischargecan properelectrostaticdischargeprecautionsd uringinstallation,setup,and servicingto avoiddamagingthe detailedinformationon configuringand wiringanMS/TPBus, FC bus, and SA bus, refer to theMS/TPCommunicationsBus TechnicalBulletin(LIT-12011034).Terminal Blocksand Bus PortsSeeFigure3for terminalblockand bus port locationsonthe controller . Observethe followingguidelineswhenwiringa OutputTerminalBlocksAll of the fixedinputterminalblocksare mountedon thebottomof the controllerand the outputterminalblocksare mountedon the top of the controller . SeeTable 4formoreinformationaboutI/O terminalfunctions,requirements,and Bus TerminalBlockThe FC Bus terminalblockis a blue,removable,4-terminalplug that fits into a the removableFC bus terminalblockplugson thecontroller, and othercontrollersin a daisy-chainconfigurationusing3-wiretwist ed,shieldedcableasshownbelow. SeeTable 6for : FC Bus TerminalBlockWiringNote:The FC bus Shield(SHLD)terminalis isolatedand can be usedto connect(daisychain)theshieldsfor FC bus Bus TerminalBlockThe SA Bus terminalblockis a brown,removable,4-terminalplug that fits into a the removableSA Bus terminalblockplugson thecontrollerand otherSA Bus devicesin a daisy-chainconfigurationusing4-wiretwist ed,shieldedcableasshownin the 6for : SA Bus TerminalBlockWiringNote:The SA PWRterminalsupplies15 SAPWR terminalcan be usedto connect(daisychain)the 15 VDCpowerleadson the SA Bus PortThe FC bus port on the front of the controlleris an RJ-12,6-positionmodularjack that providesa connectionforthe WirelessCommissioningConverter, or ZFR/ZFRProWirelessFieldBus FC bus port is connectedinternallyto the FC and PowerSupplyTerminalBlock Ratingand RequirementsTablefor FC bus Port pin assignmentis.
9 Pin NumberAssignmentsfor Sensor,FC Bus,and SA Bus Portson ControllersSensorPortThe Sensor(SA Bus) port on the bottomof the controller () is an RJ-12,6-positionmodularjack that providesaconnectionfor the WirelessCommissioningConverter,the VAV BalancingTool, specifiednetworksensors,orotherSA Bus deviceswith FEC is configuredfor N2 communication,theSA Bus port mustbe usedto downloadand commissionthe controller . A DIS1710 LocalControllerDisplayalsocan be connectedto the SA Bus port (but only on FECmodelswithoutintegraldisplayand pushbuttons).The Sensorport is connectedinternallyto the SA 6for pin assignmentis 24 VAC supplypowerterminalblockis a gray,removable,3-terminalplug that fits into a board-mountedjack on the top right of the the 24 VAC supplypowerwiresfrom the transformerto the HOTand COMterminalson the terminalplug asshownbelow. The middleterminalon the supplypowerterminalblockis not 6for moreinformationaboutthe : 24 VAC SupplyPowerTerminalBlockWiringNote:The supplypowerwire colorsmay be differentontransformersfrom transformermanufacturer s instructionsandthe projectinstallationdrawingsfor :Connect24 VAC supplypowerto thecontrollerand all othernetworkdevicessothat transformerphasingis uniformacrossthe uniform24 VAC supplypowerphasingreducesnoise,interfere nce,andgroundloop Field controllerdoesnot requirean controllercan also be installedin a wirelessapplicationusinga ZFR/ZFRPro :Wirelessoperationis not theMetasysSystemUL 864 UUKLT enthEditionSmokeControlSystemTechnicalBu lletin(LIT-12012487)for detailedrequirementsand proceduresfor installing,commissioning,and operatingUL 864 configurea controllerfor use with the ZFR/ZFRProSeriesWirelessFieldBus system:1.
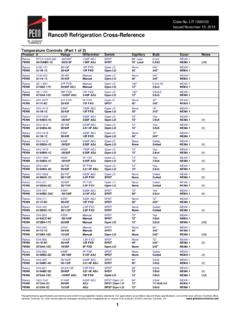
10 Wire the input/outputterminalsand SA :In wirelessnetworkapplications,do notconnectany wiresto the FC bus terminalblock.(Connectthe SA/FCterminalblockonan IOM to an SA bus only.)2. Connectthe ZFR/ZFRPro WirelessFieldBus Routerto the FC bus port (RJ-12modularjack)on the frontof the Ensurethat the controller 'sdeviceaddressDIPswitchesare set to the Set DIP switch128 to ON, whichenableswirelessoperationon the Field moreinformationon the ZFR Pro WirelessFieldBus system,refer to theWNC1800/ZFR182xProSeriesWirelessField Bus SystemProductBulletin(LIT-12012320).For moreinformationon the ZFR 1800 WirelessFieldBus system,refer to theZFR1800 SeriesWirelessField Bus SystemProductBulletin(LIT-12011336).Term inationDetailsA set of JohnsonControls terminationdiagramsprovidesdetailsfor wiringinputsand outputsto the the figuresin this sectionfor the 2: TerminationDetailsTerminationDiagramsTyp e ofInput/OutputType of FieldDeviceUITemperatureSensorUIVoltageI nput- ExternalSource7 FEC26 FieldEquipmentControllersInstallationIns tructionsTable 2: TerminationDetailsTerminationDiagramsTyp e ofInput/OutputType of FieldDeviceUIVoltageInput- InternalSourceUIVoltageInput(Self-Powere d)UICurrentInput- ExternalSource(Isolated)UICurrentInput- InternalSource(2-wire)UICurrentInput- InternalSource(3 wire)UICurrentInput- ExternalSource(in Loop)8 FEC26 FieldEquipmentControllersInstallationIns tructionsTable 2.