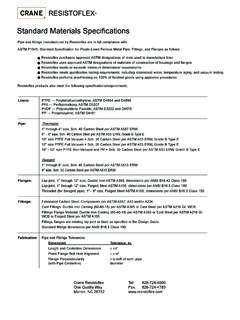
Transcription of Flange Bolt Torquing - Resistoflex
1 91 Flange bolt Torquingfor Resistoflex Plastic-Lined Piping Products1) Always use flat washers on both sides of the ) Tighten the Flange bolts with a calibrated torque wrench. The recommended bolt torque values are shown in the tables on the reverse of this card. Note: For zinc-plated bolts, or with anti-seize compounds, the torque values will be different. Please contact Resistoflex for more informat- ) Tighten the Flange bolts with a torque wrench, using a crisscross pattern that alternately tightens the bolts located 180 degrees ) Using this pattern, tighten the bolts in 20% increments of the final bolt torque until 80% of final bolt torque has been ) For tightening to the final torque values, tighten bolts seq- uentially clockwise once around the Flange .
2 This will help ensure that the bolts are evenly ) Care should be taken to avoid over- Torquing , which can cause damage to the plastic sealing : When bolting together dissimilar materials, alwaystighten to the lowest recommended torque of the componentsin the joint. Using higher torques may cause excessivedeformation of the softer material in the joint. Install a 1/2"thick spacer between Resistoflex plastic-lined pipe or fittingsand other plastic-lined components, particularly valves, if thediameters of the raised plastic faces are different.
3 Bellevillewashers are not recommended for use with retorque should be applied a minimum of 24 hours after theinitial torque or after the first thermal cycle. This allows forseating of the plastic and for relaxation of the bolts. If thesystem is to perform at elevated temperatures, it is recom-mended that hot water be circulated at the maximum operat-ing temperature of the process (if possible) for a minimum of24 hours. This allows for the pipe system to experience onethermal cycle. After cool-down, retorquing of the systemshould be done.
4 Torquing should only be done on the systemin the ambient, cooled state, never while the process is atelevated temperature, or excessive force could be applied tothe plastic faces. Never disassemble a Flange joint in a hotsystem. Wait until the system has cooled to ambient , after initial torque and retorque, a hydrotest shouldbe performed following ANSI requirements. Experience hasshown that if the above procedure has been followed very few,if any, of the Flange joints may fail the hydrotest. If a Flange jointdoes leak, first check the torque values, then tighten in 10%increments over the specified bolt torques until , if 150% of the specified torque value is reached andthe Flange joint still leaks, stop and disassemble the flangejoint.
5 Something else is probably wrong such as a scratchedplastic after the hydrotest has been successfully completed andany leaks corrected, can the pipeline be signed off retorquingRetorquing should be done at least annually thereafterespecially if the process line experiences elevated tempera-tures or extreme ambient temperature situations. Torquingshould only be done on the system in the ambient, cooledstate, never while the process is at elevated temperature orexcessive force could be applied to the plastic assembling Flange connections, always use a full complement of clean, new high strength A193-B7 bolting.
6 If using stainless steel bolting, the bolts should be A320/A320M Class 2 B8 (304 SS) or Class 2 B8M (316 SS) with A 94/A194M Grade 8 or 8A Nuts (for 304 SS) or Grade 8M or 8MA (for 316 SS). If other bolting materials are used, the end user must ensure that the new bolting material strength properties exceed the calculated bolt stress values to be generated in making the piping Testing Plastic Lined PipeThese recommendations are derived from ASME The only limitations that are placed on this testingrelate to the pressure ratings of our diaphragm valves.
7 Themaximum test pressures for our diaphragm valves are thefollowing: 1-4 inch diaphragm valves225 psi 6 inch diaphragm valves200 psi 8 inch diaphragm valves150 psiOther than this limitation, our pipe and fittings can be tested atthe pressures recommended by TestThe fluid used for the hydrostatic test is typically water. Anothersuitable non-toxic liquid can be substituted if there is the riskof damage due to the adverse effects of having water in thesystem. The system should be tested at a pressure not lessthan times the design pressure.
8 If the design temperatureis above the test temperature then the required test pressureis calculated by the following equation:Pt = ( PSt) SWherePt = minimum hydrostatic test gauge pressureP = internal design gauge pressureSt = stress value at test temperatureS = stress value at design temperatureTypically, for the pressures and temperatures in which plastic-lined pipe is used, the above calculation reduces to:Pt = PWe recommend that the system be retorqued after the firstthermocycle. If the hydrostatic test is performed at the ex-pected operating temperature (a hot hydrotest ) then thehydrotest can constitute the first thermocycle and the recom-mended retorquing can occur after the pressure Leak TestThis pressure test is performed in some situations where thepresence of any water in the system is forbidden.
9 The test isvery dangerous due to the stored energy of the compressedgas. ASME refers to the dangers of performing this testand provides safety considerations in the a pneumatic pressure test, a pressure relief device mustbe in the system. This relief device should be set at the testpressure plus either 50 psi or 10% of the test pressure,whichever is lower. The gas used for the pneumatic test, if notair, can be any nonflammable and non-toxic gas. The testpressure required for this test is 110% of the design perform the pneumatic leak test, begin by increasing thepressure until a gauge pressure of 25 psi is attained.
10 At thispoint, a preliminary check for leaks must be made. After theinitial check, the pressure should be incrementally increased,holding the pressure at each increment long enough toequalize the piping strains. Once the test pressure is reached,the pressure is then reduced to the design pressure beforeexamining for Leak TestIf a hydrostatic pressure test is undesirable due to the possiblechemical reactions with water and a pneumatic test in undesir-able due to the potential hazards, then an alternative leak testcan be used. This test is not applicable to plastic lined pipebecause it relates to welded Service Leak TestThis test is applicable only to systems, which meet the follow-ing requirements: The fluid handled is nonflammable, non-toxic,and not damaging to human tissues.