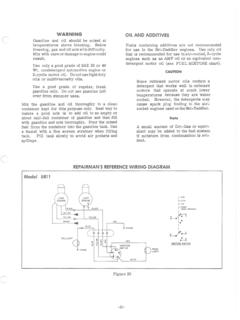
Transcription of GP 338F/GPK433F - Vintage Snow
1 VA AHA' .. , . , .. 8101108111 GP 338F/GPK433F . SIRVICIMAIUAI ~ TABLE OF CONTENTS CHAPTER 1. GENERAL .. 1-1 . Specifications .. 1-2. Service Data 1-3. Tools .. CHAPTER 2. ENGINE 2-1. 2-2. Removing the Engine. Starter .. 2-2-1. Removal 2-3. Primary Sheave .. 2-3-1. Disassembly. 2-3-2. Cleaning and Inspection .. 2-3-3. Assembly 5 5 6 7 7 .. 8 9 9 2-4. Magneto .. 11 2-4-1. Removal .. 12 2-5. Carburetor .. 14 2-5-1. Removal. 2-5-2. Disassembly (GPX338F) 2-5-3. Cleaning and Inspection (GPX338F) .. 15 16 17 18 18 18 2-5-4. Assembly (GPX338F) .. 2-5-5. Installation (GPX338F) 2-5-6. Adjustments (GPX338F) . 2-5-7. Disassembly (GPX433F) .. 20 2-5-8. Cleaning and Inspection (GPX433F) .. 20 2-5-9. Assembly (GPX433F) .. 21 2 -5-10. Installation (GPX433F) 2-5-11.
2 Adjustments (GPX433F). 2-5-12. Carburetor with Accelerator Pump (GPX433F) .. 21 .. 21 .. 23 2-6. Oil Pump .. 24 2-7. Engine .. 2-7-1. Disassembly .. CHAPTER 3. POWER TRAIN 3-1. Secondary Sheave .. 3-1-1. Removal 3-1-2. 3-1-3. 3-1-4. Cleaning and Inspection. Assembly .. Adjustments .. 3-2. Disc Brake .. 3-2-1. 3-2-2. 3-2-3. 3-2-4. Removal .. Cleaning and Inspection Installation Adjustments 3-3. Chain Housing .. 3-3-1 . 3-3-2. 3-3-3. Removal Cleaning and Inspection Assembly .. 26 .. 26 .. 29 ..29 30 30 .. 30 .. 33 .. 35 .. " .. 36 ..36 .. 36 .. 37 .. 38 .. 39 .. 39 .. 40 Front Axle Rear Axle.. 41 .. 42 3 -4 . 3-5. 3 - 6 . Sliding Suspension .. 4 3 CHAPTER 4. STEERING (SKI) AND CHASSIS .. 4 5 4-1. Frame .. 4 6 4 -2 . Engine M ount .. 4 -3.
3 Oil and .. 4 -4 . Ski.. Steering .. Control Wires .. 4 8 .. 48 .. 4 8 .. 48 .. 48 4 -5 . 4 -6 . 4 -7. Shroud .. 48 CHAPTER 5. ELECTRICAL SYSTEM .. 49 CHAPTER 6. TIGHTENING TORQUE .. 5 7 GENERAL -Specifications, Service Data CHAPTER 1. GENERAL 1 -1 . Specifications Model GPX338F GPX433F Dimensions & Weight: Overall length (including the ski) ins. (2,510 mm.) ins. (2,510 mm.) Overall width ins. (1,010 mm.) ins. (1,010 mm.) Overall height (including the windshield) ins. (965 mm.) ins. (965 mm.) Engine: Type Two-stroke five-port induction Two-stroke five-port induction aluminum cylinder aluminum cylinder No. of cylinders & arrangement Parallel twin Parallel twin Displacement (338 ) (433 ) Bore & stroke x ins.
4 (60 x mm.) x ins. (68 x mm.) Cooling system Natural air cooled Natural air cooled Lubrication system "Autolube" oil injection "Autolube" oil injection Oil tank capacity qts. ( lits.) qts. ( lits.) Starting System: Recoiled hand starter Recoiled hand starter Fuel System: Fuel Gasoline (high-octane) Gasoline (high-octane) Fuel tank capacity ( lits.) 6 .0 ( lits.) Carburetor Diaphragm type Diaphragm type MIKUNI BN38-34SH x 2 KEIHIN CDX42-38 x 2 Ignition and Electrical Systems: Ignition system Flywheel magneto (CD I) Flywheel magneto (CDI) Headlight 12V. 60/60W. (High/Low beams) 12V. 60/60W. (High/Low beams) Taillight Stoplight Meter lamp Frame: Fabricated aluminum and steel Fabricated aluminum and steel Drive track: Molded rubber, steel reinforced Molded rubber, steel reinforced with cleats with cleats Transmission: V-belt automatic transmission V-belt automatic transmission Brake: Disc brake Disc brake 1-2.
5 Service Data Model GPX338F GPX433F Engine: Cylinder head tightening torque Nuts: ft-Ibs. Nuts: ft-Ibs. ( m-kgs.) (2 .3 m-kgs.) Bolts: ft- Ibs. Bolts: ft-Ibs. ( m-kgs.) ( m-kgs.) Piston clearance in. in. (0045 mm.) ( mm.) Lubrication oil Yamalube or Johnson outboard oil Yamalube or Johnson outboard oil Ignition timing mm. mm. -1-GENERAL -Service Data, Tools Model Compression ratio Idling speed Spark plug Carburetor: Model Number of turns out Main adjuster Slow adjuster Fuel level Valve seat Ski width Drive track deflection Oil pump Note: Minimum stroke Maximum stroke GPX338F 7 .8 : 1 2,100 B-9EV MIKUNI BN38-34SH x 2 (87800) L. R: 1 '1/8 L. R: 3 / 4 #85 (Spare #95) in.
6 Dia. (15 mm ) ins. (750 mm.) in. ( 5 mm.) mm. mm. #95 pilot jet should be used when the engine speed acceleration is not smooth at temperatures below 0 C at low altitudes. 1 -3 _ Tools To service the snowmobile, the following tools are re-quired. o Special tools o Gauges (Measuring instruments) 1. Special Tools 2-b. o General tools o Standard tools GPX433F : 1 2,500 Champion N-2G KEIHIN CDX42-38 x 2 (87900) L. R: L, R: #65 #45 1 1 18 1-3/ 8 in. dia. ( mm ) ins. (750 mm.) in. ( 5 mm.) mm. mm. 1-a. Crankshaft separator 1-b. Crankshaft jig 1-f. Wedge 2 -c. Magnet puller attachment 5 . Sheave gauge 1 -c. Press box 1-d. Press pin 1-g. Stop (56 mm.) 2-a. Magnet puller body 2-b. Magnet puller screw 2-d.
7 3 . 4. Fig. 1-1 -2 -Screw, 8-mm. L : 80 mm. 6 . Primary fixed sheave puller bolt Dial gauge stand #2 7-a. Primary sheave installer/remover 2 Socket end wrench 7-b. Primary sheave installer/remover 1 GENERAL -Tools 2 . Gauges 4 ~ ~ .. ~-.~ 2 3 6 13 1. Feeler gauge 8. Coil tester 2. Dial gauge 9 . Electro tester 3 . Micrometer 10. Scale 4. Cylinder gauge 11. Spring balance 5. Vernier cali pers 12. Pocket tester 6. Torque wrench 13 Tachometer 7. Point checker Fig. '-2 3 . General Tools 18 1. Plug wrench 11. Phillips-head screwdriver (large) 2 Set of open-end wrenches 12. Philli ps-head screwdriver (medium) 3 Set of socket wrenches 13. Slotted-head screwdriver (medium) 4. Soft-faced hammer 14. Slotted-head screwdriver (large) 5. Steel hammer 15.
8 Slotted-head screwdriver (small ) 6. Circli p pl iers (ST type) 16. T-handle. socket wrench 7. Circlip pliers (RT type) 17. L-handle socket wrench 8. Needle-nose pliers 18. Torque w rench and sockets 9. Pliers 19. Scraper 10. Phillips-head sc rewdri ver (small) 20. Allen wrench (6 mm.) Fig. 1-3 -3 -GENERAL -Tools 4 . Standard Tools 2 1. Plier 2. 30 x 22 mm. special wrench 3. 17x14mm. open-end wrench 4. 17 x 13 mm. open-end wrench 5. 12x10mm. open-end wrench 6. 10 x 8 mm. open-end wrench 7. 13 mm. special wrench Fig. 1-4 -4-8. S 10 11. 12. 13. 14. 6 8 9 10 Point w rench and feeler gauge 13 x 21 mm. plug wrench Screwdriver handle 11 13 Combination slotted and Phillips-head screwdriver Phillips-head screw driver Allen wrench Tool bag ENGINE Removing the Engine CHAPTER 2.
9 ENGINE 2-1. Removing the Engine This chapter deals with the procedure for engine removal from the frame. The engine can be removed without removing the car-buretor. and starter assembly. The carburetor and starter can be removed from the frame without removing the engine. Tools Required: Pliers Slotted head screwdriver (M) 10 mm. socket-end wrench Chisel Steel head hammer Long nose pliers 17 mm. socket-end wrench 1. Remove the four spring hooks and four tension springs from the exhaust chamber. using pliers. and then remove the two exhaust chambers. Next. remove the starter handle from the starter handle holder. 2. Remove the throttle wires (R & L) and choke wires from the carburetor assembly. 3. Remove the two spring assemblies from the silencer.
10 And remove silencer 1. (Fig. 2-1) Fig. 2-1 4. Remove the six bolts from the carburetor using the 10-mm. open-end wrench. and remove the silencer-plate. Next. remove the tachometer cable from the oi l pump. (Fig. 2 -2. 2-3) Fig. 2 2 Fig. 2-3 5. Disconnect the lead wire coming from the CDI mag-neto. Remove the four nuts securing the engine. and demount the engine. Note: Before demounting or mounting the engine. the pri-mary sheave must be removed or installed. For procedure. refer to 20-3. Primary Sheave. For carburetor removal. refer to 2-5. -5-ENGINE -Starter 2 -2. Starter Tools required: 10-mm. socket wrench 13-mm. socket wrench Slotted- head screwdriver (medium) 19 ~ / 20 ~~ ~ I 13 1. 2. 3. 4 . 5. 6. 7 8. 9 . 10. Starter case Sheave drum Starter spring Drive paw l Thrust washer Drive plate spring Return spring Return spring Drive plate Thrust washer 3 2 11 11 Sprin g washer 12 Nut 13.