Transcription of GPSMAP 76CSx - Garmin
1 GPSMAP 76 CSxmapping gps owner s manualGPSMAP 76 CSx shown with optional MapSource 2007 2009 Garmin Ltd. or its subsidiariesGarmin international , Inc. 1200 East 151st Street, Olathe, Kansas 66062, USA Tel. (913) or (800) Fax (913) (Europe) Ltd. Liberty House Hounsdown Business Park, Southampton, Hampshire, SO40 9LR UK Tel. +44 (0) (outside the UK) 0808 2380000 (within the UK) Fax +44 (0) Corporation No. 68, Jangshu 2nd Road, Shijr, Taipei County, Taiwan Tel. 886 Fax 886 rights reserved. Except as expressly provided herein, no part of this manual may be reproduced, copied, transmitted, disseminated, downloaded or stored in any storage medium, for any purpose without the express prior written consent of Garmin . Garmin hereby grants permission to download a single copy of this manual onto a hard drive or other electronic storage medium to be viewed and to print one copy of this manual or of any revision hereto, provided that such electronic or printed copy of this manual must contain the complete text of this copyright notice and provided further that any unauthorized commercial distribution of this manual or any revision hereto is strictly in this document is subject to change without notice.
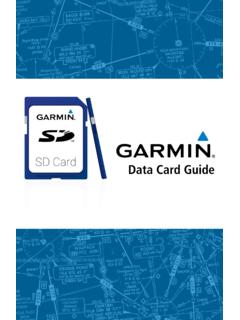
2 Garmin reserves the right to change or improve its products and to make changes in the content without obligation to notify any person or organization of such changes or improvements. Visit the Garmin Web site ( ) for current updates and supplemental information concerning the use and operation of this and other Garmin is a trademark of Garmin Ltd. or its subsidiaries, registered in the USA and other countries. GPSMAP , AutoLocate , TracBack , BlueChart g2, and MapSource are trademarks of Garmin Ltd. or its subsidiaries. These trademarks may not be used without the express permission of is a trademark of The SD Card Association. TransFlash is a trademark of SanDisk 2009 Part Number 190-00558-00 Printed in TaiwanGPSMAP 76 CSx Owner s Manual IntroductIonIntroductIonThank you for choosing the Garmin GPSMAP 76 CSx. Both use the proven performance of Garmin GPS and full-featured mapping to create an unsurpassed portable GPS receiver.
3 Take a moment to compare the contents of this package with the packing list on the box. If any pieces are missing, contact your Garmin and ShortcutsTo quickly return to the Main Menu from any page, press the MENU key extend battery life, turn off the GPS when not using the eTrex for navigation. Decrease the level of the display s backlight by quickly pressing and releasing the POWER key. Product RegistrationHelp us better support you by completing our online registration today! Connect to our Web site at Keep the original sales receipt, or a photocopy, in a safe GarminContact Garmin if you have any questions while using your unit. Contact Garmin Product Support by phone: (913) 397-8200 or (800) 800-1020, Monday Friday, 8 AM 5 PM Central Time; or go to and click Product Europe, contact Garmin (Europe) Ltd. at +44 (0) (outside the UK) or 0808 2380000 (within the UK).Optional ccessories ccessoriesFor a complete list of available accessories and maps for use with the eTrex, refer to GPSMAP 76 CSx Owner s ManualIntroductIontable of contentsIntroduction.
4 ITips and Shortcuts ..iProduct Registration ..iContact Garmin ..iOptional ccessories ..iOperating the GPSM P ..ivImportant Information ..ivGetting Started ..1 Unit Overview ..1 Using the GPSM P 76 CSx on the GPSM P 76 CSx ..4 Initializing the GPS Receiver ..4 Basic Operation ..7 Creating and Using Waypoints ..7 Using the Find Menu ..11 Using Tracks ..18 Creating a Route ..22 Main Pages ..25 Satellite Page ..26 Map Page ..26 Compass Page ..29 ltimeter Page ..35 Trip Computer Page ..Main Menu ..39 Tracks ..39 Route Page ..39 Highway Page ..39 Setup Menu ..40 Calendar ..48 Calculator ..48 Stopwatch ..48 Sun and Moon ..48 Hunt & Fish ..48 Games Menu ..48 ppendix ..49 Specifications ..49 Interfacing ..50 Connecting Your GPSM P 76 CSx to a Computer ..51 Caring for the GPSM P 76 CSx ..52 FCC Compliance ..53 Limited Warranty ..54 Software License greement ..55 Index ..56 GPSMAP 76 CSx Owner s Manual IntroductIonOperating the GPSM P 76 CSxUnderstanding TermsSelect move the highlighted area on the screen up, down, left, or right with the ROCKER key to select individual fields.
5 Key when you are directed to press a key, press and quickly release the key. Field the location on a page where data or an option can be shown or entered. On-screen button use the ROCKER key to select a button, and press bar when viewing a list of items too long to appear on the screen, a scroll bar appears next to the list. To scroll through a list, press up or down on the ROCKER, or use the In and Out the factory setting saved in the unit s memory. You can change the settings, and revert to the factory settings when you select Restore ghl ghted fieldOn-screen buttonsF eldManual ConventionsIn this manual, when you are instructed to select an item, small arrows (>) appear in the text. They indicate that you should highlight a series of items on the screen using the ROCKER, and press ENTER after each item. For example, if you see select Service > Show Info, you should highlight Service, and press ENTER. Then highlight Show Info, and press ENTER again.
6 V GPSMAP 76 CSx Owner s ManualIntroductIonFailure to avoid the following potentially hazardous situations could result in an accident or collision resulting in death or serious navigating, carefully compare information displayed on the unit to all available navigation sources, including information from visual sightings, and maps. For safety, always resolve any discrepancies or questions before continuing navigation. Use the electronic chart in the unit only to facilitate, not to replace, the use of authorized government charts. Official government charts and notices to mariners contain all information needed to navigate this unit only as a navigational aid. Do not attempt to use the unit for any purpose requiring precise measurement of direction, distance, location, or topography. WARNING: This product, its packaging, and its components contain chemicals known to the State of California to cause cancer, birth defects, or reproductive harm.
7 This Notice is provided in accordance with California s Proposition 65. See for more California Electronic Waste Recycling Act of 2003 requires the recycling of certain electronics. For more information on the applicability to this product, see InformationMAP DATA INFORMATION: One of the goals of Garmin is to provide customers with the most complete and accurate cartography that is available to us at a reasonable cost. We use a combination of governmental and private data sources, which we identify in product literature and copyright messages displayed to the consumer. Virtually all data sources contain some inaccurate or incomplete data. In some countries, complete and accurate map information is either not available or is prohibitively expensive. WarningsGPSMAP 76 CSx Owner s Manual GettInG startedUnit OverviewCarry lanyard attachment slotsBattery compartment coverExternal Data/ uxiliary Power PortInternal antennaInterface keys uxiliary GPS ntenna ConnectorBattery compartment locking D-ringUSB connector portGettInG Started GPSMAP 76 CSx Owner s ManualGettInG StartedBatteries, microSD Card, and LanyardThe GPSMAP 76 CSx operates on two AA batteries (not included), which are located in the back of the unit.
8 You can use Alkaline, NiMH, or Lithium batteries. See page 40 for information on setting the battery install the batteries:1. Remove the battery cover by turning the D-ring 1/4 turn counter-clockwise and pulling the cover Insert the batteries, observing the proper polarity. 3. Reinstall the battery the batteries from your unit when you do not expect to use the unit for several months. Stored data is not lost when batteries are install the microSD card:1. Remove the battery cover by turning the D-ring 1/4 turn counter-clockwise and pulling the cover Locate the microSD card in the slot below the batteries and press down on the top edge of the card until you feel it click. Then gently allow the card to Press down again to install the card, making certain the card is fully in place to prevent damage when reinstalling the battery install the lanyard:1. Place the loop of the lanyard throught the slot at the base of the Route the strap through the loop, and pull croSD card slot (w th m croSD card n pos t on for nsert on)Install the carry lanyard n the slot at the bottom of the un tGPSMAP 76 CSx Owner s Manual GettInG StartedUsing the GPSM P 76 CSx KeypadQUIT KeyPress to cancel data entry or exit a KeyPress and release to enter highlighted options, data or confirm on-screen and hold at any time to mark your current location as a Zoom KeysPress to zoom in or out on the Map to scroll up or down a list on any other KeyPress at any time to view the Find and hold for KeyPress and hold to turn the unit on or and Release to adjust the KeyPress up, down, left, or right to highlight options and to enter data, or move the map panning KeyPress to cycle through the main pages.
9 Press and hold to turn the compass on or off MENU KeyPress to view page twice to view the Main Menu. GPSMAP 76 CSx Owner s ManualGettInG StartedTurning on the GPSM P 76 CSxTo turn the GPSM P 76 CSx on and off: Press and hold the the BacklightTo adjust the backlight level:1. Press and quickly release the POWER Press up on the ROCKER to increase the brightness, or press down to Press ENTER or QUIT to page 40 for information on changing the screen colors and backlight time out and brightness the GPS ReceiverThe first time you turn on your unit, the GPS receiver must collect satellite data and establish its current location. To receive satellite signals, you should be outdoors and have a clear view of the initialize your GPSM P 76 CSx:Hold the unit in front of you facing the sky and observe the Satellite page. While the GPS receiver is searching for the satellite signals, a Locating Satellites message is replaced by an Acquiring Satellites message until a location fix is Strength of each satell te s outer c rcle represents the hor nner c rcle s 5 degrees from the hor ng bug nd cates your d rect onInitialization OptionsIf the unit cannot get a satellite fix, an options menu with a list of solutions appears.
10 Highlight the appropriate solution and press 76 CSx Owner s Manual 5 GettInG StartedUsing the Status BarAt the top of each page, the status bar provides status information for several unit BarThe Battery Power icon () shows the remaining battery power. The Auxiliary Power icon () or Cable Connection icon () appears when the unit is plugged in to an external or USB power signal status is shown when searching for or acquiring satellites (), when a 2D fix () is attained and when a 3D fix () is Backlight icon () appears when the backlight is on. The Backlight is off when you turn the unit on. The Backlight uses a significant amount of battery power. Electronic compass icon () appears when the electronic compass is turned MessagesWhen a significant event in the operation of the unit occurs, an on-screen message appears to advise you of the occurrence. In each case the condition is described and often a remedy provided.